Showing posts with label Techvedic- Ecommerce Solutions. Show all posts

Tuesday, 8 July 2014

HOW TO CLEAR BROWSER CACHE

Most browsers associate clearing the cache with deleting cookies and provide control over cookies in the same general area. We've included information on deleting cookies with the cache-clearing instructions below.

Internet Explorer 7


Select "Tools" at the right side of the browser's toolbar. Select "Internet Options" from the bottom of the "Tools" pop-up menu.


On the "General" tab of the "Internet Options" dialog box, select "Delete" in the "Browsing History" section.


Uncheck the "Preserve Favorites website data" box. Check the "Temporary Internet files" and "Cookies" boxes. Select "Delete."


Google Chrome V3.2

Select the Chrome menu on the browser toolbar.


Select "Tools."


Select "Clear browsing data." 


Select the checkboxes for the kind of data you want removed. Use the dropdown menu to select the time from which you want to delete data. Choose "beginning of time" to delete all the data.


Select the "Clear browsing data" button. This will both clear the cache and remove cookies.


Firefox

Select the "Firefox" button at the top left corner for the browser window, then "Options."


Select "Advanced" (1), then "Network" (2), then "Clear Now."


Safari 6.1.2

From the "Safari" menu, select "Preferences."


Select "Remove All Website Data." This will both clear the cache and remove cookies.


------------------------------------------------------------------------------------------------------------------

Get professional tech support, cloud backup and recovery solution, cloud CRM platform and cloud-based e-Commerce builder from Techvedic. For help and consultation, feel free to call our experts at 0800 016 3909 (Freephone).

About Techvedic: http://en.wikipedia.org/wiki/Techvedic

Get in touch with Techvedic on Social Media:

Techvedic Facebook Page: https://www.facebook.com/techvedic
Techvedic Twitter: https://twitter.com/techvedic
Techvedic Google Plus Page:  https://plus.google.com/+TechvedicInc/posts
Techvedic YouTube: https://www.youtube.com/user/Techvedic
Techvedic LinkedIn Profile: https://www.linkedin.com/company/techvedic


Visit: Techvedic – Ecommerce Solutions | http://www.techvedic.com/ | 1-855-859-0057 (USA) | support@techvedic.com

How to calibrate your TV?


Are you planning to calibrate your TV? If yes then you can hire experts for this task as they can adjust all the settings as per your room ambience to make your TV watching experience more pleasant. 
Complete Guide on TV Calibration- Make Your TV Just Perfect
Have you brought a new TV to furnish your living area? Is it delivering best picture quality? If not then you need to calibrate it. TV Calibration is a common term that you must have heard several times. In order to increase your TV viewing experience, calibration is very important. Incorrectly calibrated TV can result in poor picture quality thereby making your viewing experience bad.

How to calibrate your TV?

Have you brought a new TV to furnish your living area? Is it delivering best picture quality? If not then you need to calibrate it. TV Calibration is a common term that you must have heard several times. In order to increase your TV viewing experience, calibration is very important. Incorrectly calibrated TV can result in poor picture quality thereby making your viewing experience bad.
How to calibrate your TV?

1.Firstly, you need to reset the TV to Factory Settings as these settings are designed to suit the store ambience. In order to calibrate it as per your room ambience, you must reset its factory settings. 
2.In case you find any dynamic display then disable it as this is the in-built ambient sensor that can be used to calibrate the TV color automatically according to the room environment.
3.It’s time to adjust the brightness. Basically, the process of increasing brightness means reducing blackness. You can adjust it according to your eyes comfort. 
4.By performing the contrast adjustment, you are actually controlling the white light. You can adjust it till the point at which you can differentiate between dark blacks, light blacks, dark whites and light whites. 
5.Make picture more crisp and clear by adjusting the sharpness setting. In HDTVs, you don’t need to adjust it as they have sharpness already. 
6.You will see Tint setting in your TV that needs not to be adjusted as it is already calibrated.
What are the benefits of calibration?
By calibrating your TV correctly, you can provide a more pleasing experience to your eyes as well as it can consume less power and last longer. As compared to default settings, calibration can make the picture dimmer and this dimmer picture consumes less power so that you can enjoy longer lifespan of your TV. This is due to the reduced strain on the light generating parts of the TV. You can feel the images of your TV more natural after proper calibration. There are some companies that are associated with ISF and thus, they can provide specific calibratable picture modes. Among those, ISF-Day and ISF-Night modes are most useful. Correct calibration needs adjustments of different settings as per the light of the room so as to get the most out of your TV all the time. 

Is it required for you?
If you are not familiar with the correctly calibrated TV then you may not like calibrated TV at first. The sharpness control setting may add an artificial edge which covers the real details. On removing that sharpness mask, image appears soft. Therefore, it depends how much you are compatible with calibration.
Summing up the entire process of TV Calibration, you can also call professionals for this task. They can accurately tune its color temperature as well as adjust other settings perfectly. You can find this service at competent prices. By doing this, you can make the most out of your TV. 

ISF-Night modes are most useful. Correct calibration needs adjustments of different settings as per the light of the room so as to get the most out of your TV all the time. 
Is it required for you?
If you are not familiar with the correctly calibrated TV then you may not like calibrated TV at first. The sharpness control setting may add an artificial edge which covers the real details. On removing that sharpness mask, image appears soft. Therefore, it depends how much you are compatible with calibration.
Summing up the entire process of TV Calibration, you can also call professionals for this task. They can accurately tune its color temperature as well as adjust other settings perfectly. You can find this service at competent prices. By doing this, you can make the most out of your TV. 

------------------------------------------------------------------------------------------------------------------

Now build your online store easily. Don’t know the ins and outs of Web technologies? No problem. Techvedic brings easy-to-use editor with its VedicCloud Ecomm X website builder to help you go online and manage your inventory and customers effortlessly. For subscription or consultation, feel free to connect with us on 0800 016 3909 (Freephone).

About Techvedic: http://en.wikipedia.org/wiki/Techvedic

Get in touch with Techvedic on Social Media:

Techvedic Facebook Page: https://www.facebook.com/techvedic
Techvedic Twitter: https://twitter.com/techvedic
Techvedic Google Plus Page:  https://plus.google.com/+TechvedicInc/posts
Techvedic YouTube: https://www.youtube.com/user/Techvedic
Techvedic LinkedIn Profile: https://www.linkedin.com/company/techvedic


Visit: Techvedic – Ecommerce Solutions | http://www.techvedic.com/ | 1-855-859-0057 (USA) | support@techvedic.com

Monday, 7 July 2014

How to Change Default File Save Location in Microsoft Office?

While working in Microsoft Office, when you try to open or save a document, it opens the default documents folder to open or save the file.To change this default location to your desired drive or folder please follow the following steps

For Microsoft Office 2000, XP and 2003:

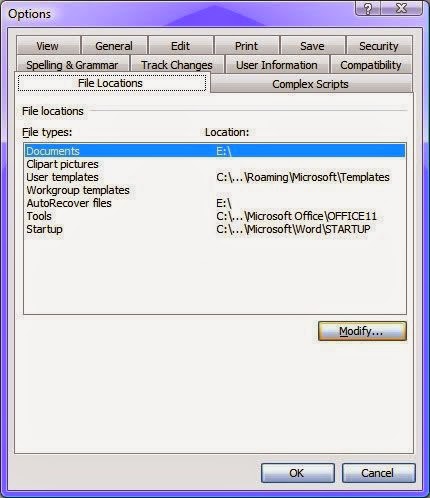
1. Open any Office application like Microsoft Word and click on "Tools -> Options".

2. Click on "File Locations" tab and select "Documents". Now click on "Modify" button:


3. It'll open browse window. Navigate to the desired drive or folder which you want to set as default location and click on OK button. It'll change the file location. Now click on OK button and you have done.

NOTE: You'll need to follow these steps for all Office applications separately.


For Microsoft Office 2007, 2010 and 2013:

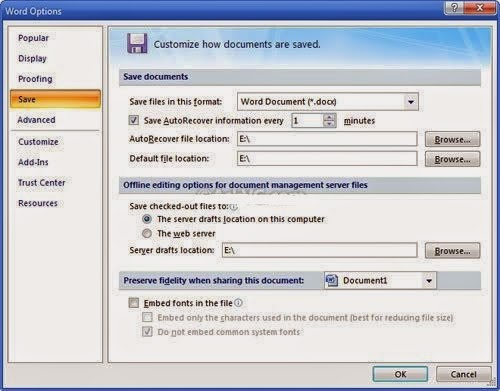
1. Open any Office application like Microsoft Word and click on Office ORB (Big round button) or FILE menu at top-left.

2. Now click on "Options", it'll open Options window. Click on "Save" tab and in right-side pane, you can change the "Default file location" by simply typing the exact path or by selecting the desired drive/folder using Browse button:


----------------------------------------------------------------------------------------------------------------------

Get on-demand tech support for PC, Mac, peripheral, tablet, phone, gaming console and more at Techvedic. Enjoy our services from the comfort of your home or office over the phone. Need on-site support? Book an appointment with experts now. For support and delivery mechanism details, call us at 0800 016 3909 (Freephone).

About Techvedic: http://en.wikipedia.org/wiki/Techvedic

Get in touch with Techvedic on Social Media:

Techvedic Facebook Page: https://www.facebook.com/techvedic
Techvedic Twitter: https://twitter.com/techvedic
Techvedic Google Plus Page:  https://plus.google.com/+TechvedicInc/posts
Techvedic YouTube: https://www.youtube.com/user/Techvedic
Techvedic LinkedIn Profile: https://www.linkedin.com/company/techvedic


Visit: Techvedic – Ecommerce Solutions | http://www.techvedic.com/ | 1-855-859-0057 (USA) | support@techvedic.com

How to Uninstall Microsoft OneNote

Like many other useful Microsoft programs, MS OneNote helps users in creating and organizing notes in electronic notebook. There are different features offered by this application, such as screenshots of the Windows platform on desktop, creation of notes with sound and clips from web pages. However, if OneNote is no more useful for you and it is occupying space unnecessarily on the hard disk of your computer, you can uninstall Microsoft OneNote to free up some space.

So, here are easy-to-follow instructions on how to uninstall Microsoft OneNote.

A. Uninstall the Program
In order to remove MS Office OneNote from your computer, you have to go to the “Start” menu and choose “Control Panel”. Now browse the cursor to “Programs” section and click “Uninstall a Program” in the Control Panel.

B. Hide Office OneNote
Look for the MS office version installed on your device and choose it in the list created for showing installed programs. Click “Change”. On the wizard, choose “Add or Remove Features” and click “Continue”. Now go to the drop down menu that opens with Microsoft OneNote. Go to the “Installation Options” and choose “Not Available”.

C. Uninstallation of OneNote
Browse on the screen and choose “Install Now”. Click “Continue”. This uninstalls MS Office OneNote from the Office suite. Select “Close” when the process gets over and restart your system to observe the changes. This helps you to assure that Microsoft OneNote is uninstalled perfectly.


----------------------------------------------------------------------------------------------------

Back up PC, Mac, iOS, Android, Windows Phone, or any other device in a quick and easy manner with BackupRunner powered by Techvedic. Whether its backing up data, accessing data, restoring lost files, archiving records or managing your data, all have become simple and easy with us. For subscription or support call us at 0800 016 3909 (Freephone).

About Techvedic: http://en.wikipedia.org/wiki/Techvedic

Get in touch with Techvedic on Social Media:

Techvedic Facebook Page: https://www.facebook.com/techvedic
Techvedic Twitter: https://twitter.com/techvedic
Techvedic Google Plus Page:  https://plus.google.com/+TechvedicInc/posts
Techvedic YouTube: https://www.youtube.com/user/Techvedic
Techvedic LinkedIn Profile: https://www.linkedin.com/company/techvedic


Visit: Techvedic – Ecommerce Solutions | http://www.techvedic.com/ | 1-855-859-0057 (USA) | support@techvedic.com

Thursday, 3 July 2014

Convert MP3, Wav and Other Media Files into AAC or M4A Formats Using iTunes


1. First download iTunes if you don't have it:

Download iTunes

2. Now install it and run the program. We'll need to change a few options.

3. Click on "Edit -> Preferences".

4. Now go to "Advanced" tab and click on "Importing" tab.

5. Select "AAC Encoder" from "Import Using" list and select "Custom" from "Setting" list. As soon as you select "Custom" option, it'll show a new dialog box.

6. Select "64 kbps" as "Stereo Bit Rate", "44.100 kHz" as "Sample Rate" and "Stereo" as "Channels". These are standard values which I found best for a quality media file. You can change them according to your requirements.


7. Now click on OK and and again OK to exit the Preferences box.

8. Now we have customized all settings to convert files into AAC format. Now open any media file by pressing "Ctrl+O" or by selecting "File -> Add File to Library" option.

9. It'll add the file in Library window. Now right-click on the file and select "Convert Selection to AAC" option.

10. That's it. Now sit back and wait for a few seconds. iTunes will convert the file into .M4A file which you can upload to your cell phone.

11. You can mass convert files into AAC. Open multiple files and select all of them and follow Step 9.

12. If you are wondering where is your converted file has been stored? Then go to "Edit -> Preferences" and click on "Advanced" tab.

It shows the folder location where iTunes will store the music files. You can change it using "Change" button.

That's it.

----------------------------------------------------------------------------------------------------------------

Get on-demand technical support as per your convenience: Online, In-Home or Repair-Labs. We have resolved more than 1 million issue with 95% First-Call Resolution rate, and are ready to take the next challenge. Speak with our experts at 0800 016 3909 (Freephone).

About Techvedic: http://en.wikipedia.org/wiki/Techvedic

Get in touch with Techvedic on Social Media:

Techvedic Facebook Page: https://www.facebook.com/techvedic
Techvedic Twitter: https://twitter.com/techvedic
Techvedic Google Plus Page:  https://plus.google.com/+TechvedicInc/posts
Techvedic YouTube: https://www.youtube.com/user/Techvedic
Techvedic LinkedIn Profile: https://www.linkedin.com/company/techvedic


Visit: Techvedic – Ecommerce Solutions | http://www.techvedic.com/ | 1-855-859-0057 (USA) | support@techvedic.com

Wednesday, 2 July 2014

Start Menu Option is Missing in Windows XP, Vista and 7

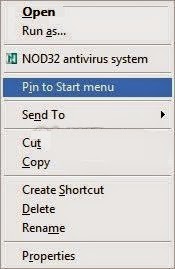
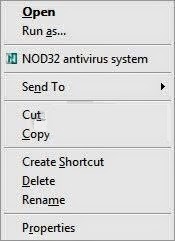
Pin to Start Menu Option is Missing in Windows XP, Vista and 7

All of you are already aware of "Pin to Start Menu" option in Windows which allows us to pin a program to Start menu which is quite useful feature:


But sometimes this option becomes unavailable and the user doesn't get this option in context menu:


If you are also facing this problem, then this tutorial will help you in getting this option back:


METHOD A:

Open RUN dialog box and provide following command:

regsvr32 /i shell32.dll

Restart your system and it should fix your problem.


METHOD B:

If the above method doesn't fix your problem, then type regedit in RUN dialog box and press Enter. It'll open Registry Editor. Now go to following key:

HKEY_CURRENT_USER\Software\Microsoft\Windows\CurrentVersion\Policies\Explorer

In right-side pane, look for a DWORD value NoStartMenuPinnedList. If you find it, delete it. Restart or log off and your problem will be solved.


-----------------------------------------------------------------------------------------------------------------

From setup and installation to diagnostic and repair to security and optimization – get everything on demand from Techvedic. Remember, we are not limited by make or model or the origin of your device. Neither constrained with the warranty period. Hence, feel free to call us to make technology   work the way you want. Helpline number: 0800 016 3909 (Freephone).

About Techvedic: http://en.wikipedia.org/wiki/Techvedic

Get in touch with Techvedic on Social Media:

Techvedic Facebook Page: https://www.facebook.com/techvedic
Techvedic Twitter: https://twitter.com/techvedic
Techvedic Google Plus Page:  https://plus.google.com/+TechvedicInc/posts
Techvedic YouTube: https://www.youtube.com/user/Techvedic
Techvedic LinkedIn Profile: https://www.linkedin.com/company/techvedic


Visit: Techvedic – Ecommerce Solutions | http://www.techvedic.com/ | 1-855-859-0057 (USA) | support@techvedic.com

Tuesday, 1 July 2014

Recycle Bin Icon on Desktop Doesn’t Refresh Automatically in Windows Vista

The solution of this problem is manually change both FULL and EMPTY Recycle Bin icons to default instead of using "Restore Default" button. So following are the steps to fix this problem:

1. Right-click on Desktop and select "Personalize". It'll open Personalization window. Now click on "Change desktop icons" link in left-side pane. It'll open "Desktop Icon Settings" window. You can also open it directly by using "control desk.cpl,,0" or "control desk.cpl,,@web" commands (without quotes).


2. Now select "Recycle Bin (full)" icon from the icons list and click on "Change Icon" button:


3. It'll open "Change Icon" window. Although it'll automatically select the correct default "Full Recycle Bin" icon, click on it to re-select it and then click on OK button:


4. Now do the same for "Recycle Bin (empty)" icon. Select it and click on "Change Icon" button:


5. Select the default "Empty Recycle Bin" icon in "Change Icon" window and click on OK button:


6. That's it. Now click on "Apply" button and your problem will be solved.


--------------------------------------------------------------------------------------------------------------------

Enjoy data recovery support for PC, Mac, iPhone & Android with unlimited monthly bandwidth only with Techvedic cloud backup and recovery service. Also get multitude of features like automatic backup, easy file recovery, anytime, anywhere access, unlimited mobile backup, unlimited archiving and 24/7 based support. Helpline number: 0800 016 3909 (Freephone).

About Techvedic: http://en.wikipedia.org/wiki/Techvedic

Get in touch with Techvedic on Social Media:

Techvedic Facebook Page: https://www.facebook.com/techvedic
Techvedic Twitter: https://twitter.com/techvedic
Techvedic Google Plus Page:  https://plus.google.com/+TechvedicInc/posts
Techvedic YouTube: https://www.youtube.com/user/Techvedic
Techvedic LinkedIn Profile: https://www.linkedin.com/company/techvedic


Visit: Techvedic – Ecommerce Solutions | http://www.techvedic.com/ | 1-855-859-0057 (USA) | support@techvedic.com

Windows Vista Explorer Hangs while Copying Files from External Media


1. Click on "Start button -> All Programs -> Accessories". Right-click on "Command Prompt" and select "Run As Administrator". If you are prompted to enter password, enter the password and continue. You can also open Command Prompt in Administrator mode by typing "cmd" in Start Menu Search box and press "Ctrl+Shift+Enter".

2. Now provide following command:

bcdedit.exe /set {current} nx AlwaysOff

3. Restart your system and now you should not face any problem while copying files.


--------------------------------------------------------------------------------------------------------------------

Ease lead management and contacts & accounts management with VedicCloud CRM and empower your workforce to explore sales opportunities and improve customer service to craft a niche of your own in the highly competitive market. For enquiry, call us at 0800 016 3909 (Freephone).

About Techvedic: http://en.wikipedia.org/wiki/Techvedic

Get in touch with Techvedic on Social Media:

Techvedic Facebook Page: https://www.facebook.com/techvedic
Techvedic Twitter: https://twitter.com/techvedic
Techvedic Google Plus Page:  https://plus.google.com/+TechvedicInc/posts
Techvedic YouTube: https://www.youtube.com/user/Techvedic
Techvedic LinkedIn Profile: https://www.linkedin.com/company/techvedic


Visit: Techvedic – Ecommerce Solutions | http://www.techvedic.com/ | 1-855-859-0057 (USA) | support@techvedic.com

Monday, 30 June 2014

How to Change Default File Save Location in Microsoft Office?


For Microsoft Office 2000, XP and 2003:

1. Open any Office application like Microsoft Word and click on "Tools -> Options".

2. Click on "File Locations" tab and select "Documents". Now click on "Modify" button:


3. It'll open browse window. Navigate to the desired drive or folder which you want to set as default location and click on OK button. It'll change the file location. Now click on OK button and you have done.

For Microsoft Office 2007, 2010 and 2013:

1. Open any Office application like Microsoft Word and click on Office ORB (Big round button) or FILE menu at top-left.

2. Now click on "Options", it'll open Options window. Click on "Save" tab and in right-side pane, you can change the "Default file location" by simply typing the exact path or by selecting the desired drive/folder using Browse button:


--------------------------------------------------------------------------------------------------------------------

Now manage your sales effortlessly with Vedic Cloud CRM. Get Tasks, Calls and Calendar, Feeds for Collaboration, Web to Lead Form, and Mobile App integration with iOS/Android, Sales Forecasting, Reports & Dashboards, Mass Email, Product Customization and more in your cloud-based package. For subscription call us at 0800 016 3909 (Freephone).

About Techvedic: http://en.wikipedia.org/wiki/Techvedic

Get in touch with Techvedic on Social Media:

Techvedic Facebook Page: https://www.facebook.com/techvedic
Techvedic Twitter: https://twitter.com/techvedic
Techvedic Google Plus Page:  https://plus.google.com/+TechvedicInc/posts
Techvedic YouTube: https://www.youtube.com/user/Techvedic
Techvedic LinkedIn Profile: https://www.linkedin.com/company/techvedic


Visit: Techvedic – Ecommerce Solutions | http://www.techvedic.com/ | 1-855-859-0057 (USA) | support@techvedic.com

Create a Virtual Drive for Your Desired Folder

Here is how to do it:

1. Open Command Prompt and provide following command:

subst drive_letter: folder_path

for example, if you want to create a virtual drive letter H: for a folder "E:\Wallpapers", then use following command:

subst H: E:\Wallpapers


2. It'll immediately create a virtual drive H: which will represent the "Wallpapers" folder:

Before using subst command:


After using subst command:


3. As you can see. A new drive letter H: has been created which directly goes to "E:\Wallpapers" folder upon double-click.

4. If you want to delete this virtual drive, then provide following command:


subst drive_letter: /D

for example, we created H: drive in Step1, so our command to delete this virtual drive would be:


subst H: /D


5. You can view a list of all existing virtual drives by simply giving subst command without any parameter in Command Prompt.

-------------------------------------------------------------------------------------------------------------------

Get on-demand tech support for PCs, Macs, tablets, phones, gaming consoles, network devices, peripherals, TVs and home theaters from Techvedic UK. Access our tech support from the convenience of your home or office. We are available online, over the phone, email or chat. Get support right away online, or book an appointment with our experts for on-site support. You may also drop your technology products at our repair-labs to get issue resolved. Contact us at 0800 016 3909 (Freephone).

About Techvedic: http://en.wikipedia.org/wiki/Techvedic

Get in touch with Techvedic on Social Media:

Techvedic Facebook Page: https://www.facebook.com/techvedic
Techvedic Twitter: https://twitter.com/techvedic
Techvedic Google Plus Page:  https://plus.google.com/+TechvedicInc/posts
Techvedic YouTube: https://www.youtube.com/user/Techvedic
Techvedic LinkedIn Profile: https://www.linkedin.com/company/techvedic


Visit: Techvedic – Ecommerce Solutions | http://www.techvedic.com/ | 1-855-859-0057 (USA) | support@techvedic.com

Friday, 27 June 2014

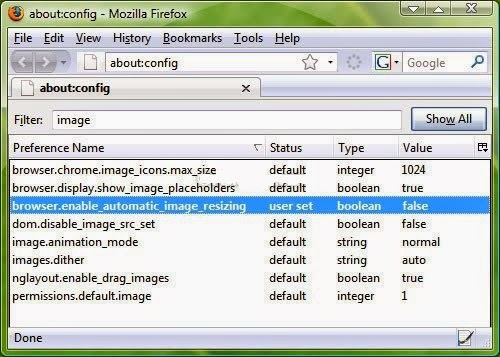
Disable Automatic Image Resizing in Mozilla Firefox?

To disable automatic image resizing, please follow the flowing steps

1. Open firefox and type about:config in the addressbar and press Enter. It'll confirm, click on I'll be careful, I promise! button.

2. Now type image in the Filter box. It'll show a few entries in the result box. Look for an entry "browser.enable_automatic_image_resizing".

3. Either double-click on this entry or right-click on it and select "Toggle". It'll set its value to "False"


That's it. Now Firefox will not resize any image automatically and will show the image in its original size.


--------------------------------------------------------------------------------------------------------------------

Reach your prospects and customers without any barrier using VedicCloud Ecomm X platform offered by Techvedic. Choose your template, create your store, update products and services and manage customer-experience in an effortless manner. Worried about update and upgrade? Give it a dump as we provision cloud-based e-Commerce platform to let you stay worry-free. Contact us at 0800 016 3909 (Freephone) to know more.

About Techvedic: http://en.wikipedia.org/wiki/Techvedic

Get in touch with Techvedic on Social Media:

Techvedic Facebook Page: https://www.facebook.com/techvedic
Techvedic Twitter: https://twitter.com/techvedic
Techvedic Google Plus Page:  https://plus.google.com/+TechvedicInc/posts
Techvedic YouTube: https://www.youtube.com/user/Techvedic
Techvedic LinkedIn Profile: https://www.linkedin.com/company/techvedic

Visit: Techvedic – Ecommerce Solutions | http://www.techvedic.com/ | 1-855-859-0057 (USA) | support@techvedic.com

Disable / Restrict Use of USB Storage Devices in Windows?

If the USB storage device is not installed in system:

1. Type %windir%\inf in Explorer addressbar or RUN dialog box and press Enter. It'll open "inf" folder.

2. Now look for following 2 files:
usbstor.inf
usbstor.pnf

3. Now you have to change their user permissions setting. Do as following for each file:

Right-click on the file and select "Properties". Go to "Security" tab and select the desired user or group in "Group or user names" list which you want to restrict from using USB drives. Now in "Permissions for Users" list, click on "Deny" checkbox next to "Full control" option and then click on OK.

In Windows Vista, you'll have to click on "Edit" button after selecting the user or group in "Group or user names" list and then again select the same user or group in new dialog box. Now you can click on "Deny" checkbox.

That's it

If the USB storage device is already installed in system:

1. Type regedit in RUN dialog box and press Enter. Now go to:


HKEY_LOCAL_MACHINE\SYSTEM\CurrentControlSet\Services\UsbStor

2. In right-side pane, change value of "Start" to 4


3. Now whenever a user will attach a USB storage device which is already installed in system, Windows will not detect it and it'll not be shown in My Computer.


-------------------------------------------------------------------------------------------------------------------

Generate leads, manage sales and offer post-sales support to customers using our VedicCloud CRM to create a niche of your own in the highly competitive marketplace. Worried about update and upgrade? Give it a dump as we provision cloud-based e-Commerce platform to let you stay worry-free. Contact us at 0800 016 3909 (Freephone) to know more.

About Techvedic: http://en.wikipedia.org/wiki/Techvedic

Get in touch with Techvedic on Social Media:

Techvedic Facebook Page: https://www.facebook.com/techvedic
Techvedic Twitter: https://twitter.com/techvedic
Techvedic Google Plus Page:  https://plus.google.com/+TechvedicInc/posts
Techvedic YouTube: https://www.youtube.com/user/Techvedic
Techvedic LinkedIn Profile: https://www.linkedin.com/company/techvedic


Visit: Techvedic – Ecommerce Solutions | http://www.techvedic.com/ | 1-855-859-0057 (USA) | support@techvedic.com

Thursday, 26 June 2014

How to Restore Missing “Desktop (create shortcut)” Item in Send To Menu in Windows XP, Vista and 7


To Restore Missing “Desktop (create shortcut)” Item in Send To Menu in Windows XP, Vista and 7 Please follow the following steps.

METHOD 1:

1. Type "shell:sendto" in RUN dialog box and press Enter. It'll open "Send To" folder.

2. Now right-click on blank area in the folder and select "New -> Text document". It'll create a textfile with the name "New Text Document.txt". Rename this file and set its name to "Desktop (create shortcut).DeskLink".

3. That's it. Now you'll get "Desktop (create shortcut)" option back in "Send To" menu.

NOTE: Make sure "Hide extensions for known file types" option is disabled in "Folder Options", otherwise the second step might not work and the text file will not convert in desktop shortcut item.

METHOD 2:

This method will only work in Windows XP. It'll not work in Vista and 7:

1. Type following command in RUN dialog box:

regsvr32 sendmail.dll

2. It'll re-create the missing "Desktop (create shortcut) option in "Send To" menu.


-------------------------------------------------------------------------------------------------------------------

Get reliable, scalable, affordable and cost-effective cloud-based CRM from Techvedic and attract and retain customers efficiently. We also help you integrate your CRM with social media plug-ins and cloud telephony services to let you interact with customers in a quick and easy manner keeping operational cost at low. For CRM solution and consultation, speak with our experts at 0800 016 3909 (Freephone).

About Techvedic: http://en.wikipedia.org/wiki/Techvedic

Get in touch with Techvedic on Social Media:

Techvedic Facebook Page: https://www.facebook.com/techvedic
Techvedic Twitter: https://twitter.com/techvedic
Techvedic Google Plus Page:  https://plus.google.com/+TechvedicInc/posts
Techvedic YouTube: https://www.youtube.com/user/Techvedic
Techvedic LinkedIn Profile: https://www.linkedin.com/company/techvedic

Visit: Techvedic – Ecommerce Solutions | http://www.techvedic.com/ | 1-855-859-0057 (USA) | support@techvedic.com