Showing posts with label iPhone. Show all posts

Friday, 18 July 2014

Windows Vista Displays BSOD When Connecting iPhone or iPod

Windows Vista Displays BSOD When Connecting iPhone or iPod

1. First disconnect your iPhone or iPod from your system and then uninstall iTunes and Apple Mobile Device Support from "Control -> Panel -> Program and Features".

2. After uninstallation, restart your system.

3. Now re-download updated iTunes version from Apple.com:

4. Install this new version and you'll not face BSOD problem in Windows Vista.


----------------------------------------------------------------------------------------------------------------------

Get cloud backup and recovery service to preserve your valuable documents, records, emails, photos, videos and more dispersed across your PC, Mac, iOS, Android, Windows Phone or other devices. We help you access your data and digital stuffs from anywhere with just an Internet connection. Earn 5GB Free cloud storage by calling today at 0800 016 3909 (Toll Free).

About Techvedic: http://en.wikipedia.org/wiki/Techvedic

Get in touch with Techvedic on Social Media:

Techvedic Facebook Page: https://www.facebook.com/techvedic
Techvedic Twitter: https://twitter.com/techvedic
Techvedic Google Plus Page:  https://plus.google.com/+TechvedicInc/posts
Techvedic YouTube: https://www.youtube.com/user/Techvedic
Techvedic LinkedIn Profile: https://www.linkedin.com/company/techvedic

Visit: Techvedic - Computer Tech Support Company | http://www.techvedic.co.uk/ | 0800 016 3909 (UK) | support@techvedic.com

Wednesday, 26 March 2014

Watch YouTube Video in Slow or Fast Motion


Watch YouTube Video in Slow or Fast Motion


1. Click on the gear or setting icon on the YouTube video player while watching a video.

2. Now, click on the Speed option as shown in the pic.

3. From the list, select the speed on which you would like to play the video. To slow the speed of the YouTube video, select the 0.5 or 0.25 and to play the video faster, select 1.5 or 2 from the Speed menu.
4. To return back to the normal speed, just select the Normal option.


HOW TO : Watch YouTube Video in Slow or Fast Motion in VLC Player

1. Open the VLC player and press Ctrl+N together to open the Network Stream option.
2. Now, just copy and paste the URL of the YouTube video which you want to play on VLS player in the given Network dialog box.
3. Click on the Play button to play the YouTube video in VLC player.

4. Now, click on the Playback option at the top menu bar. From the dropdown menu, select the Playback Speed option. Now, just use the slider given to change the playback speed of the video from Normal to Faster or Slower.

For more from the XpertCrewTM team please follow us on Twitter @Techvedic or 

our Facebook Page- 

or  contact us at

U.S. +855-859-0057 (http://www.techvedic.com/  )
U.K. +800-635-0716 (http://www.techvedic.co.uk/ )
CA  1-855-749-5861 (http://www.techvedic.ca/ )
AU  1-800-197-298  (http://www.techvedic.com.au/ )
And yes, we are eagerly waiting for your valuable feedback. Do write us back. We would be more than happy to help you. We are available 24/7.

Monday, 3 March 2014

Mac and iOS major security fix

iOS and OS X devices -- this is a security update you can't afford to ignore- a bug fix that prevents third parties from intercepting and fiddling with activity on an iOS device.

without the update, the system does not check SSL/TLS hostnames, so connections that should be encrypted are left wide open.

here's how to find it:
Go to Settings > General > Software Update. Those running iOS 7 will see the 7.0.6 update, while those running iOS 6 on older devices (including the iPhone 3GS and the 4th-gen iPod Touch) will see the iOS 6.1.6 update. Tap "Install Now" to get the update.

Once you've updated, the Software Update screen will indicate that "Your software is up to date."

Apple also released an OS X Mavericks system update Tuesday that patches the same hole that allows "an attacker" to "capture or modify data" transferred with Safari, Mail, iCloud and other Apple-created applications, according to Apple.

here's how tp get it 
open the Mac menu (the Apple logo), and click "Software Update.

The Mac App Store will launch, and you'll see the system update, along with other app updates. Choose to update the Software Updates, or Topics:Security, Smartphones Tags:iPad, Mavericks, iPhone, iPod 
Touch, security, Mac OS X, iOS 7, iOSclick "Update All" to install all listed updates, including apps.

For more from the XpertCrewTM team please follow us on Twitter @Techvedic or 

our Facebook Page- 

or  contact us at

U.S. +855-859-0057 (http://www.techvedic.com/  )
U.K. +800-635-0716 (http://www.techvedic.co.uk/ )
CA  1-855-749-5861 (http://www.techvedic.ca/ )
AU  1-800-197-298  (http://www.techvedic.com.au/ )
And yes, we are eagerly waiting for your valuable feedback. Do write us back. We would be more than happy to help you. We are available 24/7.

Friday, 21 February 2014

send photos to Chromecast using iOS devices


Sending photos from your iOS device to your TV using Chromecast is now possible, thanks to this free app.

After Google opened up the Chromecast to all developers who were interested, it was only a matter of time until we started seeing apps hit Android and iOS markets alike.

One such app that's especially useful for iOS users, will send photos to a Chromecast. The app is called Photo Cast and is available for free.

After installing the app the only setup required is to grant the app permission to access your photos, and tapping on the Chromecast icon to select the device you'd like to send the photos to.

Then, any photos you select will show up on your TV automatically. You can even start playing a slideshow, with an adjustable timer for each slide.

Some downsides currently are the inability to send videos from your iDevice to Chromecast, and of course there's no way to continue a slideshow while the app runs in the background.

For more from the XpertCrewTM team please follow us on Twitter @Techvedic or 

our Facebook Page- 

or  contact us at

U.S. +855-859-0057 (http://www.techvedic.com/  )
U.K. +800-635-0716 (http://www.techvedic.co.uk/ )
CA  1-855-749-5861 (http://www.techvedic.ca/ )
AU  1-800-197-298  (http://www.techvedic.com.au/ )
And yes, we are eagerly waiting for your valuable feedback. Do write us back. We would be more than happy to help you. We are available 24/7.

Tuesday, 4 February 2014

Facebook's Paper app

Last week Facebook declared a replacement app known as Paper. The app is meant to assist users discover news through what it's job "Sections." Sections contain articles announce by your friends or surfaced through Facebook's algorithms.
As of these days, Facebook has created Paper accessible for iPhone users through the App Store. For now, the app is U.S.A. solely.

The first time you launch the app a video can walk you thru a number of the fundamentals of Paper. when the initial tutorial, after you navigate to a screen for the primary time, an equivalent voice and overlays found within the video can walk you thru some element of the app. however the tutorial does not cowl everything, thushere's some tips to induce you start.
Customize sections


After surfing the initial tutorial wherever you are schooled a way to add news sections to Paper, you'll be able to return and edit your sections by swiping down from the most screen in Paper, then sound on "Edit Sections."

You can add or take away sections with an easy gesture, however did you understand you'll be able toadditionally set up the sections? faucet and hold on a section's icon and drag it to your required location in your Sections catalog.

The only section you can't take away is your Facebook feed. do you have to decide you wish to use Paper strictly as a news supply, you'll be able to move it to the top of your sections.
Disable autoplay videos
 

Arguably one among the additional annoying options apps area unit setting out to implement is that theautomotive vehicle play of videos. Facebook and Instagram area unit each guilty of victimization the feature,however additionally offer strategies for disabling it. As such, Facebook provides Paper users the choice to disable video autoplay once browsing sections.
Pull down the menu by swiping down on the most screen within the app, then sound on 

"Settings."


Move the switch next to "Autoplay Videos" to the left to show it off.
Notifications

While you are within the settings, you'll be able to additionally decide if you need Paper to receive all Facebook notifications going forward. Doing thus can enable you to additional or less replace the most Facebook app with Paper.


In my short time with the app this morning I've nevertheless to seek out a feature I often use within the main Facebook app missing from Paper. i am ready to like, comment, post standing updates and use traveller (complete with chat heads). Paper could find yourself being the primary Facebook app i actually get pleasure from using; it's still early, though.


One feature that is not extravagantly clear till you dig around within the app some is that the ability to look atthe feed of any cluster, friend or Page you follow on Facebook.
You can either explore for a devotee or page by swiping down on the most screen. on the highest of the screenyou will search a look icon, wherever you'll be able to explore for a Facebook account. Or by sound on the three-lined icon within the top-right corner you will be ready to read a listing of your friends, groups, and Pages.

There's still nevertheless additional to be told concerning Facebook Paper, however between the initial walkthrough and these further tips, you ought to be ready to begin golf stroke Paper to figure for you.

For more from the XpertCrewTM team please follow us on Twitter @Techvedic or

our Facebook Page- 

or  contact us at

U.S. +855-859-0057 (http://www.techvedic.com/  )
U.K. +800-635-0716 (http://www.techvedic.co.uk/ )
CA  1-855-749-5861 (http://www.techvedic.ca/ )
AU  1-800-197-298  (http://www.techvedic.com.au/ )
And yes, we are eagerly waiting for your valuable feedback. Do write us back. We would be more than happy to help you. We are available 24/7.

Sunday, 26 January 2014

How to use Keynote to control...Keynote on iOS, Mac

Regulating a presentation from over the room simply got a great deal less demanding with the most recent overhaul for Keynote on ios. 

Rather than obliging an alternate application to control Keynote presentations from an alternate apparatus, Apple overhauled Keynote on ios to go about as a remote. 

Keeping in mind the end goal to get the remote usefulness to work, there's some additional steps you'll have to tackle your ios apparatus, and your Mac. 


When you can control a presentation on an alternate gadget (Mac or ios), you'll have to empower remote control. To empower it on a Mac, launch Keynote and click on File > Preferences. From that point, select the Remotes segment and check the crate to empower the characteristic. 


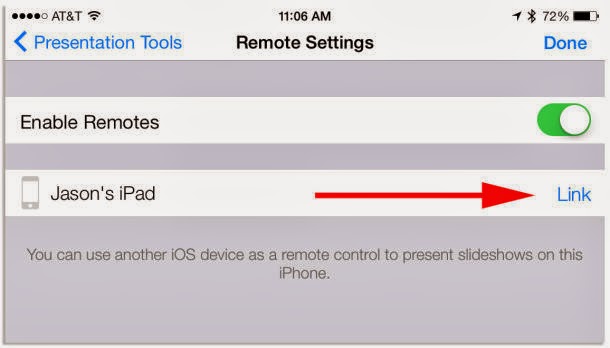
On ios, you'll have to start a presentation and afterward tap on the settings symbol (the torque) and select Presentation Tools > Allow Remote Control; flip the switch to the on position. 

In the wake of empowering the capacity to utilize a remote control with Keynote, you will associate the two units to each other. For ios mechanisms either an imparted Wi-Fi system or Bluetooth association is needed. To control a presentation on a Mac from an ios mechanism, just an imparted Wi-Fi system will work. 


With a specific end goal to utilize one ios mechanism to control Keynote on an alternate ios unit, tap on the remote symbol on the fundamental screen in Keynote on the apparatus you need to go about as a remote. Accompany the prompts to make the gadget accessible (showed by an enlivened blue dab amidst your screen). On the mechanism you need to have the slideshow shown on, launch the slideshow and explore to the same settings screen where you beforehand empowered remotes. There you will see the remote mechanism recorded (envisioned previously). Tap on Link and check the same security code is shown on both mechanisms. 

To utilize an ios gadget as a remote for a presentation on a Mac, start the ios application and tap on the remote symbol. Once more, take after the prompts until the blue speck is enlivened, showing your mechanism is accessible. On the Mac explore over to Remotes settings in inclination and click on "Link" placed beside the gadget you'd jump at the chance to use as a remote (imagined previously). Affirm the security code. 

When apparatuses are interfaced, launch the presentation and on the remote gadget, tap the remote symbol accompanied by the huge green play bind.

For more from please follow us our Facebook Page-
or contact us at

http://www.techvedic.co.in/careers/
http://www.techvedic.com/careers/
http://www.techvedic.co.uk/careers/

Friday, 24 January 2014

Never shoot a vertical movie with iphone


Know somebody who experiences Vertical Video Syndrome? Blessing them this application and help them shake the terrible propensity! 

Skyline is an application we all wish had existed long back. The reason is straightforward: regardless of how somebody is holding their telephone, the application will just record even film. I initially uncovered the application while perusing a post on TUAW. 

Some may even view this application as a cure for Vertical Video Syndrome. I know I do. Not acquainted with VVS? Here, watch this motion picture and after that return. I think we can all concur, VVS should stop. 

first mode - keeps the video framed horizontally and at the same size.


second mode -  will adjust the scale (or zoom) as you rotate your device.


third mode  locks the video into full horizontal orientation, even if you rotate your device.


Priced at just under a dollar, Horizon is compatible with most iOS devices running iOS 7 and up
to download:- 


For more from the XpertCrewTM team please follow us on Twitter @Techvedic or 

our Facebook Page- 

or  contact us at

U.S. +855-859-0057 (http://www.techvedic.com/  )
U.K. +800-635-0716 (http://www.techvedic.co.uk/ )
CA  1-855-749-5861 (http://www.techvedic.ca/ )
AU  1-800-197-298  (http://www.techvedic.com.au/ )
And yes, we are eagerly waiting for your valuable feedback. Do write us back. We would be more than happy to help you. We are available 24/7.


Thursday, 23 January 2014

Apple 'white screen of death' fixed


Since Apple released  ios 7, its totally patched up working framework for the iphone, audits have been blended however basically positive. 

Nonetheless, a glitch that has quietly tormented iphone clients — the "white/black screen of death," a bug that suddenly delicate reboots the cell phone — will at last be tended to in a future ios 7 overhaul. 

"We have a fix in an approaching programming overhaul for a bug that can infrequently cause a home screen accident," Apple  spokesperson said. 

A percentage of the first reports of the glitch started to harvest up as unanticipated as September on Apple's talk discussions, and consequently showed up on different social media channels like Twitter. 

In view of different reports, the shade of the boot-up screen hinges on upon the color of your iphone's face. A white iphone face prepares a white boot up screen with a dark Apple logo, while a gadget with a dark face handles a dark screen with a white Apple logo. 

The glitch seems to influence any iphone running ios 7, with a few clients reporting that the sudden stopping happens once the iphone's electric cell dunks down into the 30% level. 

The upgrade is reputed to land nearby ios 7.1, which is at present in its fourth beta with engineers. Notwithstanding altering the "white screen of demise," ios 7.1 is relied upon to carry some minor UI and outline changes. 

What to Do Before Downloading ios 7 

When you download the new programming — which will be pushed to ios clients at some point throughout the day — there are a couple of basic things to do early on the off chance that there are bugs. The exact opposite thing you'd need is to have your portraits, music and different records wiped along the way. 

To download ios 7 effortless, the first stage is to go down your information by means of icloud. Apple actually backs up the most important data (if using iOS 5 or later) automatically, but the feature has to be enabled. To set this up, visit Settings > iCloud > Backup & Storage. This will back up your iPhone on a daily basis as long as the device's screen is locked, on a Wi-Fi network and connected to power.

But before you download iOS, we suggest doing a manual back up. To do so, follow the same steps as above (Settings > iCloud > Backup & Storage) and then click "Back Up Now."


It will take a bit of time to do a full backup, so just sit tight in the meantime. For those with a ton of data you might not be able to complete the backup — you'll have to either transfer files (photos, etc.) via an Apple connector to a computer, delete a few apps you haven't used in awhile, or make room elsewhere.

You'll probably run into the same issue when trying to update iOS 7 if your device is near storage capacity, so you might want to clean house now.


Another area worth backing up is your iTunes library. Connect your device to a computer to sync with iTunes, but note this might be disabled if you have iCloud backup turned on. RIght-click the device in iTunes under Devices and select Back Up. You can also back it up by clicking the file menu and select Devices > Back Up.

Will you be downloading iOS 7 when it launches or will you be waiting until possible bugs are updated? 
For more from the XpertCrewTM team please follow us on Twitter @Techvedic or 

our Facebook Page- 

or  contact us at

U.S. +855-859-0057 (http://www.techvedic.com/  )
U.K. +800-635-0716 (http://www.techvedic.co.uk/ )
CA  1-855-749-5861 (http://www.techvedic.ca/ )
AU  1-800-197-298  (http://www.techvedic.com.au/ )
And yes, we are eagerly waiting for your valuable feedback. Do write us back. We would be more than happy to help you. We are available 24/7.

Sunday, 12 January 2014

Skype Download For Free on Android, iPhone and Windows Phone


Skype is one of the most ideal approaches to get in touch with anybody on the planet, if you need to contact an individual in your present area or an individual from an alternate nation.

It could be downloaded and introduced in your Pcs and in your cell units also.

Step by step instructions to Download Skype on Your Cellular Device

In the event that you are the kind of an individual who are dependably on the go, then having this application on your cell unit might be exceptionally functional. You can send moment quick messages right away and you can do film calls for nothing. Moreover, you can make calls to a landline telephone from your phone unit when you will subscribe to a premium Skype account. An Internet association is all you have to get closer with anybody. Furthermore, when you travel always, you can in any case stay joined without stressing over global correspondence costs. You recently need to have an Internet association.

Obviously, you have to have this application on your mechanism.

The most effective method to Download on an Android Device

The foremost step is to head off to the Google Play store. You have to open a Google account so you can access Google Play. In the Google Play page, sort "Skype" in the pursuit field. Click "introduce", click on "acknowledge" and the "download" catch.

After this process, the Skype requisition will start to download and introduce on your Android cell apparatus. Press the "launch" catch. You will be asked to answer some fundamental inquiries concerning yourself. Subsequently, you have to make your username and secret word. At that point you respect go and you can start to revel in the numerous characteristics of this astonishing application.

Instructions to Download on an ios Device

Despite the fact that ios units have their informing instrument, in particular Facetime and imessage, these characteristics are only between Apple mechanisms just. Assuming that you are utilizing an ios cell apparatus and you wish to send quick messages and make film calls to different gadgets with an alternate working framework, then you can download this application on your ios cell unit.

The obliged working framework is ios 5 or higher.  Go to the Apple App Store and download the application. When it is introduced, you can now make your username and secret key on the site of the Skype site. This application has four tabs on an ios cell gadget specifically contacts, messages, call, and my insight. You won't be charged when you will make Skype to Skype calls, yet in the event that you will utilize Skype to call a telephone number, not a Skype username, you will be charged in like manner.

Step by step instructions to Download on a Windows Cellular Device

The prerequisite for this application to be downloaded on a Windows Phone is 7.5 OS or higher. Simply visit the page of this application and afterward press "introduce" on the relating connection. When it is introduced, you can now revel in the characteristics of this application.

When you have this application on your cell gadget, you can effortlessly unite with anybody around the globe. You can utilize it for your work and for your social exercises. You can send quick messages, offer photographs and motion pictures, stake indexes, and delight in movie calls.

For game related  issues you can contact the  tech support 

For more from the XpertCrewTM team, please follow us on Twitter @Techvedic or contact Techvedic’s computer support helpdesk, as per below contact-details:
U.S. +855-859-0057 (http://www.techvedic.com/  )
U.K. +800-635-0716 (http://www.techvedic.co.uk/ )
CA  1-855-749-5861 (http://www.techvedic.ca/ )
AU  1-800-197-298  (http://www.techvedic.com.au/ )
And yes, we are eagerly waiting for your valuable feedback. Do write us back. We would be more than happy to help you. We are available 24/7.

Wednesday, 8 January 2014

How to watch Google Play videos on your iOS device?

Description


If you are looking for the way to watch Google Play Store videos on your iOS device then it is possible now. Let’s have a look on this tutorial to see how.


Solution:

1. Install YouTube app on your iPhone, iPod Touch or iPad.

2. Run it and sign into your YouTube account.

3. In the top left corner, tap the menu button.


4. Scroll down to see “Purchases” and tap it.


5. Now, you can see all your Google play movies and TV shows. Tap the one you want to watch.
Remember, you can’t watch your iTunes purchases on your Google device. But, still it is good as you can watch the videos of Google Play Store without having Android-powered smartphone.
For more from the XpertCrewTM team, please follow us on Twitter @Techvedic or contact Techvedic’s computer support helpdesk, as per below contact-details:
U.S. +855-859-0057 (http://www.techvedic.com/  )
U.K. +800-635-0716 (http://www.techvedic.co.uk/ )
CA  1-855-749-5861 (http://www.techvedic.ca/ )
AU  1-800-197-298  (http://www.techvedic.com.au/ )
And yes, we are eagerly waiting for your valuable feedback. Do write us back. We would be more than happy to help you. We are available 24/7.


Wednesday, 18 December 2013

Best practices for creating a home inventory

Description


If you are looking for a best way to create a home inventory then here we are to help you out.


Solution:

Be thorough

There are many things that you use thus, it is important to make your inventory as detailed as possible. It is a time consuming task to prepare the list of items that you own but after completing the initial list you can easily update it later. Always create an inventory with a method that can endure any natural disasters, fires or burglaries. The most optimum method is create a digital version of your inventory and store it in cloud.

Go digital


There is another way to make an inventory. In this, lay out your valuable possessions on the floor in each room and take a video. When you record, give name to each item. Store the video file in a cloud service such as Dropbox. Another service is called Digital Locker in which you need to take photos of your belongings and upload them directly to the service using an iPhone and Android app. You can upload three photos per item as well as fill the necessary information. Through these videos, you can easily prove that you owned that item.

Some important things to consider:

1. Once a year, update your list, video or pictures.

2. When updating the list or video, indicate those items that you no longer have as well as enter new items.

3. Without any inventory app, you can create a smartphone video.

Furthermore, if you have any other question regarding the inventories then you can contact your personal agent.
For more from the XpertCrewTM team, please follow us on Twitter @Techvedic or contact Techvedic’s computer support helpdesk, as per below contact-details:
U.S. +855-859-0057 (http://www.techvedic.com/  )
U.K. +800-635-0716 (http://www.techvedic.co.uk/ )
CA  1-855-749-5861 (http://www.techvedic.ca/ )
AU  1-800-197-298  (http://www.techvedic.com.au/ )
And yes, we are eagerly waiting for your valuable feedback. Do write us back. We would be more than happy to help you. We are available 24/7.

Tuesday, 17 December 2013

Use your mobile device with the Xbox One and PS4

Description

Earlier mobile market was dominated with blackberry and Nokia. But, after the entry of Apple it has become the emperor of mobile industry. To enhance the charm of mobile devices, Microsoft and Sony has launched several mobile apps so as to allow gamers to access various Xbox One and PlayStation 4 features.

Solution:

Xbox One SmartGlass


If you have Xbox 360 then you must be aware of Microsoft’s SmartGlass app. Let’s discuss about the app in brief:

Availability- It is available for free for Android, iOS, Windows Phone, and Windows 8 and RT devices.

Getting started- When the first time you open the app, you need to sign in to your Microsoft account. After this, you can see four rows of tiles- Now Playing, recent, Featured and My Pins. With Now Playing tile, information about your current actions is displayed. The Recent section shows the recent Xbox activity. In the Featured section, new movies, TV shows, and games are available. My Pins section contains specifically pinned apps and games. From the Options menu, you can access your Xbox Live profile, friends list, achievements, pins, messages, and app settings.

Connecting to the Xbox One- Connect the Xbox One and your mobile device to the same network. For this, click “Connect” button again and again. If it is still not connecting then click “Enter IP address" option and then enter the Xbox One’s IP address.  

Functionality- By launching a live tile from the SmartGlass app, you can transform your mobile device into an 

Xbox One controller. You can choose games and programs along with a feature to display additional information on your device.

Tips- Use the “Stay Awake” option from app settings to keep the screen of your device from dimming or turning off. Also, you can use the search feature to find games, movies, TV shows, music and apps.

PlayStation 4


Sony has also released its PlayStation app to provide access to PlayStation Store including its features.
Availability- It is free in Apple’s App store and Google Play Store. This app is compatible with Android Smartphones and tablets.

Getting Started- To access the full features of the app, you need to log in to the PlayStation account. The What’s New Box displays the games which you have recently played as well as other updates from your PSN friends. With this, you can also get quick access to your profile, trophies, friends list, and purchase new games from the PlayStation Store. On the top, there is a navigation bar with options like notifications, invitations, game alerts, and messages. Get access to PlayStation news, tutorials, promotions and vents from Sony with Links tab.

Connecting to the PS4- Register your smartphone or tablet you are using to connect to the PlayStation 4. For this, go to settings, select “PlayStation App Connection Settings” and click on “Add Device.” Furthermore, connect your system and mobile device to the same network and then click on the “Connect to PS4” tab. After this, select your console and input the eight-digit code that was displaying on your HDTV.
Functionality- When the connection is complete, you can find three options: to disconnect, power the system down, or use your mobile device as a second screen. The second screen option provides two additional features- remote and keyboard.

For more from the XpertCrewTM team, please follow us on Twitter @Techvedic or contact Techvedic’s computer support helpdesk, as per below contact-details:

U.S. +855-859-0057 (http://www.techvedic.com/  )
U.K. +800-635-0716 (http://www.techvedic.co.uk/ )
CA  1-855-749-5861 (http://www.techvedic.ca/ )
AU  1-800-197-298  (http://www.techvedic.com.au/ )
And yes, we are eagerly waiting for your valuable feedback. Do write us back. We would be more than happy to help you. We are available 24/7.