Showing posts with label google. Show all posts

Friday, 11 July 2014

Create and Install Your Own Custom Themes in Google Chrome

Install Your Own Custom Themes in Google Chrome here is how


1. First you'll need to find this "default.dll" file to replace or edit it. Type following string in RUN dialog box and press Enter:


local settings\Application Data\Google\Chrome\Application

NOTE: Windows Vista users can also type "appdata" in RUN or Start Menu Search box and press enter, then navigate to "local\Google\Chrome\Application".

2. It'll open a folder containing Chrome files.

3. Now when you are in "Application" folder using 1st step, you'll see a folder having some random characters in its name. Open this folder and go to "Themes" folder. That's it, you'll find the "default.dll" file in this folder.

4. First take a backup of this file before replacing or editing it, so that you can restore it if you want to get the default look back.

5. Now open this file in "Resource Tuner" and expand "BINDATA" folder.

6. Under this folder, you can replace the existing PNG files with your custom PNG files. Create your own PNG image with same dimensions using Photoshop, Gimp, etc. and then replace existing PNG in the "default.dll" file with your one.

To replace the existing PNG file with your custom one, select the PNG file in Resource Tuner and then press "Ctrl+Shift+E", it'll open another window asking for your own resource file. Press "Ctrl+O" and browse to your own PNG file, select it and click on "Open" button and then click on "OK" button.

When you have replaced all desired resources, save the file and you have done.

Since Chrome supports PNG files, there are lots of possibilities for theme creators to put transparency in their themes.

7. You can also download some 3rd party ready-made themes. Just download them and you'll get the custom "default.dll" file. Replace the default file with this new one as mentioned in above tutorial.

--------------------------------------------------------------------------------------------------

Worried about data security and availability? You should not because with Techvedic’s BackupRunner now you can enjoy impeccable and industry-compliant backup and recovery solution at rock bottom prices. Home and business users both can take advantage of our cloud-based backup and recovery service. For more information on product and pricing, call us at 0800 016 3909 (Freephone).

About Techvedic: http://en.wikipedia.org/wiki/Techvedic

Get in touch with Techvedic on Social Media:

Techvedic Facebook Page: https://www.facebook.com/techvedic
Techvedic Twitter: https://twitter.com/techvedic
Techvedic Google Plus Page:  https://plus.google.com/+TechvedicInc/posts
Techvedic YouTube: https://www.youtube.com/user/Techvedic
Techvedic LinkedIn Profile: https://www.linkedin.com/company/techvedic

Visit: Techvedic - Computer Tech Support Company | http://www.techvedic.co.uk/ | 0800 016 3909 (UK) | support@techvedic.com

Monday, 31 March 2014

HOW TO : Remove Your Name and Picture Appearing in the Adsense Ads

HOW TO : Remove Your Name and Picture Appearing in the Adsense Ads

1. Go to the Google Plus Shared Endorsements setting page by clicking the link given below.

https://plus.google.com/settings/endorsements?hl=en

2. Scroll down and come to the settings of "Shared Endorsements in Ads" section.

3. Uncheck the box which says “Based upon my activity, Google may show my name and profile photo in shared endorsements that appear in ads.”

4. Click on the “Save” button to save the changes you have just made.

From now, your Google Plus profile picture and name will not appear in the Google Adsense ads. But keep in mind that they can still appear on other Google services like Google Play Music Store, Street View etc.

For more from the XpertCrewTM team please follow us on Twitter @Techvedic or 

our Facebook Page- 

or  contact us at

U.S. +855-859-0057 (http://www.techvedic.com/  )
U.K. +800-635-0716 (http://www.techvedic.co.uk/ )
CA  1-855-749-5861 (http://www.techvedic.ca/ )
AU  1-800-197-298  (http://www.techvedic.com.au/ )
And yes, we are eagerly waiting for your valuable feedback. Do write us back. We would be more than happy to help you. We are available 24/7.

Thursday, 27 March 2014

Google Maps in the Background of your Contact Form


There are basically two layers on the page – one is the map and the other is the form – and we are using the z-index property of CSS to define the stack order. The form has a higher z-index than Google Maps and thus the latter appears in the background. Let’s look at the actual code now.
-------------------------------------------------------------------------------------------

The HTML — There are two DIV elements – the map will render inside the element with ID #googlemaps while everything that you add inside #contactform will show up in your form. You can even embed a Google Form here.
<div id="googlemaps"></div>
<div id="contactform">
<!-- You can even embed a Google Form here -->
</div>

------------------------------------------------------------------------------------------
The CSS — The #googlemaps element occupies the entire height and width of the page while the #contactform has a fixed width. You can also change the opacity level of #contactform to make your forms slightly transparent.
#googlemaps {
height: 100%;
width: 100%;
position:absolute;
top: 0;
left: 0;
z-index: 0; /* Set z-index to 0 as it will be on a layer below the contact form */
}

#contactform {
position: relative;
z-index: 1; /* The z-index should be higher than Google Maps */
width: 300px;
margin: 60px auto 0;
padding: 10px;
background: black;
height: auto;
opacity: .45; /* Set the opacity for a slightly transparent Google Form */
color: white;
}

------------------------------------------------------------------------------------------
The JavaScript — Find the latitude and longitude of your place and replace the co-ordinates in line #7. You can then copy-paste the modified JavaScript code in the footer of your HTML page.
<!-- Include the Google Maps API library - required for embedding maps -->
<script src="http://maps.googleapis.com/maps/api/js?sensor=false"></script>

<script type="text/javascript">

// The latitude and longitude of your business / place
var position = [27.1959739, 78.02423269999997];

function showGoogleMaps() {

var latLng = new google.maps.LatLng(position[0], position[1]);

var mapOptions = {
zoom: 16, // initialize zoom level - the max value is 21
streetViewControl: false, // hide the yellow Street View pegman
scaleControl: true, // allow users to zoom the Google Map
mapTypeId: google.maps.MapTypeId.ROADMAP,
center: latLng
};

map = new google.maps.Map(document.getElementById('googlemaps'),
mapOptions);

// Show the default red marker at the location
marker = new google.maps.Marker({
position: latLng,
map: map,
draggable: false,
animation: google.maps.Animation.DROP
});
}

google.maps.event.addDomListener(window, 'load', showGoogleMaps);
</script>

--------------------------------------------------------------------------------------------
You may refer to the HTML source of this contact form for a complete example.

For more from the XpertCrewTM team please follow us on Twitter @Techvedic or 

our Facebook Page- 

or  contact us at

U.S. +855-859-0057 (http://www.techvedic.com/  )
U.K. +800-635-0716 (http://www.techvedic.co.uk/ )
CA  1-855-749-5861 (http://www.techvedic.ca/ )
AU  1-800-197-298  (http://www.techvedic.com.au/ )
And yes, we are eagerly waiting for your valuable feedback. Do write us back. We would be more than happy to help you. We are available 24/7.


Wednesday, 26 March 2014

Watch YouTube Video in Slow or Fast Motion


Watch YouTube Video in Slow or Fast Motion


1. Click on the gear or setting icon on the YouTube video player while watching a video.

2. Now, click on the Speed option as shown in the pic.

3. From the list, select the speed on which you would like to play the video. To slow the speed of the YouTube video, select the 0.5 or 0.25 and to play the video faster, select 1.5 or 2 from the Speed menu.
4. To return back to the normal speed, just select the Normal option.


HOW TO : Watch YouTube Video in Slow or Fast Motion in VLC Player

1. Open the VLC player and press Ctrl+N together to open the Network Stream option.
2. Now, just copy and paste the URL of the YouTube video which you want to play on VLS player in the given Network dialog box.
3. Click on the Play button to play the YouTube video in VLC player.

4. Now, click on the Playback option at the top menu bar. From the dropdown menu, select the Playback Speed option. Now, just use the slider given to change the playback speed of the video from Normal to Faster or Slower.

For more from the XpertCrewTM team please follow us on Twitter @Techvedic or 

our Facebook Page- 

or  contact us at

U.S. +855-859-0057 (http://www.techvedic.com/  )
U.K. +800-635-0716 (http://www.techvedic.co.uk/ )
CA  1-855-749-5861 (http://www.techvedic.ca/ )
AU  1-800-197-298  (http://www.techvedic.com.au/ )
And yes, we are eagerly waiting for your valuable feedback. Do write us back. We would be more than happy to help you. We are available 24/7.

Tuesday, 25 February 2014

Change name : Gmail | Yahoo Mail | Outlook.com

Change your name in Gmail, Yahoo Mail, and Outlook.com

You can change the From: name in your Web e-mail accounts. We'll show you how to change it in Gmail, Yahoo Mail, and Outlook.com.

When you signed up for a new Web e-mail account, you probably filled out your account profile and entered your real name. When you send e-mails with that account, your real name is displayed in the From: field of the e-mail header.

You may, however, want to change your name so that only your first name is displayed for privacy reasons, or use a completely different name just for fun. All three of the major Web e-mail providers (Gmail, Yahoo Mail, and Outlook.com) offer a way to change your name.

Gmail
Step 1: Click on the gear icon, then select Settings

Step 2: Click on the Accounts tab, then under the Send mail as: section, click on the "edit info" link.

Step 3: Enter a new name in the box and make sure the radio button for the new name is selected. Click on the Save Changes button to save.


Yahoo Mail
Step 1: Click on the gear icon, then select Settings

Step 2: Go to the Account tab, then under the Yahoo account section, click on the Edit button.

Step 3: Enter a new name in the Sending Name box, then click Save. Click Save again to save your new settings.


Outlook.com
Step 1: Click on the gear icon, then select More mail settings

Step 2: Under Managing your account, click on Account details.

Step 3: When your Account summary shows up, click on the "Edit display name" link under your name.

Step 4: Enter a new first and last name, then click Save. Unlike Gmail and Yahoo Mail, Outlook.com requires a first and last name.


Your new name should now show up in the From: field in all new e-mails. E-mails from the official mobile apps should also use your new name. If they're not, try logging out of the apps, then logging back in.

For more from the XpertCrewTM team please follow us on Twitter @Techvedic or 

our Facebook Page- 

or  contact us at

U.S. +855-859-0057 (http://www.techvedic.com/  )
U.K. +800-635-0716 (http://www.techvedic.co.uk/ )
CA  1-855-749-5861 (http://www.techvedic.ca/ )
AU  1-800-197-298  (http://www.techvedic.com.au/ )
And yes, we are eagerly waiting for your valuable feedback. Do write us back. We would be more than happy to help you. We are available 24/7.


Friday, 21 February 2014

send photos to Chromecast using iOS devices


Sending photos from your iOS device to your TV using Chromecast is now possible, thanks to this free app.

After Google opened up the Chromecast to all developers who were interested, it was only a matter of time until we started seeing apps hit Android and iOS markets alike.

One such app that's especially useful for iOS users, will send photos to a Chromecast. The app is called Photo Cast and is available for free.

After installing the app the only setup required is to grant the app permission to access your photos, and tapping on the Chromecast icon to select the device you'd like to send the photos to.

Then, any photos you select will show up on your TV automatically. You can even start playing a slideshow, with an adjustable timer for each slide.

Some downsides currently are the inability to send videos from your iDevice to Chromecast, and of course there's no way to continue a slideshow while the app runs in the background.

For more from the XpertCrewTM team please follow us on Twitter @Techvedic or 

our Facebook Page- 

or  contact us at

U.S. +855-859-0057 (http://www.techvedic.com/  )
U.K. +800-635-0716 (http://www.techvedic.co.uk/ )
CA  1-855-749-5861 (http://www.techvedic.ca/ )
AU  1-800-197-298  (http://www.techvedic.com.au/ )
And yes, we are eagerly waiting for your valuable feedback. Do write us back. We would be more than happy to help you. We are available 24/7.

Monday, 17 February 2014

Deauthorize Google Play Music devices

If you have reached your 10-device limit on Google Play Music, you'll have to deauthorize a tool so as to permit a brand new one to access the service.

Google permits you to use the Google Play Music service on up to ten totally different devices together with your account. If you have reached your device limit and need to feature a brand new device, you'll have to deauthorize Associate in Nursing recent one before being allowed to feature another device.
There ar 2 ways that to deauthorize devices from your account: employing a application program or through the Google Play Music mechanical man app. The device management feature was simply else to the mechanical man app on, therefore we'll begin there.


Deauthorize from Android
From your Google Play Music Android app, go to Settings, then select My devices. If you don't see My devices, make sure you're running the latest version of the app. Tap on the "X" next to the device you want to deauthorize, then tap the Deauthorize button to confirm.Deauthorize from Android 

Deauthorize from Android

Deauthorize from the Web
To deauthorize a device from your Google Plays Music account using a browser, go to Google Play Music Settings. In the Manage My Devices section, click the Deauthorize link next to the device you want to remove, then click on the Deauthorize button to confirm.

Deauthorize from Web


Deauthorize from Web
That's it. Keep in mind that the iOS version of Google Play Music has not been updated with device management, so iOS users will need to use the Web browser method to deauthorize devices for now.


For more from the XpertCrewTM team please follow us on Twitter @Techvedic or 

our Facebook Page- 

or  contact us at

U.S. +855-859-0057 (http://www.techvedic.com/  )
U.K. +800-635-0716 (http://www.techvedic.co.uk/ )
CA  1-855-749-5861 (http://www.techvedic.ca/ )
AU  1-800-197-298  (http://www.techvedic.com.au/ )
And yes, we are eagerly waiting for your valuable feedback. Do write us back. We would be more than happy to help you. We are available 24/7.

Sunday, 9 February 2014

Chrome Connectivity Diagnostics

When you are having network problems and cannot access the web, analytic the matter is not straightforward. As Ghacks points out, several pc systems have networking tools on the market to assist you work out the problem. Tools like ping, traceroute, nslookup, and netstat, area unit all tested utilities that facilitate determine network issues.

If you are not aware of mistreatment those tools or would really like an easier general tool, Google has created a Chrome app referred to as Chrome property medical specialty. It contains many completely different networking tests with the results displayed in AN easy-to-read format.

After installing Chrome Connectivity Diagnostics from the Chrome Web Store, start the app from the Chrome App Launcher to begin running the tests.


                  Chrome Connectivity Diagnostics running tests

To display all the tests and the results, click on the gear icon and select "Show passing tests." Clicking on the individual tests will provide a brief description of the test and a link to the logs.

                      Chrome Connectivity Diagnostics test results and log

That's it. If you happen to be on a Chrome OS device, you'll also notice two additional tests: Wi-Fi signal strength and default gateway is reachable.


For more from the XpertCrewTM team please follow us on Twitter @Techvedic or 

our Facebook Page- 

or  contact us at

U.S. +855-859-0057 (http://www.techvedic.com/  )
U.K. +800-635-0716 (http://www.techvedic.co.uk/ )
CA  1-855-749-5861 (http://www.techvedic.ca/ )
AU  1-800-197-298  (http://www.techvedic.com.au/ )
And yes, we are eagerly waiting for your valuable feedback. Do write us back. We would be more than happy to help you. We are available 24/7.

Thursday, 30 January 2014

Google two-factor authentication

Two-factor authentication called -step verification in Google's speech adds a second stage to your Google login. Not just do you need to enter your username and watchword, additionally a solitary utilization security code, which generally gets sent to your telephone by means of an application or quick message. As an exchange for the additional exertion, you'll get an additional layer of assurance that can bail keep programmers out of your personal information.

Setting up 2-step verification

If you have an account for any of Google's services (Gmail, Google+, and so on), the setting up 2-step verification fairly straightforward. Start by visiting Google.com, and press the blue Sign In button in the upper right hand corner, and log in. Once signed in, look for your profile picture in the upper right corner and click it, then select Account from the menu that appears. 


Once you're at the Accounts settings page, select Security from the list along the left. Click the Edit link next to the 2-step verification heading to begin the process of setting it up. Google will give you a brief pictoral overview of what to expect: Give it a once-over, then press Start setup when you're ready to rock.

On the next screen, Google will ask you for your cellphone number. Select your country from the drop-down list (as represented by the flag icon), enter your number as instructed, then choose how you want to receive your security codes.

You can get security codes either via text message or voice call: If you're hearing impaired or aren't great at remembering strings of numbers, you'd probably be better off going with the Text message option. On the other hand, the Voice Call option might be a better choice if you have a limited—or no—text message plan.


Once you've entered your number and chosen how you want to recieve security codes, press Send code, and Google will send a test code to your phone. On the next screen, enter this test code where instructed, then press the Verify button.

You're almost done! Google will ask you if you want to trust the computer you're logged in on: If you "trust" a computer, you don't need to use a security code on it. This might be useful if you lose your phone and need to get into your Google account, or you're sick of entering security codes on your locked-down, highly secure office computer. Make your choice and press Next; you can go back and change this setting later if you change your mind.

Finally, Google will have you confirm one last time that you want to use 2-step verification. Press Confirm, and you're all set to go.

For more from the XpertCrewTM team please follow us on Twitter @Techvedic or 

our Facebook Page- 

or  contact us at

U.S. +855-859-0057 (http://www.techvedic.com/  )
U.K. +800-635-0716 (http://www.techvedic.co.uk/ )
CA  1-855-749-5861 (http://www.techvedic.ca/ )
AU  1-800-197-298  (http://www.techvedic.com.au/ )
And yes, we are eagerly waiting for your valuable feedback. Do write us back. We would be more than happy to help you. We are available 24/7.

snooping in your Gmail? Find it How

Your Gmail account presumably holds some touchy data messages from your loved ones parts, data about records for different administrations, authentic pictures, and on and on. Imagine a scenario where another person has been jabbing around in there. Luckily, Google provides for them you the instruments important to discover. 

First, log into your Gmail account from your computer's Web browser. Once you get to your inbox screen, scroll to the bottom, and look for the link labelled "Details" in the lower-right corner. (It's a small link.)

Click the link, and you'll get a pop-up window that shows the last 10 times someone accessed your Gmail account, along with how they accessed it (through a browser, an email app, and so on), their IP address, and when they access it. If something looks fishy, you'll want to change your password as soon as humanly possible.


While you're at it, you may want to turn on two-factor authentication for your Google account and give yourself an extra layer of protection.


What's that? You don't have your IP location retained? Don't feel awful the vast majority of us don't. One path around this is to visit Whatismyip.com at areas where you often utilize your machine (at home, at work, at the espresso place you successive, et cetera)—or check your IP address at whatever point you unite with another system and store those in a content archive or something


For more from the XpertCrewTM team please follow us on Twitter @Techvedic or 

our Facebook Page- 

or  contact us at

U.S. +855-859-0057 (http://www.techvedic.com/  )
U.K. +800-635-0716 (http://www.techvedic.co.uk/ )
CA  1-855-749-5861 (http://www.techvedic.ca/ )
AU  1-800-197-298  (http://www.techvedic.com.au/ )
And yes, we are eagerly waiting for your valuable feedback. Do write us back. We would be more than happy to help you. We are available 24/7.

Monday, 27 January 2014

How to use Google Calendar for groups

Instructions to utilize Google Calendar to keep assemblies sorted out

In the matter of keeping a family, group, or staff composed, nothing works superior to everybody having entry to one another's timetables. One of the most straightforward routes for everybody to stay on the same page is to utilize Google Calendar.

The quest monster offers a few courses for everybody to impart datebook information. Here's a gander at two especially accommodating choices.


Group calendar

The most straightforward approach to keep everybody on the same page is to make a gathering schedule that everybody puts their timetable on.

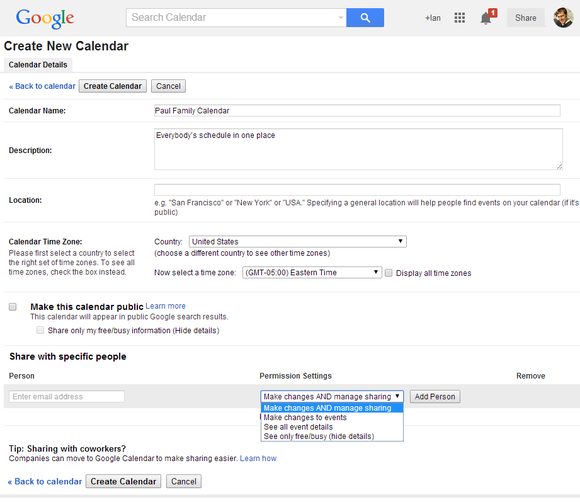
Open up Google Calendar and in the left-hand navigation column, click the downward facing arrow to the right of the “My calendars” heading. In the drop down menu that appears, select “Create new calendar.”


In the new page that opens, we’ll create a calendar for the Paul Family. So in the “Calendar Name” entry field we’ll put “Paul Family Calendar.” Put whatever you want in the description field.


Then fill out the location if you want, and set the calendar time zone to your local time. Note that Google Calendar does not automatically choose a time zone based on what you put in the location entry field. Since this is a private calendar for one family, we won’tcheck off “Make this calendar public.”

The last thing to do is send this to everyone in the family by filling out each family member’s email address under “Share with specific people.” Fill out the first person’s email then choose her editing rights under “Permission Settings.”

In this case we want every person who has access to the calendar to have full edit rights, so we’ll click the drop down and select “Make changes AND manage sharing.” Click “Add Person” , then continue adding other people using the same process.

When you're done, click the “Create Calendar” button to, well, create the calendar.

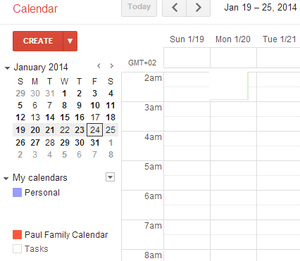
Google will now shoot you back to the main calendar page, and in a few seconds you should see the new group calendar under “My Calendars.”


Finding an event time that works

Another way to manage schedules if everyone prefers to keep separate calendars is to use Google’s “Find a time” feature. This will help you figure out the best time to schedule a meeting, party, or other occasion.

For this feature to work everyone has to be sharing their calendars with each other. To find out how to share your private calendar with specific people check out Google’s Calendar help page.

First, create a new event by clicking the aptly named “Create” button on the main page of Google Calendar.

Now just create your calendar event as you normally would: fill out the name of the event, select the date and time (we’ll change it later), add a location, and select the Calendar you want to use. (Note: this is where teams and families would choose the group calendar from the drop down menu.)

There you have it: Two distinctive, yet just as utilitarian approaches to keep your companions, relatives, and collaborators on the same page. Revel in!


For more from the XpertCrewTM team please follow us on Twitter @Techvedic or 

our Facebook Page- 

or  contact us at

U.S. +855-859-0057 (http://www.techvedic.com/  )
U.K. +800-635-0716 (http://www.techvedic.co.uk/ )
CA  1-855-749-5861 (http://www.techvedic.ca/ )
AU  1-800-197-298  (http://www.techvedic.com.au/ )
And yes, we are eagerly waiting for your valuable feedback. Do write us back. We would be more than happy to help you. We are available 24/7.

Friday, 24 January 2014

Gmail loading images automatically

Gmail for Android as of late upgraded to permit pictures in your email to immediately show. Here's the means by which to turn it off assuming that you're not a fan.

As you may review, promptly in December Googled published it was set to begin showing pictures immediately in accepted messages. The organization guaranteed that it had resolved how to support the same level of security by handling the pictures through its substitute servers. In the meantime, Google proclaimed that the characteristic would finally go to its versatile Gmail applications.

Quick send to the latest redesign to Gmail for Android and the characteristic is to be sure incorporated. In the wake of upgrading on both my Moto X and Nexus 5, pictures were showing immediately in messages I accepted. I didn't need to change a setting, or empower it.

For some the new characteristic is set to be invited, however for others showing pictures could be a disturbance (and put a gouge in your information plan).

Fortunately, Google has incorporated a choice in the settings to change how pictures function. To require Gmail for Android to ask before demonstrating any pictures in an email, start the Gmail application and explore to the settings area. Rather than selecting General Settings, tap on the record you'd get a kick out of the chance to oversee, then span to the lowest part of the page.


At the lowest part you'll discover a posting for "Images." Selecting it will provide for them you the choice to set it to dependably demonstrate, or ask before demonstrating.


The picture on the left is the manner by which messages will show up when you open them with the "dependably demonstrate" alternative chose, where the picture on the right most likely looks natural and speaks to the "ask before indicating" setting under Images.

While the characteristic makes it simpler to view complete messages without making additional moves to load pictures, its decent that Google has made it conceivable to turn the characteristic off. The great news is while this setting adjusts over to Gmail's Web website, when in any case you need to determine everything is setup fittingly on the webpage.

For more from the XpertCrewTM team please follow us on Twitter @Techvedic or 

our Facebook Page- 

or  contact us at

U.S. +855-859-0057 (http://www.techvedic.com/  )
U.K. +800-635-0716 (http://www.techvedic.co.uk/ )
CA  1-855-749-5861 (http://www.techvedic.ca/ )
AU  1-800-197-298  (http://www.techvedic.com.au/ )
And yes, we are eagerly waiting for your valuable feedback. Do write us back. We would be more than happy to help you. We are available 24/7.