Showing posts with label google chrome. Show all posts

Wednesday, 16 July 2014

Disable Google Chrome Built-in Spell Checker?

Disable Google Chrome Built-in Spell Checker?

step-by-step method to disable Chrome spell-checker:

1. Open Google Chrome and click on Settings button present at the end of the toolbar. Now select Settings menu item.

2. Click on "Show advanced settings..." link given at the bottom of Settings page.

3. Now scroll down a little and click on "Languages and spell-checker settings..." button present in "Languages" section.


4. It'll open a new window where you'll see a checkbox "Enable spell checking". Uncheck the option and click on OK button.


5. That's it. It'll turn spell-check feature off.


--------------------------------------------------------------------------------------------------------

Professional technology support is now just a call away. Get comprehensive tech support from setup and installation to diagnosis and repair to security and optimization only at Techvedic. Device origin – No bar, warranty period – No bar. Enjoy unlimited tech support at affordable prices. To speak with our experts, dial 0800 016 3909 (Toll Free).

About Techvedic: http://en.wikipedia.org/wiki/Techvedic

Get in touch with Techvedic on Social Media:

Techvedic Facebook Page: https://www.facebook.com/techvedic
Techvedic Twitter: https://twitter.com/techvedic
Techvedic Google Plus Page:  https://plus.google.com/+TechvedicInc/posts
Techvedic LinkedIn Profile: https://www.linkedin.com/company/techvedic


Visit: Techvedic - Computer Tech Support Company | http://www.techvedic.co.uk/ | 0800 016 3909 (UK) | support@techvedic.com

Friday, 11 July 2014

Create and Install Your Own Custom Themes in Google Chrome

Install Your Own Custom Themes in Google Chrome here is how


1. First you'll need to find this "default.dll" file to replace or edit it. Type following string in RUN dialog box and press Enter:


local settings\Application Data\Google\Chrome\Application

NOTE: Windows Vista users can also type "appdata" in RUN or Start Menu Search box and press enter, then navigate to "local\Google\Chrome\Application".

2. It'll open a folder containing Chrome files.

3. Now when you are in "Application" folder using 1st step, you'll see a folder having some random characters in its name. Open this folder and go to "Themes" folder. That's it, you'll find the "default.dll" file in this folder.

4. First take a backup of this file before replacing or editing it, so that you can restore it if you want to get the default look back.

5. Now open this file in "Resource Tuner" and expand "BINDATA" folder.

6. Under this folder, you can replace the existing PNG files with your custom PNG files. Create your own PNG image with same dimensions using Photoshop, Gimp, etc. and then replace existing PNG in the "default.dll" file with your one.

To replace the existing PNG file with your custom one, select the PNG file in Resource Tuner and then press "Ctrl+Shift+E", it'll open another window asking for your own resource file. Press "Ctrl+O" and browse to your own PNG file, select it and click on "Open" button and then click on "OK" button.

When you have replaced all desired resources, save the file and you have done.

Since Chrome supports PNG files, there are lots of possibilities for theme creators to put transparency in their themes.

7. You can also download some 3rd party ready-made themes. Just download them and you'll get the custom "default.dll" file. Replace the default file with this new one as mentioned in above tutorial.

--------------------------------------------------------------------------------------------------

Worried about data security and availability? You should not because with Techvedic’s BackupRunner now you can enjoy impeccable and industry-compliant backup and recovery solution at rock bottom prices. Home and business users both can take advantage of our cloud-based backup and recovery service. For more information on product and pricing, call us at 0800 016 3909 (Freephone).

About Techvedic: http://en.wikipedia.org/wiki/Techvedic

Get in touch with Techvedic on Social Media:

Techvedic Facebook Page: https://www.facebook.com/techvedic
Techvedic Twitter: https://twitter.com/techvedic
Techvedic Google Plus Page:  https://plus.google.com/+TechvedicInc/posts
Techvedic YouTube: https://www.youtube.com/user/Techvedic
Techvedic LinkedIn Profile: https://www.linkedin.com/company/techvedic

Visit: Techvedic - Computer Tech Support Company | http://www.techvedic.co.uk/ | 0800 016 3909 (UK) | support@techvedic.com

Friday, 2 May 2014

How to add dictionaries to Google Chrome’s spell checker


You can add additional languages and dictionaries to the browser. This can be useful if you want spell checking functionality for additional languages. So, if you write in German and English for example, you may want to add the German dictionary to Chrome so that your German texts get spell checked as well.

To add a new language and dictionary to Chrome, do the following:
Load chrome://settings/languages directly in the web browser by pasting it into the address bar and hitting enter afterwards.
Or click on the Hamburger button located on the top right, select Settings, then Show advanced settings, and there language and input settings.

The languages menu displays all installed languages. You can only install spell checking support for languages that are installed in the browser, so click on add first on the screen to add another language to Chrome.


You can go quickly through the menu by entering the first couple of letters of the language that you want to add once the full selection menu is displayed here., e.g. Chi for Chinese.

For each language that you install this way, you get the following options:
Display Google Chrome in this language - This makes the selected language the primary language of Chrome. Note that a browser restart is required before the change takes effect. Menus are displayed in that language on restart. You can always go back to the previous language though.
Use this language for spell checking - You can only select one language for spell checking. This is the primary spell checking language that Chrome will use by default.
Offer to translate pages in this language - Chrome won't offer to translate pages in languages that you have installed by default. If you want that functionality, you need to check the box so that the translate option is displayed for the selected language.


---------------------------------------------------------------------------

We make sure that you can access your CRM database easily and you are always provided with the best Intel to take your business to new level. For reducing the cost-of-operation and improving the profit margin, Techvedic is the best place to resort to.

About Techvedic: http://en.wikipedia.org/wiki/Techvedic

Get in touch with Techvedic on Social Media:

Techvedic Facebook Page: https://www.facebook.com/techvedic
Techvedic Twitter: https://twitter.com/techvedic
Techvedic Google Plus Page:  https://plus.google.com/+TechvedicInc/posts
Techvedic YouTube: https://www.youtube.com/user/Techvedic
Techvedic LinkedIn Profile: https://www.linkedin.com/company/techvedic


Visit: Techvedic – Customer Relationship Management | http://www.techvedic.co.in/ | 1 800 3000 1126 | support@techvedic.com

Friday, 18 April 2014

How to Speed up the Google Chrome


Follow these three simple steps, you can see the changes in the speed of the internet connection.

1. Disable the Plugins: Google Chrome Browser has provided various plugins that allows you to improve the user usability. But in turn, it will reduce the speed of the browser. Generally Google Chrome Browser has several built in Plugins that are installed predefined. For example, various plugins for java, Silverlight and so on. But most of those plugins are remain unused; in such a case you can improve the speed of the browser by disabling the plugins in the Google Chrome Browser.

2. Clear the Browsing Data: Browsing data are the data which are similar to cache memory that helps you access the websites through stored cookies.Cache memories are stored in the database of your system which allows you to store the history of the website that is visited by you. By clearing the browsing data, the speed of the internet connection can be improved.

3. Disable Extensions: These are the Small programs on the Google Chrome Browser, which is available in the Google Chrome Web store and these small programs adds an extra features to the Google Chrome Browser. These extensions are very useful, but if the number of the extensions increases then it would ends up in slower browsing speed of the personal computer. You can even disable this plugin to improve the browsing speed of your Google Chrome Browser without uninstalling the extensions from the Google Chrome Browser.


-------------------------------------------------------------------------

Need a high-end tech support service that delivers at odd hours, we make sure that you are not appalled even at odd hours if your computer is not working. At TechVedic, our experts are always there to provide tech support round the clock.

About Techvedic: http://en.wikipedia.org/wiki/Techvedic

Get in touch with Techvedic on Social Media:

Techvedic Facebook Page: https://www.facebook.com/techvedic
Techvedic Twitter: https://twitter.com/techvedic
Techvedic Google Plus Page:  https://plus.google.com/+TechvedicInc/posts
Techvedic YouTube: https://www.youtube.com/user/Techvedic
Techvedic LinkedIn Profile: https://www.linkedin.com/company/techvedic


Visit: Techvedic – Customer Relationship Management | http://www.techvedic.co.in/ | 1 800 3000 1126 | support@techvedic.com

Monday, 14 April 2014

Best Web Browsers For iOS


Apple devices running iOS comes with Apple’s safari browser as their default browser. However, with a lot of alternative better and quicker browsers out there for iOS, you're ne'er stuck with the default one. And if you're searching to ditch safari browser and use another better internet browsers for iOS devices, then today we are here with a listing of the top five best internet browsers for iOS worth trying out.

1. Google Chrome for iOS:

Google Chrome is one of the most popular web browsers for PC, Android and iOS as well. Google Chrome is specially optimized to save your mobile data by compressing web pages, and is indeed one of the best alternative for the Safari browser in iOS. Google Chrome for iOS is compatible with every Apple device running iOS 6.0 or later.

2. Atomic Web Browser for iOS:

Atomic is yet another popular web browser option for iOS. This is a paid option and purchasing this application will cost you $2. However, for the price you pay you do get a lot of features such as the option to call your contacts from within the browser, ad-blocker, support for dropbox, private browsing experience and so on. Atomic Web Browser is compatible with any iOS running Apple device with iOS version 4.3 or above.

3. Dolphin Browser for iOS:

One of the most common web browser choice in the mobile space. Dolphin Browser is well known for its best data compressing technology to minimize data usage on your iOS device and also the unique speech-to-text converter within the browser is quite appreciated too. Like the Atomic Web browser for iOS, Doplhin browser too supports all Apple devices with iOS version 4.3 or above.

4. Opera Mini for iOS:

The Opera mini web browser is globally appreciated for its performance, compressibility and support. Opera Mini browser for iOS can be termed as one of the fastest web browsers for iOS and is significantly better than the stock Safari web browser of iOS. The opera mini browser supports every Apple devices running IOS version 4.2 or above.

5. Photon Flash Browser for iOS:

Photon flash web browser for iOS is yet another paid alternative for the Safari web browser and will cost you $3.99 to unlock the premium version. This web browser is absolutely worth the price because it is one of the best web browsers for iOS with Flash support by default. Hence, if you are someone who streams a lot of flash content and if you are ready to shed some money in purchasing an application, then the Photon Flash Browser for iOS must be your choice.


Well, that was our list of the top 5 best web browsers for iOS devices. If you’re not satisfied with Safari or its performance, then any of the alternatives mentioned above will surely impress you.

For more from the XpertCrewTM team please follow us on Twitter @Techvedic or 

our Facebook Page- 

or  contact us at

U.S. +855-859-0057 (http://www.techvedic.com/  )
U.K. +800-635-0716 (http://www.techvedic.co.uk/ )
CA  1-855-749-5861 (http://www.techvedic.ca/ )
AU  1-800-197-298  (http://www.techvedic.com.au/ )
And yes, we are eagerly waiting for your valuable feedback. Do write us back. We would be more than happy to help you. We are available 24/7.

Wednesday, 9 April 2014

If you have installed Chrome, you might have noticed that a new process "GoogleUpdate.exe" runs in background. You can check it using Task Manager:


Even if you End Task of this process, it automatically comes back after a few minutes or when you launch Chrome next time.

Actually this standalone exe file is used by Google Chrome to check for new updates. If it finds any update available, it downloads and installs it.

But its very annoying because it never asks before downloading or installing the updates and runs in background for all the time.

The most easiest way is to disallow "GoogleUpdate.exe" to access Internet using your system Firewall. You can create a new rule for it.

If you don't use any firewall or don't want to use the 1st method, then you can use following steps to permanently remove the "GoogleUpdate.exe" file from your system (after removing the file you'll no longer be able to update the Chrome web browser using its built-in update function )

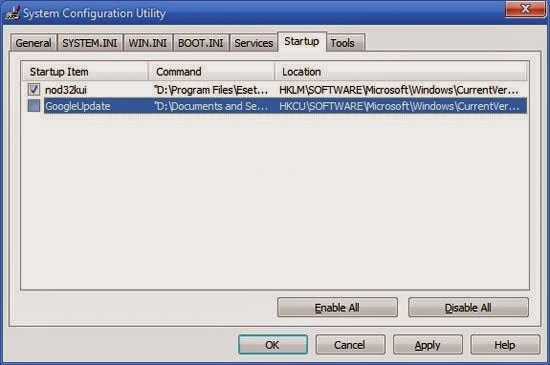
STEP 1: First disable "GoogleUpdate.exe" from system startup. Type msconfig in RUN dialog box and press Enter. It'll open "System Configuration" window. Now go to "Startup" tab and uncheck "GoogleUpdate" from the list.


Apply the changes and restart your system.

PS: You can also use Registry Editor or any other 3rd party utility to remove startup entry. Windows Defender can also do the job.

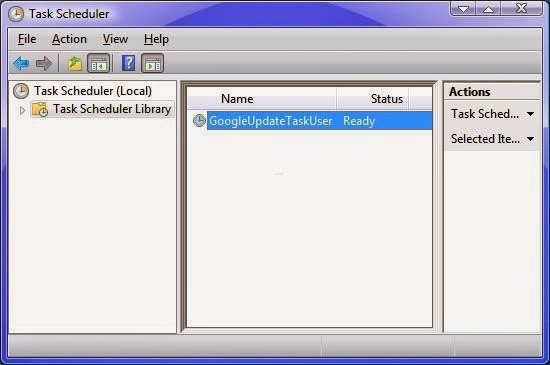
STEP 2: Now we'll need to remove the scheduled task created for GoogleUpdate.exe from our system. Open "Scheduled Tasks" or "Task Scheduler" from Control Panel or Programs menu. You can also run it by directly providing "taskschd.msc" command in RUN dialog box or by opening "%windir%\Tasks" folder.

Now look for the "GoogleUpdateTaskUser" task and delete it.

Windows XP:


Windows Vista and later:


You can also disable the task instead of deleting it.


STEP 3: Now the last thing. We'll need to remove the "GoogleUpdate.exe" file permanently so that it doesn't add its entry in startup.

Go to following folder:


C:\Documents and Settings\Administrator\Local Settings\Application Data\Google\Update

Replace C: with your system drive where Windows is installed and replace "Administrator" with your user name in Windows.

In the above folder, you'll find the "GoogleUpdate.exe" file. Delete the file.


For more from the XpertCrewTM team please follow us on Twitter @Techvedic or 

our Facebook Page- 

or  contact us at

U.S. +855-859-0057 (http://www.techvedic.com/  )
U.K. +800-635-0716 (http://www.techvedic.co.uk/ )
CA  1-855-749-5861 (http://www.techvedic.ca/ )
AU  1-800-197-298  (http://www.techvedic.com.au/ )
And yes, we are eagerly waiting for your valuable feedback. Do write us back. We would be more than happy to help you. We are available 24/7.

How to Change Homepage Settings in Google Chrome?

If you like a blank page as homepage or want to change the homepage to some other website, then Please follow the following steps

1. Open Google Chrome and click on Settings button present at the end of the toolbar. Now select Settings menu item.

2. Now look into "On startup" section. Using this section, you can customize the homepage.

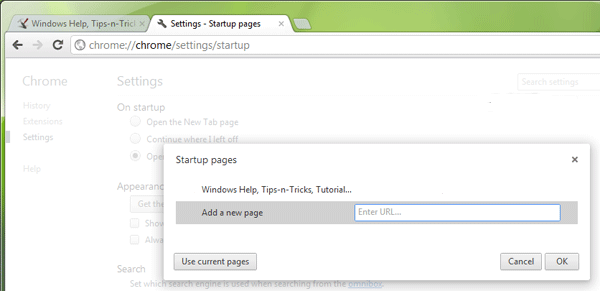
3. Select "Open a specific page or set of pages" option and click on "Set pages" link.

4. It'll open a new window where you can add your desired website URLs to set them as Chrome homepage.


5. That's it. Now click on OK button and get ready enjoy your desired homepage in Google Chrome.

That’s it! All your selected apps will now be downloaded one by one to your different Windows 8 system.

Please click to on the line in case you require additional - Tech Support / software-install-help

For more from the XpertCrewTM team please follow us on Twitter @Techvedic or 

our Facebook Page- 

or  contact us at

U.S. +855-859-0057 (http://www.techvedic.com/  )
U.K. +800-635-0716 (http://www.techvedic.co.uk/ )
CA  1-855-749-5861 (http://www.techvedic.ca/ )
AU  1-800-197-298  (http://www.techvedic.com.au/ )
And yes, we are eagerly waiting for your valuable feedback. Do write us back. We would be more than happy to help you. We are available 24/7.

Wednesday, 12 March 2014

current version of your web browser


How to determine the current version of your web browser

I’m often asked how to determine which version of a particular web browser is installed on a computer. In fact, three people have asked me this same question just this week.

Since knowing the current version of your web browser is often useful for troubleshooting Internet-related issues, I thought it might be helpful to write a tip explaining how to determine the version number in all the most popular browsers.

Just follow the steps below for your particular browser. 

For Internet Explorer, 
click Help>About Internet Explorer. A small window will pop up containing the version number.

For Google Chrome:
1 – Click the Customize icon in the upper right-hand corner of the window (it looks like three horizontal lines stacked on top of one another).
2 – Click About Google Chrome.

For Firefox:
1 – Click the orange Firefox button in the top left-hand corner of the window.
2 – Hover you mouse pointer over the Help link, then click About Firefox.

For Opera:
1 - Click the Opera button in the top left-hand corner of the window.
2 – Click About Opera.

 For Safari:
1 – Click the “gear-shaped” Settings icon in the upper right-hand corner of the window.
2 – Click About Safari.

For more from the XpertCrewTM team please follow us on Twitter @Techvedic or 

our Facebook Page- 

or  contact us at

U.S. +855-859-0057 (http://www.techvedic.com/  )
U.K. +800-635-0716 (http://www.techvedic.co.uk/ )
CA  1-855-749-5861 (http://www.techvedic.ca/ )
AU  1-800-197-298  (http://www.techvedic.com.au/ )

And yes, we are eagerly waiting for your valuable feedback. Do write us back. We would be more than happy to help you. We are available 24/7.

Sunday, 9 March 2014

Play MP3 & Video Files directly using Google Chrome


Play MP3 & Video Files directly using Google Chrome

Google Chrome is presently the foremost standard application program, surpassing all major ones like Firefox, Opera and internet explorer. The browser is full-featured with varied functionalities and there's one great feature that you simply may be unaware of, that is that the ability to play audio and video files at intervals Chrome while not using any extra plugin or extension. this is often doable with the combination of Adobe Flash Player and HTML5 audio component in Chrome.

Use Google Chrome as a Music Player -

To Play an MP3, supported audio or video file in Chrome,

simply drag and drop the file over to the browser’s window. The music will start playing, you can pause and adjust the volume.

supported audio file formats include AAC, WAV, and OGG.

Similarly, you can watch saved videos in Chrome browser with support for popular formats like MP4, FLV and you can switch to full screen view.

For more from the XpertCrewTM team please follow us on Twitter @Techvedic or 

our Facebook Page- 

or  contact us at

U.S. +855-859-0057 (http://www.techvedic.com/  )
U.K. +800-635-0716 (http://www.techvedic.co.uk/ )
CA  1-855-749-5861 (http://www.techvedic.ca/ )
AU  1-800-197-298  (http://www.techvedic.com.au/ )
And yes, we are eagerly waiting for your valuable feedback. Do write us back. We would be more than happy to help you. We are available 24/7.

Monday, 17 February 2014

Google-chrome-and-Mozilla-firefox are not safe any more


In view of those suspicious virus-based activities, net users are asked to upgrade their personal versions of those 2 most used net browsers on their work stations.

“Multiple vulnerabilities are reportable in Mozilla Firefox, disembodied spirit and SeaMonkey that can be exploited by an overseas wrongdoer to bypass bound security restrictions, disclose doubtless sensitive data, gain escalated privileges, execute directional code and causes denial of service condition on the affected system

The two net browsers area unit a crucial tool for net aquatics among on-line shoppers. The anomalies are detected recently and it'd be suggested that users upgrade their existing versions before later. These activities area unit mischief on a part of hackers or they're harmful viruses

the vulnerability is caused “due to improper prohibit access to ‘about:home’ buttons by script on alternative pages in Mozilla Firefox”

A user-assisted remote wrongdoer may exploit this vulnerability employing a crafted web site or webpage. successful exploitation of this vulnerability may permit user-assisted remote wrongdoer to cause a denial of service condition

Similar problems are re portable within the in style browser offered by Google. ”Multiple vulnerabilities are re portable in Google Chrome that can be exploited by an overseas wrongdoer to cause denial of service condition or execute discretion code on the target system,

The maximum harm these vulnerabilities will cause, the informatory same, was memory corruption, unwanted downloading of files, loss of sensitive data (when Mozilla Firefox is employed in mechanical man phones) and explanation for denial of varied services on the web to the user.

The Internet users to either user correct security patches or upgrade the browser version. The affected code systems embrace “Firefox versions before twenty seven.0, Firefox extended support unharness (ESR) versions before 24.3, disembodied spirit versions before 24.3, Sea Monkey versions before a pair of.24 and Google Chrome before version thirty two.0.1700.102

For more from the XpertCrewTM team please follow us on Twitter @Techvedic or 

our Facebook Page- 

or  contact us at

U.S. +855-859-0057 (http://www.techvedic.com/  )
U.K. +800-635-0716 (http://www.techvedic.co.uk/ )
CA  1-855-749-5861 (http://www.techvedic.ca/ )
AU  1-800-197-298  (http://www.techvedic.com.au/ )
And yes, we are eagerly waiting for your valuable feedback. Do write us back. We would be more than happy to help you. We are available 24/7.


Wednesday, 6 November 2013

How to check memory usage of Chrome extensions?

Description

Chrome web store offer you various new extensions so that you can enhance your web browsing experience. But, it can also slow down things by adding many others. In case, you are having trouble in picking the ones that are beneficial then check the memory usage of each extension.

Solution:

Google Chrome has a built-in tool which can help you to show memory usage by each extension. Open the Chrome window and click on the menu icon present on the toolbar. Then go to “Tools” > “Task Manager.” Also, you can prefer the keyboard shortcut i.e. Shift + Esc. If you are opening the Chrome Task Manager for the first time then the window will be very small. But, you can resize it to see the full name of the extensions as well as their memory usage.

Chrome extensions-1

You can categorize the window by clicking on the Task heading along the top. With this, your extensions get grouped up with their “Extension” prefix. After seeing the amount of memory some extensions are using, you will definitely going to remove those extensions. But, some extensions are so important that you don’t bother about the memory they are using. For this, you can go to Google Chrome web store and search for the current extension you are using. Then click the related tab along the top so as to find the similar extension. 

Chrome extensions-2

By using the above tips, you can easily pick up the right extensions. For more from the XpertCrewTM team, please follow us on Twitter @Techvedic or contact Techvedic’s computer support helpdesk, as per below contact-details: 
U.S. +855-859-0057 (http://www.techvedic.com/ )
U.K. +800-635-0716 (http://www.techvedic.co.uk/ )
CA 1-855-749-5861 (http://www.techvedic.ca/ )
AU 1-800-197-298 (http://www.techvedic.com.au/ )
And yes, we are eagerly waiting for your valuable feedback. Do write us back. We would be more than happy to help you. We are available 24/7.

Monday, 4 November 2013

Block online spoilers with Unspoiler for Google Chrome

Description

In case, headlines, comments or other info about any show or episode is spoiling your online fun while using Facebook, Twitter, or surfing any news site then you must take the help of Unspoiler in Google Chrome

spoilers

Solution:
Google Chrome user can install Unspoiler. With this extension, you can filter out all online mentions of specified TV shows. Thus, you can easily enjoy browsing as well as social-media activities without any interruption. After installing it, you can see Unspoiler icon on your Chrome toolbar. Go to a site like Entertainment Weekly and look for mentions of your show. Previously where you would normally see a headline, Unspoiler will display a red banner. Also, you can go ahead for details, click “show spoiler.” By clicking “save spoiler”, all the details get collected at Unspoiler.tv. 
This is something really useful for hassle free browsing. For more from the XpertCrewTM team, please follow us on Twitter@Techvedic or contact Techvedic’s computer support helpdesk, as per below contact-details: 
U.S. +855-859-0057 (http://www.techvedic.com/ )
U.K. +800-635-0716 (http://www.techvedic.co.uk/ )
CA 1-855-749-5861 (http://www.techvedic.ca/> )
AU 1-800-197-298 (http://www.techvedic.com.au/> )
And yes, we are eagerly waiting for your valuable feedback. Do write us back. We would be more than happy to help you. We are available 24/7.

Wednesday, 30 October 2013

Enable Hidden Secret “Stacked Tabs” Feature in Google Chrome

Description

If you have used both Mozilla Firefox and Google Chrome then you must have noticed a difference. In Google Chrome, when you open various tabs then browser starts shrinking the tabs and after one stage you can only view a cross(x) button. This is really irritating as you need to open each tab for getting your desired tab. But, Mozilla Firefox does not shrink the tabs to that much extent. Instead, they shrink it to a limited size and after that it starts stacking new tabs to the right. If you want this feature in Google Chrome web browser also then this tutorial can help you.

Stacked Tabs-1

Solution:

With this, you can enable the hidden feature “Stacked Tabs” in Google Chrome. As this feature is not enabled by default thus, you need to enable it.

Stacked Tabs-2

Check out the following simple steps:

1.Firstly, type “chrome://flags/” in Google Chrome address bar and press “Enter.” An advanced configuration page gets open.
2.Press "Ctrl+F" keys together to launch find box and type following in the find box:
Stacked Tabs
It'll highlight an option with the same name.
Stacked Tabs Windows
Tabs never shrink, instead they stack on top of each other when there is not enough space. #stacked-tab-strip

Stacked Tabs-3

3.Click on the "Enable" link given below the option.

4.At the end click on "Relaunch Now" button and now Google Chrome have the secret stacked tabs feature similar to Mozilla Firefox web browser.
This is all you need to do for enabling the hidden feature in Google Chrome. For more from the XpertCrewTM team, please follow us on Twitter @Techvedic or contact Techvedic’s computer support helpdesk, as per below contact-details:
U.S. +855-859-0057 (http://www.techvedic.com/ )
U.K. +800-635-0716 (http://www.techvedic.co.uk )
CA 1-855-749-5861 (http://www.techvedic.ca )
AU 1-800-197-298 (http://www.techvedic.com.au )
And yes, we are eagerly waiting for your valuable feedback. Do write us back. We would be more than happy to help you. We are available 24/7.

Thursday, 10 October 2013

How to make your Chrome extension icons visible again?

Description

Are you tired of the unwanted changes occurring in your browser without your consent? Then you are at the right place. If you have lost all your frequently used extension icons in Google Chrome then you can bring them back. This tutorial is going to help you.

Chrome-1

Solution:

Chrome-2

Put your mouse between the address bar and double arrow until your cursor changes to a left-right arrow. Now drag this "handle" to the left and you can see those icons again. Chrome is one of the best browsers. But, the constant UI changes make it a bit irritating. Also, Microsoft and Mozilla are also doing the same. 

Chrome-3

Chrome-4

Therefore, you can follow the above given steps to bring back the lost extension icons in Chrome. For more from the XpertCrewTM team, please follow us on Twitter @Techvedic or contact Techvedic’s computer support helpdesk, as per below contact-details:
U.S. +855-859-0057 (http://www.techvedic.com/ )
U.K. +800-635-0716 (http://www.techvedic.co.uk/ )
CA 1-855-749-5861 (http://www.techvedic.ca/)
AU 1-800-197-298 (http://www.techvedic.com.au/)
And yes, we are eagerly waiting for your valuable feedback. Do write us back. We would be more than happy to help you. We are available 24/7.