If you have installed Chrome, you might have noticed that a new process "GoogleUpdate.exe" runs in background. You can check it using Task Manager:
Even if you End Task of this process, it automatically comes back after a few minutes or when you launch Chrome next time.
Actually this standalone exe file is used by Google Chrome to check for new updates. If it finds any update available, it downloads and installs it.
But its very annoying because it never asks before downloading or installing the updates and runs in background for all the time.
The most easiest way is to disallow "GoogleUpdate.exe" to access Internet using your system Firewall. You can create a new rule for it.
If you don't use any firewall or don't want to use the 1st method, then you can use following steps to permanently remove the "GoogleUpdate.exe" file from your system (after removing the file you'll no longer be able to update the Chrome web browser using its built-in update function )
STEP 1: First disable "GoogleUpdate.exe" from system startup. Type msconfig in RUN dialog box and press Enter. It'll open "System Configuration" window. Now go to "Startup" tab and uncheck "GoogleUpdate" from the list.
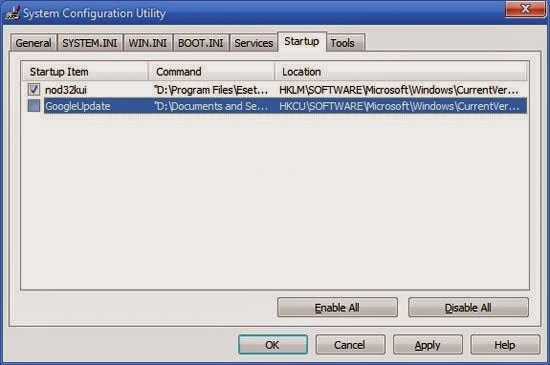
Apply the changes and restart your system.
PS: You can also use Registry Editor or any other 3rd party utility to remove startup entry. Windows Defender can also do the job.
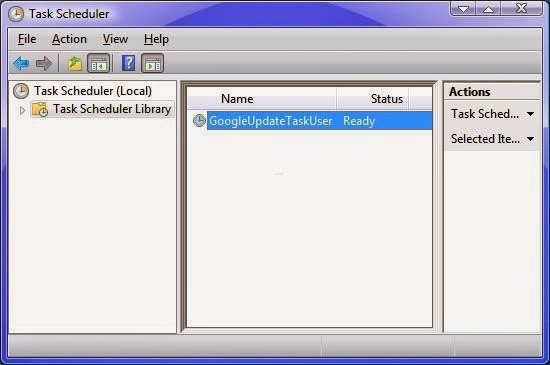
STEP 2: Now we'll need to remove the scheduled task created for GoogleUpdate.exe from our system. Open "Scheduled Tasks" or "Task Scheduler" from Control Panel or Programs menu. You can also run it by directly providing "taskschd.msc" command in RUN dialog box or by opening "%windir%\Tasks" folder.
Now look for the "GoogleUpdateTaskUser" task and delete it.
Windows XP:

Windows Vista and later:
You can also disable the task instead of deleting it.

STEP 3: Now the last thing. We'll need to remove the "GoogleUpdate.exe" file permanently so that it doesn't add its entry in startup.
Go to following folder:
C:\Documents and Settings\Administrator\Local Settings\Application Data\Google\Update
Replace C: with your system drive where Windows is installed and replace "Administrator" with your user name in Windows.
In the above folder, you'll find the "GoogleUpdate.exe" file. Delete the file.
Even if you End Task of this process, it automatically comes back after a few minutes or when you launch Chrome next time.
Actually this standalone exe file is used by Google Chrome to check for new updates. If it finds any update available, it downloads and installs it.
But its very annoying because it never asks before downloading or installing the updates and runs in background for all the time.
The most easiest way is to disallow "GoogleUpdate.exe" to access Internet using your system Firewall. You can create a new rule for it.
If you don't use any firewall or don't want to use the 1st method, then you can use following steps to permanently remove the "GoogleUpdate.exe" file from your system (after removing the file you'll no longer be able to update the Chrome web browser using its built-in update function )
STEP 1: First disable "GoogleUpdate.exe" from system startup. Type msconfig in RUN dialog box and press Enter. It'll open "System Configuration" window. Now go to "Startup" tab and uncheck "GoogleUpdate" from the list.
Apply the changes and restart your system.
PS: You can also use Registry Editor or any other 3rd party utility to remove startup entry. Windows Defender can also do the job.
STEP 2: Now we'll need to remove the scheduled task created for GoogleUpdate.exe from our system. Open "Scheduled Tasks" or "Task Scheduler" from Control Panel or Programs menu. You can also run it by directly providing "taskschd.msc" command in RUN dialog box or by opening "%windir%\Tasks" folder.
Now look for the "GoogleUpdateTaskUser" task and delete it.
Windows XP:
Windows Vista and later:
You can also disable the task instead of deleting it.
STEP 3: Now the last thing. We'll need to remove the "GoogleUpdate.exe" file permanently so that it doesn't add its entry in startup.
Go to following folder:
C:\Documents and Settings\Administrator\Local Settings\Application Data\Google\Update
Replace C: with your system drive where Windows is installed and replace "Administrator" with your user name in Windows.
In the above folder, you'll find the "GoogleUpdate.exe" file. Delete the file.
For more from the XpertCrewTM team please follow us on Twitter @Techvedic or
our Facebook Page-
or contact us at
U.S. +855-859-0057 (http://www.techvedic.com/ )
For more from the XpertCrewTM team please follow us on Twitter @Techvedic or
our Facebook Page-
or contact us at
U.S. +855-859-0057 (http://www.techvedic.com/ )
U.K. +800-635-0716 (http://www.techvedic.co.uk/ )
CA 1-855-749-5861 (http://www.techvedic.ca/ )
AU 1-800-197-298 (http://www.techvedic.com.au/ )
And yes, we are eagerly waiting for your valuable feedback. Do write us back. We would be more than happy to help you. We are available 24/7.


0 comments:
Post a Comment