Showing posts with label troubleshooting. Show all posts

Tuesday, 12 August 2014

Get “Hide Window When Minimized” Option Back in Windows Live Mail in Windows 7

When I installed Windows Live Mail in Windows 7, I found that "Hide window when minimized" option was missing in Windows Live Mail system tray context menu.

Its one of the most essential option. It allows you to minimize the Windows Live Mail window to system tray instead of taskbar. But its not shown in Windows 7 because of some compatibility issues.

Here is a step-by-step tutorial to get the "Hide window when minimized" option back in Windows Live Mail:

1. Right-click on the Windows Live Mail shortcut and select Properties. Here the shortcut might be present on Desktop, Programs menu or anywhere else.

2. Go to "Compatibility" tab and enable "Run this program in compatibility mode for:" option.

3. Select "Windows Vista" from the drop-down list and Apply it.


4. That's it. Now start Windows Live Mail and you'll get the option back in its system tray context menu:

----------------------------------------------------------------------------------------------------------------

Techvedic is worldwide recognized as an online tech support company that offers best technical support services for a range of third-party computer devices, including PC, phone, Mac, gaming console, tablet, network server, home theater etc. and on premise and cloud-storage applications meant for business and home users. Techvedic’s technical support are accessible as: on-site, online and at repair labs.

About Techvedic : http://en.wikipedia.org/wiki/Techvedic

Get in touch with Techvedic on Social Media:

Techvedic Facebook Page: https://www.facebook.com/techvedic
Techvedic Twitter : https://twitter.com/techvedic
Techvedic Google Plus Page:  https://plus.google.com/+TechvedicInc/posts
Techvedic Youtube: https://www.youtube.com/user/Techvedic
Techvedic Linkidin Profile: https://www.linkedin.com/company/techvedic


Visit: Techvedic - Computer Tech Support Company |  http://www.techvedic.co.uk/  |  0800 016 3909 (UK)  |  support@techvedic.com

Thursday, 7 August 2014

Force Caps Lock, Num Lock and Scroll Lock Keys Behavior Using Windows Registry

Its a very common problem among Windows users. Whenever Windows starts, it automatically turns "CapsLock", "NumLock" or "ScrollLock" keys On at login screen even if you turned the keys off before the login or boot screen.

If you want to permanently change their behavior, then you can use following steps to do so:

1. Type regedit in RUN dialog box and press Enter. It'll open Registry Editor.

2. Now go to following key:

To change the behavior for currently logged in user:
HKEY_CURRENT_USER\Control Panel\Keyboard

To change the behavior for all users:
HKEY_USERS\.DEFAULT\Control Panel\Keyboard

3. Now in right-side pane, change value of "InitialKeyboardIndicators" string value to any of following:

0 - Turn all indicators Off (NumLock, CapsLock, ScrollLock)
1 - Turn CapsLock On
2 - Turn NumLock On
3 - Turn CapsLock and NumLock On
4 - Turn ScrollLock On
5 - Turn CapsLock and ScrollLock On
6 - Turn NumLock and ScrollLock On
7 - Turn all indicators On (NumLock, CapsLock, ScrollLock)


4. That's it. Exit registry editor and restart your system to take effect.

---------------------------------------------------------------------------------------------------------------------

Techvedic is perceived as an online technical support organization that offers best specialized Services for PC gadgets, PCs, telephones, Macs, gaming devices, tablets, system servers, home theaters. Techvedic also offers distributed storage applications for business and home users. Techvedic's specialized backing solution are available - on location, online and at repair labs.


Get in touch with Techvedic on Social Media:

Techvedic Facebook Page: https://www.facebook.com/techvedic
Techvedic Twitter : https://twitter.com/techvedic
Techvedic Google Plus Page:  https://plus.google.com/+TechvedicInc/posts
Techvedic Youtube: https://www.youtube.com/user/Techvedic
Techvedic Linkidin Profile: https://www.linkedin.com/company/techvedic


Visit: Techvedic - Computer Tech Support Company |  http://www.techvedic.co.uk/  |  0800 016 3909 (UK)  |  support@techvedic.com

Restore Default Smart Bookmarks Folders in Mozilla Firefox?

Mozilla Firefox 3.0 comes with "Smart Bookmarks Folders". These folders work like saved searches and update automatically. If you don't know about them, then click on "Bookmarks" menu and you'll see following 3 smart bookmarks folders along with your other custom bookmarks


Easy steps to get the default "Smart Bookmarks Folders" back in Firefox:

1. Open Firefox and type about:config in the addressbar and press Enter. It'll confirm, click on I'll be careful, I promise! button.

2. Now type smart in the Filter box. It'll show following entry:

browser.places.smartBookmarksVersion

3. Double-click on it or right-click on it and select "Modify", now set its value to 0


4. That's it. Now restart Firefox and all 3 default Smart Bookmarks folders will be back.

-------------------------------------------------------------------------------------------------------


Controlled by greatly experienced and qualified specialists, Techvedic offers online PC technical support to all kinds of Pcs and cell phones and their applications – on line and on premise. Techvedic are the best administrators of the IT utilized services for home and business.


Get in touch with Techvedic on Social Media:

Techvedic Facebook Page: https://www.facebook.com/techvedic
Techvedic Twitter : https://twitter.com/techvedic
Techvedic Google Plus Page:  https://plus.google.com/+TechvedicInc/posts
Techvedic Youtube: https://www.youtube.com/user/Techvedic
Techvedic Linkidin Profile: https://www.linkedin.com/company/techvedic


Visit: Techvedic - Computer Tech Support Company |  http://www.techvedic.co.uk/  |  0800 016 3909 (UK)  |  support@techvedic.com

Thursday, 31 July 2014

Disable Mozilla Crash Reporter aka “Breakpad” in Firefox, Thunderbird and SeaMonkey

"Breakpad" is a new crash reporting system from Mozilla which is a core part of Mozilla Firefox 3.x, Thunderbird 3.x and SeaMonkey 2.x products. It was developed to replace the old "Quality Feedback Agent" aka "Talkback" present in previous versions.

Whenever any of these 3 Mozilla products crashes, Mozilla crash reporter shows a window asking you to send the crash report to Mozilla servers and allows you to quit or restart the application:


If you want to disable this crash reporter, you can do it by simply editing an INI file:

1. Open My computer and go to the installation directory of the application:


Mozilla Firefox: %programfiles%\Mozilla Firefox
Thunderbird: %programfiles%\Mozilla Thunderbird
SeaMonkey: %programfiles%\mozilla.org\SeaMonkey

Here "%programfiles%" stands for "C:\Program Files" folder. Replace C: with your system drive letter where Windows is installed.

2. Now look for "application.ini" file and open it in Wordpad.

3. At the end of the file, you'll see following lines:

[Crash Reporter]
Enabled=1
ServerURL=https://crash-reports.mozilla.com/submit

4. Simply change the value of Enabled to 0 as following:


[Crash Reporter]
Enabled=0
ServerURL=https://crash-reports.mozilla.com/submit

5. Save the file and now you'll no longer see the Crash reporter window.


-------------------------------------------------------------------------------------------------------


Techvedic brings industry-compliant cloud-based Customer Relationship Management (CRM) solution for startups, small and medium businesses and contact centers.  Empower your people in sales, marketing and customer service to serve customers efficiently with effective collaboration and drive business growth.


Get in touch with Techvedic on Social Media:

Techvedic Facebook Page: https://www.facebook.com/techvedic
Techvedic Twitter : https://twitter.com/techvedic
Techvedic Google Plus Page:  https://plus.google.com/+TechvedicInc/posts
Techvedic Linkidin Profile: https://www.linkedin.com/company/techvedic


Visit: Techvedic - Computer Tech Support Company |  http://www.techvedic.co.uk/  |  0800 016 3909 (UK)  |  support@techvedic.com

Tuesday, 29 July 2014

Play All” Option Opens “Copy Items” and “Move Items” Dialog Box in Windows XP

Problem Description:

The problem occurs when you select a media file (it might be an audio or video file) and click on "Play All" link given in common tasks section (the sidebar present on the left in Windows Explorer):


It opens 2 annoying dialog boxes. First a "Copy Items" dialog box appears.


When you close it another "Move Items" dialog box appears.


Solution:

Follow these simple steps:

1. Type regedit in RUN dialog box and press Enter. It'll open Registry Editor.

2. Now go to following key:


HKEY_CLASSES_ROOT\AllFilesystemObjects\shellex\ContextMenuHandlers\

3. Remove Copy To and Move To keys under it.


4. That's it. Now you'll not see those 2 annoying dialog boxes any more.

------------------------------------------------------------------------------------------------------------------

Techvedic brings professional technology support, cloud backup and recovery solutions, cloud-based CRM solutions and e-Commerce website builder for individuals and businesses. Taking delve into the market and understanding the needs of customers and partners, we bring services that are highly result-oriented to let them derive the best value from their IT investment. Get in touch with a Techvedic consultant today at 0800 016 3909  (Toll Free) to know more.

About Techvedic: http://en.wikipedia.org/wiki/Techvedic

Get in touch with Techvedic on Social Media:

Techvedic Facebook Page: https://www.facebook.com/techvedic
Techvedic Twitter : https://twitter.com/techvedic
Techvedic Google Plus Page:  https://plus.google.com/+TechvedicInc/posts
Techvedic Youtube: https://www.youtube.com/user/Techvedic
Techvedic Linkidin Profile: https://www.linkedin.com/company/techvedic


Visit: Techvedic - Computer Tech Support Company |  http://www.techvedic.co.uk/  |  0800 016 3909 (UK)  |  support@techvedic.com

Thursday, 24 July 2014

Remove “Send Feedback” Link in Windows 7 Beta?

If you have installed Windows 7 beta, you might have noticed the small "Send Feedback" link present in titlebar of all windows and dialog boxes.


1. Type regedit in RUN or Start Menu search box and press Enter. It'll open Registry Editor.

2. Now go to following key:

HKEY_CURRENT_USER\Control Panel\Desktop

3. Now create a new DWORD value FeedbackToolEnabled and set its value to 0

4. Restart or log off and you'll not see that annoying link any more.


--------------------------------------------------------------------------------------------------------------------

Looking for tech support, cloud backup and recovery services, CRM solutions, or e-Commerce website builder? If yes, take a pause. Here is Techvedic to offer on-demand and result-oriented solution to help you unleash your potential by making the most of technology. For consultation or support, feel free to call us at 0800 016 3909 (Toll Free).

About Techvedic: http://en.wikipedia.org/wiki/Techvedic

Get in touch with Techvedic on Social Media:

Techvedic Facebook Page: https://www.facebook.com/techvedic
Techvedic Twitter : https://twitter.com/techvedic
Techvedic Google Plus Page:  https://plus.google.com/+TechvedicInc/posts
Techvedic Youtube: https://www.youtube.com/user/Techvedic
Techvedic Linkidin Profile: https://www.linkedin.com/company/techvedic


Visit: Techvedic - Computer Tech Support Company |  http://www.techvedic.co.uk/  |  0800 016 3909 (UK)  |  support@techvedic.com

How to Get the Old Thin Taskbar Buttons with Text in Windows 7?

Here are the steps

1. Right-click on Taskbar and select Properties.

2. Now enable "Use small icons" option.

3. You'll also see that "Taskbar buttons" option would be set to "Always combine, hide labels". Change it to either "Combine when taskbar is full" or "Never combine".

"Combine when taskbar is full" option will group same program buttons in taskbar like Windows XP and Vista. "Never combine" option will disable grouping.


4. That's it. Apply the changes and you can enjoy the same old thin taskbar with program text in Windows 7.

-----------------------------------------------------------------------------------------------------------------

From online computer repair to setup and installation to security and optimization – get everything at one place. Welcome to Techvedic. We are here to make technology work for you the way you want. Get in touch with our experienced professionals over the phone:  0800 016 3909 (Toll Free). Remember, we are not constrained by the brand make or model or even the warranty status. Cheers!

About Techvedic: http://en.wikipedia.org/wiki/Techvedic

Get in touch with Techvedic on Social Media:

Techvedic Facebook Page: https://www.facebook.com/techvedic
Techvedic Twitter : https://twitter.com/techvedic
Techvedic Google Plus Page:  https://plus.google.com/+TechvedicInc/posts
Techvedic Youtube: https://www.youtube.com/user/Techvedic
Techvedic Linkidin Profile: https://www.linkedin.com/company/techvedic


Visit: Techvedic - Computer Tech Support Company |  http://www.techvedic.co.uk/  |  0800 016 3909 (UK)  |  support@techvedic.com

Tuesday, 22 July 2014

Disable or Change a Key Action in Your Keyboard Using Sharp Keys?

Disable or Change a Key Action in Your Keyboard Using Sharp Keys?

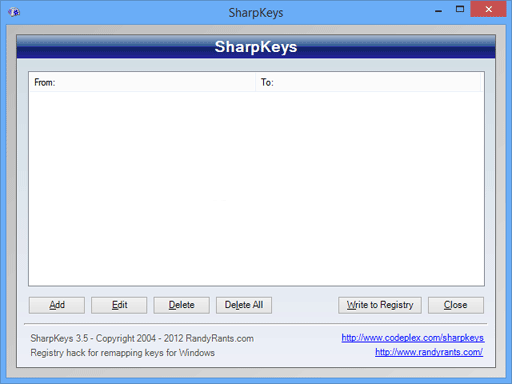
"SharpKeys" is a very small application which does an excellent job in remapping the keys. You can disable any unwanted key or you can convert any key into any other key. The bottom line is that you can customize almost all keys in your keyboard according to your requirement.


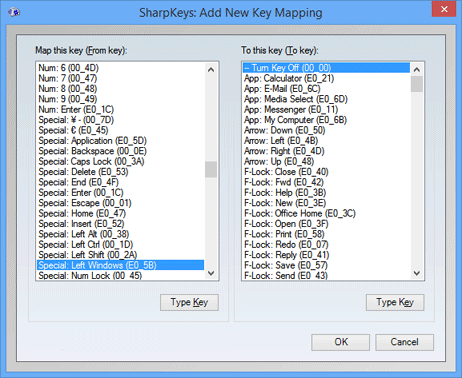
Once you launch the program, click on "Add" button to change any key's function or disable it. You'll get following window:


You can either select the key from the given list or can manually type the key using "Type Key" button. Using "Type Key" button is the best and easiest way. First click on "Type Key" button in "From Key" section and press the key which you want to change. Then click on "Type Key" button in "To Key" section and now press the key which you want to assign to the previous key. If you want to disable a key, simply select "Turn Key Off" option present at top in the "To Key" section.

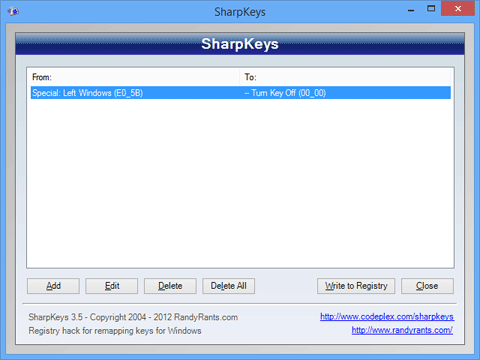
Once you complete, click on "OK" button and it'll show the conversion in the list:


At last click on "Write to Registry" button. It'll show a message that you'll need to restart or log off your system to take affect. Once you restart the system, your desired key will be changed or disabled as per your requirements.


---------------------------------------------------------------------------------------------------------------

Get customized and affordable technology support, cloud-based backup and recovery service, cloud CRM and e-Commerce website builder from Techvedic. Our aim is to help consumers and businesses drive the maximum from their IT investment. Call us at 0800 016 3909 (Toll Free) to speak with our consultant today.


Get in touch with Techvedic on Social Media:

Techvedic Facebook Page: https://www.facebook.com/techvedic
Techvedic Twitter: https://twitter.com/techvedic
Techvedic Google Plus Page:  https://plus.google.com/+TechvedicInc/posts
Techvedic YouTube: https://www.youtube.com/user/Techvedic
Techvedic LinkedIn Profile: https://www.linkedin.com/company/techvedic


Visit: Techvedic - Computer Tech Support Company | http://www.techvedic.co.uk/ | 0800 016 3909 (UK) | support@techvedic.com

Hide Window When Minimized” Option Back in Windows Live Mail in Windows 7

To get the "Hide window when minimized" option back in Windows Live Mail:

1. Right-click on the Windows Live Mail shortcut and select Properties. Here the shortcut might be present on Desktop, Programs menu or anywhere else.

2. Go to "Compatibility" tab and enable "Run this program in compatibility mode for:" option.

3. Select "Windows Vista" from the drop-down list and Apply it.


4. That's it. Now start Windows Live Mail and you'll get the option back in its system tray context menu:


-----------------------------------------------------------------------------------------------------------------

Fix PC, Mac, Tablet, Phone, TV and home theater, gaming console, home automation system and more by calling Techvedic Certified Experts at  0800 016 3909 (Toll Free). Techvedic is a one-stop technology support center for all IT products. No matter where you purchased the product from, we are here to make your technology experience smooth and error-free.


Get in touch with Techvedic on Social Media:

Techvedic Facebook Page: https://www.facebook.com/techvedic
Techvedic Twitter: https://twitter.com/techvedic
Techvedic Google Plus Page:  https://plus.google.com/+TechvedicInc/posts
Techvedic YouTube: https://www.youtube.com/user/Techvedic
Techvedic LinkedIn Profile: https://www.linkedin.com/company/techvedic


Visit: Techvedic - Computer Tech Support Company | http://www.techvedic.co.uk/ | 0800 016 3909 (UK) | support@techvedic.com