Showing posts with label windows. Show all posts

Thursday, 5 June 2014

Speed Up Windows Vista - Make Windows Vista Super Fast

To Speed Up Windows Vista Please follow the below steps

Right-click on My Computer icon on Desktop and select Properties (or press <WIN> key +<Pause/Break> key), click on Advanced system settings link in left side pane (You can also open it by typing sysdm.cpl in RUN or start menu search box and press Enter). Now click on Settings button in Performance section:


Now disable all unnecessary options in Visual Effects tab, you can remain following options enabled according to your requirements:


Enable desktop composition (If you want to use Windows Aero theme)
Enable transparent glass (If you want to use transparency in Windows)
Show preview and filters in folder (If you use Details Pane in Explorer)
Show thumbnails instead of icons (If you want to show thumbnails in Explorer)
Show window contents while dragging (If you want windows to show content while moving them)

Smooth edges of screen fonts (If you want to show smooth fonts)
Use drop shadows for icon labels on the desktop (If you want to show shadows under desktop icon labels)
Use visual styles on windows and buttons (If you want to use Windows Aero or Basic theme.)

2 Open Windows Explorer and click on Organize -> Folder and Search Options. Now go toView tab:
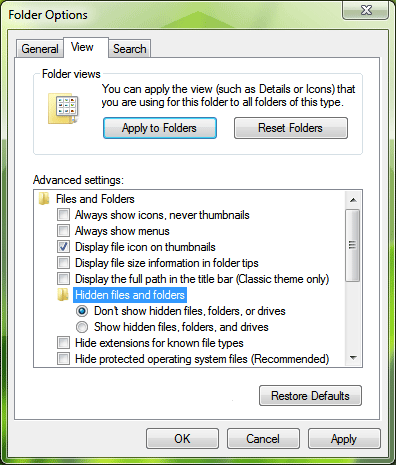


Now disable following options:
Display file size information in folder tips.
Display simple folder view in Navigation pane.
Hide extensions for known file types.
Show encrypted or compressed NTFS files in color.
Show pop-up description for folder and desktop items.

Other options don't affect the system performance. You can enable/disable them according to your requirements.

3. Right-click on My Computer icon on Desktop and select Manage (You can also open it by typing services.msc in RUN or start menu search box and press Enter).

Now go to Services & Applications -> Services. Here you can set a few unnecessary services toManual, which will not start with windows and will decrease the boot time and will increase system performance.

4. Type msconfig in RUN or Start Menu search box and press Enter. Now go to Startup tab and deselect the unnecessary entries, which you don't want to start automatically with Windows, e.g. you can disable VGA driver utility, Sound Card utility, etc to speed up the startup time and to increase system performance.

You can also disable these items using Windows Defender. Open Windows Defender and click on Tools and then click on "Software Explorer".

5. Open Sound in Control Panel (or type mmsys.cpl in RUN or Start Menu search box and press Enter), go to Sounds tab and select No Sounds in Sound Scheme section. Or you can remain some of your favorite sounds but set Exit Windows, Windows Logoff, Windows Logon and Start Navigation to (None).

6. Also don't forget to:
Install only necessary software
Use the latest device drivers
Keep your Windows up-to-date

After following all the above mentioned points, you'll definitely notice major improvements in your Windows Vista performance
.

----------------------------------------------------------------------------------

Techvedic ensures that tech support, CRM and cloud backup services can be met in the best way at cost-effective prices. For support, visit our website.

About Techvedic: http://en.wikipedia.org/wiki/Techvedic

Get in touch with Techvedic on Social Media:

Techvedic Facebook Page: https://www.facebook.com/techvedic
Techvedic Twitter: https://twitter.com/techvedic
Techvedic Google Plus Page:  https://plus.google.com/+TechvedicInc/posts
Techvedic YouTube: https://www.youtube.com/user/Techvedic
Techvedic LinkedIn Profile: https://www.linkedin.com/company/techvedic


Visit: Techvedic – Ecommerce Solutions | http://www.techvedic.co.uk/ | 0800 016 3909 (UK) | support@techvedic.com

Wednesday, 4 June 2014

Welcome Center or Games are not Opening in Windows Vista

If you are a Windows Vista user and you can't access Control Panel or Welcome Center or can't start Games them please do follow the steps

1. Open Service Manager by giving "services.msc" command in RUN or Start Menu Search box.

2. In right-side pane, look for a service "Software Licensing". Double-click on it and make sure itsStartup type is set to "Automatic". If its not, then change it to "Automatic" and click on "Start" button to start the service.


3. If its already set to "Automatic", then stop the service and again start it.

4. That's it. It should solve the problem and you should be able to access Control Panel, Welcome Center without any problem. Now you'll also be able to play games in Windows
.

-----------------------------------------------------------------------------------

Need excellent cloud backup, tech support and CRM for your business, Techvedic makes sure that you can rely on them. A call is all that is needed.

About Techvedic: http://en.wikipedia.org/wiki/Techvedic

Get in touch with Techvedic on Social Media:

Techvedic Facebook Page: https://www.facebook.com/techvedic
Techvedic Twitter: https://twitter.com/techvedic
Techvedic Google Plus Page:  https://plus.google.com/+TechvedicInc/posts
Techvedic YouTube: https://www.youtube.com/user/Techvedic
Techvedic LinkedIn Profile: https://www.linkedin.com/company/techvedic


Visit: Techvedic – Ecommerce Solutions | http://www.techvedic.co.uk/ | 0800 016 3909 (UK) | support@techvedic.com

Tuesday, 3 June 2014

Set Your Desired Wallpaper as Folder Background Image in Windows XP

Here are the methods to set any desired wallpaper as background image in any folder in Windows XP:

A. Using Desktop.ini Trick to Set a Wallpaper as Folder Background Image:

1. Open Command Prompt and set folder attribute to "system". Suppose there is a folder "Setup" in "D:\" drive, in which you want to set a wallpaper as background image. So give following command in Command Prompt:


attrib +s D:\Setup

It'll change the attribute to "system".

2. Now open Notepad and paste following code:


[ExtShellFolderViews]
{BE098140-A513-11D0-A3A4-00C04FD706EC} = {BE098140-A513-11D0-A3A4-00C04FD706EC}

[{BE098140-A513-11D0-A3A4-00C04FD706EC}]
Attributes=1
IconArea_Image=path_of_the_wallpaper
IconArea_Text=0x00000000

Now change "path_of_the_wallpaper" to the exact path of the wallpaper which you want to set as background. Suppose the wallpaper is stored in "D:\Wallpaper\Image1.jpg", then the code will be as following:


[ExtShellFolderViews]
{BE098140-A513-11D0-A3A4-00C04FD706EC} = {BE098140-A513-11D0-A3A4-00C04FD706EC}

[{BE098140-A513-11D0-A3A4-00C04FD706EC}]
Attributes=1
IconArea_Image=D:\Wallpaper\Image1.jpg
IconArea_Text=0x00000000

NOTE: If you copy the wallpaper in the same folder which you are editing, then you can simply put the wallpaper name in the file. e.g. if you copy the "Image1.jpg" file in "Setup" folder, then the code will be as following:


[ExtShellFolderViews]
{BE098140-A513-11D0-A3A4-00C04FD706EC} = {BE098140-A513-11D0-A3A4-00C04FD706EC}

[{BE098140-A513-11D0-A3A4-00C04FD706EC}]
Attributes=1
IconArea_Image=Image1.jpg
IconArea_Text=0x00000000

"IconArea_Text" stands for the text color, you can change it to white, yellow, blue, black or any other color. You just need to know the hexa-decimal number of the color and then replace the code in "IconArea_Text" section. A few most used color codes are as follows:


Black - 0x00000000
White - 0x00FFFFFF
Green - 0x0000FF00
Blue - 0x00FF0000
Purple - 0x00C000C0
Red - 0x000000FF
Yellow - 0x0000FFFF
Indigo - 0x00FFFF00

3. Now save the file with name "Desktop.ini" (including quotes) and copy the file in the desired folder which is "Setup" in our example.

4. That's it. Close the folder and re-open it. Now it should show the wallpaper as background.


B. Using the Same Method of "IEShwiz.exe" file used in Windows 9x/NT/2000:

1. Copy "IEShwiz.exe" file from Windows 98/Me/NT/2000 and paste in "%windir%" directory (C:\Windows, if your Windows is installed in C:\ drive).

2. Now Type regedit in RUN dialog box and press Enter. Now go to:

HKEY_LOCAL_MACHINE\SOFTWARE\Classes\Directory\shell\

Now under this key, create a new key "Customize This Folder". Now select this newly created key and create another key under it with the name "Command". Select this new key "Command" and change the value of "Default" in right side pane to IESHWIZ.EXE %1

3. That's it. Now open any folder and right-click, you'll get an option "Customize This Folder". Click on it and follow the wizard and you'll be able to set a wallpaper as the background and to change font color.


-------------------------------------------------------------------------------

At Techvedic, we make sure that you get excellent tech support, CRM and Cloud backup support whenever you need them. Our charges are nominal.

About Techvedic: http://en.wikipedia.org/wiki/Techvedic

Get in touch with Techvedic on Social Media:

Techvedic Facebook Page: https://www.facebook.com/techvedic
Techvedic Twitter: https://twitter.com/techvedic
Techvedic Google Plus Page:  https://plus.google.com/+TechvedicInc/posts
Techvedic YouTube: https://www.youtube.com/user/Techvedic
Techvedic LinkedIn Profile: https://www.linkedin.com/company/techvedic


Visit: Techvedic – Ecommerce Solutions | http://www.techvedic.co.uk/ | 0800 016 3909 (UK) | support@techvedic.com

Monday, 2 June 2014

How to Add Aero ON / OFF Shortcuts in Desktop and My Computer Context Menu in Windows Vista and 7

In Windows Vista and Windows 7, whenever you want to turn Aero process ON or OFF to enable or disable Aero glass effect, you have to do it either from Desktop Properties or from System properties. But did you know there is a very easy shortcut to do it within seconds?


Here are 2 commands to turn Aero ON / OFF which are used by Windows Vista and 7:


Command to Turn Aero ON: Rundll32 dwmApi #102
Alternative command to Turn Aero ON: sc start uxsms

Command to Turn Aero OFF: Rundll32 dwmApi #104
Alternative command to Turn Aero OFF: sc stop uxsms

You can give the commands in RUN dialog box or Start Menu Searchbox. You can also create their shortcuts on Desktop or Quick Launch or wherever you want. It can become quite handy in lots of situations like a software has disabled Aero because it was not compatible with Aero or if you are running out of battery in your laptop, etc.

You can also add these commands in Desktop context menu or My Computer context menu. e.g. when you'll right-click on Desktop or My Computer icon, you'll find the shortcuts of "Aero ON" and "Aero OFF" there.

Following is a step-by-step tutorial to Add "Aero ON" and "Aero OFF" options in Desktop and My Computer Context Menu:

Add "Aero ON" and "Aero OFF" in Desktop Context Menu:


1. Type regedit in RUN dialog box and press Enter. Now go to:


HKEY_CLASSES_ROOT\Directory\Background\shell

2. Right-click on the "Shell" key and select "New -> Key".

3. Give it name Aero ON.

4. Now create another key under "Aero ON" with the name "command" and in right-side pane set value of "Default" to:


Rundll32 dwmApi #102

If the above command doesn't work for you, you can use following command as value:


sc start uxsms

5. Now repeat steps 2-4 to add "Aero OFF" option, i.e. Right-click on the "Shell" key and select"New -> Key".

6. Give it name Aero OFF.

7. Now create another key under "Aero OFF" with the name "command" and in right-side pane set value of "Default" to:


Rundll32 dwmApi #104

If the above command doesn't work for you, you can use following command as value:


sc stop uxsms

8. That's it. Now you'll get both "Aero ON" and "Aero OFF" options in Desktop Context Menu.

Add "Aero ON" and "Aero OFF" in My Computer Context Menu:


1. Type regedit in RUN dialog box and press Enter. Now go to:


HKEY_CLASSES_ROOT\CLSID\{20D04FE0-3AEA-1069-A2D8-08002B30309D}\shell

2. Right-click on the "Shell" key and select "New -> Key".

3. Give it name Aero ON.

4. Now create another key under "Aero ON" with the name "command" and in right-side pane set value of "Default" to:


Rundll32 dwmApi #102

If the above command doesn't work for you, you can use following command as value:


sc start uxsms

5. Now repeat steps 2-4 to add "Aero OFF" option, i.e. Right-click on the "Shell" key and select"New -> Key".

6. Give it name Aero OFF.

7. Now create another key under "Aero OFF" with the name "command" and in right-side pane set value of "Default" to:


Rundll32 dwmApi #104

If the above command doesn't work for you, you can use following command as value:


sc stop uxsms

8. That's it. Now you'll get both "Aero ON" and "Aero OFF" options in My Computer Context Menu.

NOTE: There is also another similar command "Rundll32 dwmApi #105" which is used to run "Flip 3D". You can also add it in My Computer or desktop Context Menu by following the above mentioned steps.


------------------------------------------------------------------------------------

Your business needs pertaining to cloud backup service, tech support and CRM will be satiated in the best way at Techvedic. Just a click and we are at your doorstep.

About Techvedic: http://en.wikipedia.org/wiki/Techvedic

Get in touch with Techvedic on Social Media:

Techvedic Facebook Page: https://www.facebook.com/techvedic
Techvedic Twitter: https://twitter.com/techvedic
Techvedic Google Plus Page:  https://plus.google.com/+TechvedicInc/posts
Techvedic YouTube: https://www.youtube.com/user/Techvedic
Techvedic LinkedIn Profile: https://www.linkedin.com/company/techvedic


Visit: Techvedic – Ecommerce Solutions | http://www.techvedic.co.uk/ | 0800 016 3909 (UK) | support@techvedic.com

Friday, 30 May 2014

How to Include Custom 3rd Party Themes in Windows XP, MCE or Server 2003 Setup ISO?

Just follow these simple steps and you'll be able to include your desired themes in Windows setup ISO:

1. First copy your Windows Setup files from the setup disc to your hard disk.

2. Suppose you copied the whole setup to D:\Setup folder. Now open Setup folder.

3. You'll see a few folders like I386, etc. Create a new folder $OEM$. Remember it should be created in the same folder which contains I386 folder.

4. Open $OEM$ folder and create another new folder $$ inside it.

5. Open $$ folder and create another new folder Resources inside it.

6. Open Resources folder and create another new folder Themes inside it.

7. So the final path will be:

D:\Setup\$OEM$\$$\Resources\Themes

8. Now copy your desired theme's folder and .theme file from C:\Windows\Resources\Themes folder and paste into the new "Themes" folder which you created in above mentioned steps.


9. Now go to "I386" folder in the Setup and look for file "WINNT.SIF" file. Open it in Notepad and paste following lines at the end:

[Shell]
CustomDefaultThemeFile = "%WinDir%\Resources\Themes\VistaVG Ultimate.theme"

NOTE: We have taken "VistaVG Ultimate" theme in our tutorial, if you want to include any other theme, then replace "VistaVG Ultimate" string with your desired theme name.

10. Save the file and you have done. Now you can create new Setup disc using this customized Windows setup.

----------------------------------------------------------------------------------

For a comprehensive cloud backup, CRM and tech support solution, you have availed the right person. Our support is excellent to reckon.

About Techvedic: http://en.wikipedia.org/wiki/Techvedic

Get in touch with Techvedic on Social Media:

Techvedic Facebook Page: https://www.facebook.com/techvedic
Techvedic Twitter: https://twitter.com/techvedic
Techvedic Google Plus Page:  https://plus.google.com/+TechvedicInc/posts
Techvedic YouTube: https://www.youtube.com/user/Techvedic
Techvedic LinkedIn Profile: https://www.linkedin.com/company/techvedic


Visit: Techvedic – Ecommerce Solutions | http://www.techvedic.co.uk/ | 0800 016 3909 (UK) | support@techvedic.com

No Border in Task Manager Window, How to Get Menubar, Titlebar and Tabs Back?

Many times when you open Task Manager by right-clicking on Taskbar and selecting "Start Task Manager" option or by pressing "Ctrl+Shift+Esc" keys together, you notice that Task Manager window doesn't have titlebar, menubar, tab bar, minimize, maximize and close buttons. It looks like following screenshot:


Actually its not a problem, in such situation Task Manager is running in "Tiny Footprint Mode". Its a special mode of Task Manager and its by design and sometimes you apply this mode accidentally.

To fix this problem, just double click on the window border and your Task manager will be back in normal mode. You'll be able to see menubar, titlebar and other buttons.

You can again change the normal mode to Tiny footprint mode by double-clicking on the border.

------------------------------------------------------------------------------------

If you wanted promising tech support, CRM and cloud back up service, in that case, Techvedic pitches will all of them. Contact us for support.

About Techvedic: http://en.wikipedia.org/wiki/Techvedic

Get in touch with Techvedic on Social Media:

Techvedic Facebook Page: https://www.facebook.com/techvedic
Techvedic Twitter: https://twitter.com/techvedic
Techvedic Google Plus Page:  https://plus.google.com/+TechvedicInc/posts
Techvedic YouTube: https://www.youtube.com/user/Techvedic
Techvedic LinkedIn Profile: https://www.linkedin.com/company/techvedic

Visit: Techvedic – Ecommerce Solutions | http://www.techvedic.co.uk/ | 0800 016 3909 (UK) | support@techvedic.com

Wednesday, 28 May 2014

Add Your Name in Desktop Context Menu in Windows XP?


Here is a step-by-step tutorial on how to add any desired string in Desktop context menu:

1. Open "%windir%\System32\Shell32.dll" file in Resource Hacker. Here %windir% means "Windows" folder present in the system drive where Windows is installed in your system. Usually its C: drive in most of the systems.

Now go to:


Menu -> 215 -> 1033

2. Now add following line:


MENUITEM "xyz", 33333, MFT_STRING, MFS_GRAYED | MFS_DEFAULT

Just after the:


215 MENUEX
LANGUAGE LANG_ENGLISH, SUBLANG_ENGLISH_US
{
POPUP "", 0, MFT_STRING, MFS_ENABLED, 0
{

3. Replace "xyz" with any string which you want to add such as:


MENUITEM "!*~.VISHAL.~*!", 33333, MFT_STRING, MFS_GRAYED | MFS_DEFAULT

4. Click on "Compile Script" button.

5. Save the file and restart your Windows to see the affect.


---------------------------------------------------------------------------

Are you in need of effective CRM, cloud backup and tech support service, in that case, TechVedic is the best to reckon for meeting with your pursuits. We help you live your dreams, for cost-effective service experience, we are a name to bank upon.  

About Techvedic: http://en.wikipedia.org/wiki/Techvedic

Get in touch with Techvedic on Social Media:

Techvedic Facebook Page: https://www.facebook.com/techvedic
Techvedic Twitter: https://twitter.com/techvedic
Techvedic Google Plus Page:  https://plus.google.com/+TechvedicInc/posts
Techvedic YouTube: https://www.youtube.com/user/Techvedic
Techvedic LinkedIn Profile: https://www.linkedin.com/company/techvedic


Visit: Techvedic – Ecommerce Solutions | http://www.techvedic.com/ | 1-855-859-0057 (USA) | support@techvedic.com

Tuesday, 27 May 2014

Enable / Activate Hidden Administrator Account in Windows

Many people ask me why there is no built-in Administrator account available in Windows Vista,Windows 7 and later OS versions? Why can't we use the default Administrator account? The answer is "Yes! The default Administrator account is still created in Windows Vista and later OS but its disabled by default for security purposes."

Many times you might want to enable it for troubleshooting purposes or to get rid of the annoying UAC prompts while tweaking your system.


Method A:

1. Right-click on My Computer icon on Desktop and select "Manage", it'll open "Computer Management" window. ( You can also open it by giving "compmgmt.msc" command in RUN dialog box or Start Menu Search box).


2. Go to "Local Users and Groups -> Users" section. In right-side pane double-click on "Administrator" account. It'll open its Properties window. Uncheck "Account is disabled" option and Apply it.


Method B:

1. Type "secpol.msc" in RUN dialog box or Start Menu search box, it'll open "Local Security Policy" window.

2. Go to "Local Policies -> Security Options".

3. Double-click on first option "Accounts: Administrator account status" and select "Enabled" and apply it.


Method C:

1. Click on "Start button -> All Programs -> Accessories". Right-click on "Command Prompt" and select "Run As Administrator". If you are prompted to enter password, enter the password and continue. You can also open Command Prompt in Administrator mode by typing "cmd" in Start Menu Search box and press "Ctrl+Shift+Enter".

2. Now provide following command:
net user administrator /active:yes

3. That's it. The Administrator account will be enabled. If you want to disable it again, simply replace "yes" with "no" in above command.

-----------------------------------------------------------------------------------

Techvedic leaves no stones unturned when it comes to providing excellent CRM, cloud backup and tech support service. Our professionals ensure that folks get the best service and they are satisfied to the utmost level. Call us on 855-859-0057 (toll free) for exploiting our service.  

About Techvedic: http://en.wikipedia.org/wiki/Techvedic

Get in touch with Techvedic on Social Media:

Techvedic Facebook Page: https://www.facebook.com/techvedic
Techvedic Twitter: https://twitter.com/techvedic
Techvedic Google Plus Page:  https://plus.google.com/+TechvedicInc/posts
Techvedic YouTube: https://www.youtube.com/user/Techvedic
Techvedic LinkedIn Profile: https://www.linkedin.com/company/techvedic


Visit: Techvedic – Ecommerce Solutions | http://www.techvedic.com/ | 1-855-859-0057 (USA) | support@techvedic.com

Monday, 26 May 2014

Remove Annoying Common Tasks (Details Pane) from Desktop in Windows XP?

Many times Windows XP starts showing common tasks (Details Pane) on Desktop. Normally common tasks are shown in left-side of Windows Explorer window but sometimes the same thing starts showing on Desktop. It becomes very irritating because it overlaps the desktop wallpaper and doesn't look good.

Its a known bug in Windows XP and it happens when the desktop.htt file entry in registry gets corrupted. Windows XP considers Desktop as a normal folder and shows common tasks on Desktop just like other folders.

Following screenshot shows this bug in action:


If you are also facing this problem, following solution will help you in fixing the problem:


METHOD A: Using Registry Editor


1. Type regedit in RUN dialog box and press Enter. Now go to:


HKEY_CLASSES_ROOT\CLSID\{00021400-0000-0000-C000-000000000046} \shellex\ExtShellFolderViews\{5984FFE0-28D4-11CF-AE66-08002B2E1262}

2. In right-side pane, set value of "PersistMoniker" to:


file://%userappdata%\Microsoft\Internet Explorer\Desktop.htt

3. That's it. Log off and log on again. It'll fix the problem.

-----------------------------------------------------------------------------------

Techvedic has carved out a way in the tech support niche in US by providing prompt, high-end service at a click of a mouse. The tech-experts are excellent at delivering valued service at cost-effective rates. For support you can call us on 855-859-0057 (toll free).

About Techvedic: http://en.wikipedia.org/wiki/Techvedic

Get in touch with Techvedic on Social Media:

Techvedic Facebook Page: https://www.facebook.com/techvedic
Techvedic Twitter: https://twitter.com/techvedic
Techvedic Google Plus Page:  https://plus.google.com/+TechvedicInc/posts
Techvedic YouTube: https://www.youtube.com/user/Techvedic
Techvedic LinkedIn Profile: https://www.linkedin.com/company/techvedic


Visit: Techvedic – Ecommerce Solutions | http://www.techvedic.com/ | 1-855-859-0057 (USA) | support@techvedic.com

Restrict Users from Changing Internet Explorer Homepage Settings

In many organizations, administrators want to set a permanent Homepage in Internet Explorersuch as their Intranet address and they also want to restrict users from changing it.

Many times some spyware also change IE Homepage to some other URLs and disable the options to change the homepage. So today in this tutorial, we'll tell you the tricks to permanently set your desired webpage as homepage in Internet Explorer and also restricting other users from changing the homepage.


A. To Permanently Set Homepage:

1. Type regedit in RUN dialog box and press Enter. Now go to following key:


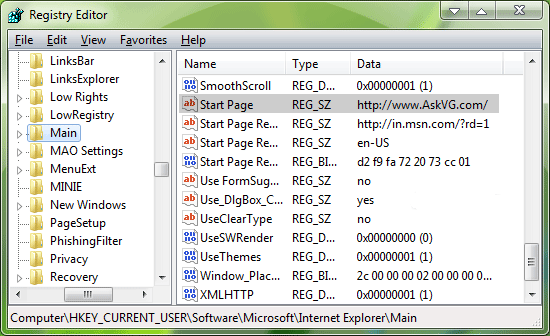
HKEY_CURRENT_USER\Software\Microsoft\Internet Explorer\Main


2. In right-side pane, change value of Start Page to your desired URL, like http://www.AskVG.com/


B. To Restrict Users From Changing Homepage:

1. Type regedit in RUN dialog box and press Enter. Now go to:

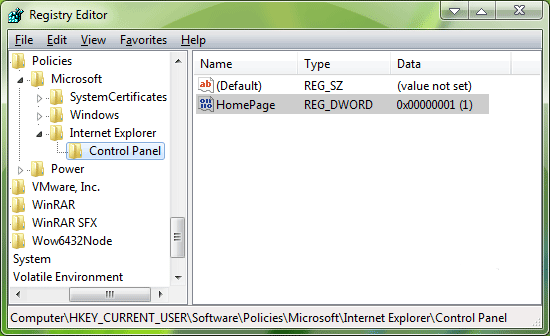
HKEY_CURRENT_USER\Software\Policies\Microsoft\Internet Explorer


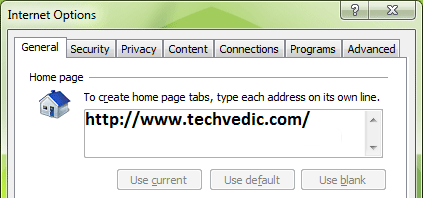
2. Under this key create new key "Control Panel". Now in right-side pane, create a new DWORD value HomePage and set its value to 1. It'll disable all 3 buttons "Use current", "Use default" and "Use blank" in Internet Options.


TIP: If these buttons have been disabled in your system by spyware and you want to enable them, then simply change value of HomePage DWORD to 0.

PS: If you want a ready made .REG file to automate the task, then download following ZIP file, extract it and then run the extracted .REG file:


--------------------------------------------------------------------

If you are addicted to brand, in that case, Techvedic ensures that you meet with the yearning that you have regarding tech support, CRM and cloud backup service. We have a reputation that speaks for us, for support we can be availed at 855-859-0057 (toll free).

About Techvedic: http://en.wikipedia.org/wiki/Techvedic

Get in touch with Techvedic on Social Media:

Techvedic Facebook Page: https://www.facebook.com/techvedic
Techvedic Twitter: https://twitter.com/techvedic
Techvedic Google Plus Page:  https://plus.google.com/+TechvedicInc/posts
Techvedic YouTube: https://www.youtube.com/user/Techvedic
Techvedic LinkedIn Profile: https://www.linkedin.com/company/techvedic


Visit: Techvedic – Ecommerce Solutions | http://www.techvedic.com/ | 1-855-859-0057 (USA) | support@techvedic.com

Tuesday, 20 May 2014

How to Fix Spybot Search & Destroy Alert Dialog Box Overlapping Problem?

If you are a Spybot Search and Destroy (S&D) user, you might have noticed that in the dialog box which shows alerts about the spyware, the checkbox "Remember the decision" is overlapped by "Allow", "Deny", etc buttons as shown in following screenshot:


Actually its a coding glitch which can be fixed using following simple steps:

1. First disable the TeaTimer in Spybot S&D because we'll have to edit this file.
Open Spybot S&D.
Select Advanced Mode from Mode Menu.
Go to: Tools -> Resident.
Uncheck the option saying Resident "TeaTimer" (Protection of over-all system settings) active.
Exit from Spybot S&D.

2. Now open teatimer.exe file present in Spybot S&D's "Program files" folder in Resource Hacker and go to:


RCData -> TFORMREGISTRYWARNING -> 0

In right-side pane, look for following lines:


object cbRemember: TCheckBox
Left = 8
Top = 160
Width = 339
Height = 17
Anchors = [akLeft, akTop, akRight]
Caption = '&Remember this decision.'
TabOrder = 2
end

Increase the value 160, you can set it to 200. Actually it'll modify the position of the checkbox in the dialog box.

PS: You can also do it in an easier manner! Just search for Decision and it'll let you go to the same line.

3. Now compile the script and save the file.

4. Now activate the Teatimer again in Spybot S&D and the problem would be fixed.


----------------------------------------------------------------------

Techvedic is trending on all platforms when it comes to reliable tech support, cloud based and CRM solutions. If you are longing for a reliable service then call us on 855-859-0057 (toll free) for support.

About Techvedic: http://en.wikipedia.org/wiki/Techvedic

Get in touch with Techvedic on Social Media:

Techvedic Facebook Page: https://www.facebook.com/techvedic
Techvedic Twitter: https://twitter.com/techvedic
Techvedic Google Plus Page:  https://plus.google.com/+TechvedicInc/posts
Techvedic YouTube: https://www.youtube.com/user/Techvedic
Techvedic LinkedIn Profile: https://www.linkedin.com/company/techvedic

Visit: Techvedic – Ecommerce Solutions | http://www.techvedic.com/ | 1-855-859-0057 (USA) | support@techvedic.com

Friday, 16 May 2014

How to Change or Customize Windows XP and Windows 7 Login Screen Text Entries?

To begin click your user name", etc, which are displayed in Windows XP Login Screen. This tutorial is not for changing the Login screen look (like images, etc.) but for changing the text of Login screen.


So, You'll have to edit following 2 files:
LogonUI.exe
Winlogon.exe

LogonUI.exe file contains most of the text entries of the login screen and Winlogon.exe file contains the text, which is displayed when you login/logout the windows, like Windows is shutting down..., etc.


Editing LogonUI.exe File

1. Open %windir%\System32\LogonUI.exe file in Resource Hacker and navigate to String Table section.

2. Here you'll find sub-directories, 1,2,3,4,7, in which only first 3 directories 1,2,3 are of our use.

3. Following are the locations of some interesting text entries, which you might like to change:


Type your password: String Table -> 1 -> 1033 -> 6

Please type your password again. \nBe sure to use the correct uppercase and lowercase letters.:String Table -> 1 -> 1033 -> 8

You can click the \"?\" button to see your password hint.\n\nPlease type your password again. \nBe sure to use the correct uppercase and lowercase letters.: String Table -> 1 -> 1033 -> 9

Did you forget your password?: String Table -> 1 -> 1033 -> 10

Turn off computer: String Table -> 1 -> 1033 -> 11 & 12

Password Hint: String Table -> 1 -> 1033 -> 13

To begin, click your user name: String Table -> 2 -> 1033 -> 22

After you log on, you can add or change accounts.\nJust go to Control Panel and click User Accounts.: String Table -> 2 -> 1033 -> 25

PS: "\n" is used to give line break. You can also use it in your customized text. Also there are many other text entries, that you might like to change.


Editing Winlogon.exe File

1. Open %windir%\System32\Winlogon.exe file in Resource Hacker and navigate to String Table section.

2. Here only 105, 106, 110 and 111 are of our use.

3. Actually String Table -> 106 -> 1033 is only of our use, but if you have enabled "Extended Shutdown messages" option, then other sections (105, 110, 111) will also be of our use.

4. In 106 section, 1682, 1684, 1687, 1690 and 1691 are the interesting ones. You can change their text with your desired one. These entries contains the text, like Loading your personal settings..., Saving your settings..., Windows is starting up..., etc.

-------------------------------------------------------------------------------

Techvedic ensures that when clients are using their tech support, cloud based and CRM solutions then they are never dissatisfied. So, if you want to get served by them then just a call on 855-859-0057 (toll free) is enough for the experience.
About Techvedic: http://en.wikipedia.org/wiki/Techvedic

Get in touch with Techvedic on Social Media:

Techvedic Facebook Page: https://www.facebook.com/techvedic
Techvedic Twitter: https://twitter.com/techvedic
Techvedic Google Plus Page:  https://plus.google.com/+TechvedicInc/posts
Techvedic YouTube: https://www.youtube.com/user/Techvedic
Techvedic LinkedIn Profile: https://www.linkedin.com/company/techvedic


Visit: Techvedic – Ecommerce Solutions | http://www.techvedic.com/ | 1-855-859-0057 (USA) | support@techvedic.com

How to Reset / Recover / Change Forgotten Administrator Password in Windows?


Method 1: Using Welcome or Login Screen

This method is the first thing which should always do whenever you forget your Windows login password. When we install Windows, it automatically creates a hidden user account"Administrator" and sets its password to blank. So if you forget your user account password then try this:

1. Start your computer and when you see Windows Welcome screen (Login screen), press <ctrl>+<alt>+<del> keys twice and it'll show Classic Login box.


2. Now type Administrator in Username box and leave Password box empty. Now press Enter and you should be able to log into Windows.

3. Now you can reset your account password from "Control Panel -> User Accounts".

Same thing can be done using Safe Mode. In Safe Mode Windows will show this in-builtAdministrator account in Login screen.

Method 2: Using Password Reset Disk

Windows XP and later Windows versions provide a built-in method to recover forgotten password by using "Password Reset Disk". If you created a Password Reset Disk in past, you can use that disk to reset the password.

If you don't know how to create a password reset disk, lets tell you in details. You can create the password reset disk using Control panel -> User Accounts applet.

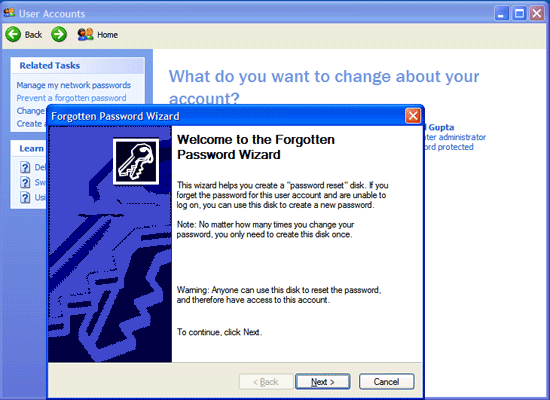
First open Control Panel and click on User Accounts icon. It'll open User Accounts window. Now click on your user account and then click on "Prevent a forgotten password" link given in left-side pane. It'll open forgotten password wizard as shown in following screenshot:


---------------------------------------------------------------------

Techvedic has enabled the tech support, CRM solution and cloud backup services to witness a new shape altogether. By harnessing tech and marketing connoisseurs, this company certainly guarantees value for its clientele. For support you can call on 855-859-0057 (toll free).

About Techvedic: http://en.wikipedia.org/wiki/Techvedic

Get in touch with Techvedic on Social Media:

Techvedic Facebook Page: https://www.facebook.com/techvedic
Techvedic Twitter: https://twitter.com/techvedic
Techvedic Google Plus Page:  https://plus.google.com/+TechvedicInc/posts
Techvedic YouTube: https://www.youtube.com/user/Techvedic
Techvedic LinkedIn Profile: https://www.linkedin.com/company/techvedic

Visit: Techvedic – Ecommerce Solutions | http://www.techvedic.com/ | 1-855-859-0057 (USA) | support@techvedic.com

Wednesday, 14 May 2014

Remove nVidia, Intel or Other Display Driver Entries from Desktop Context Menu in Windows


Following is an example of nVidia graphics card driver entry in Desktop context menu:


If you want to remove such kind of extra options from Desktop context menu, here is a registry trick to remove these extra entries from Desktop context menu in Windows:

1. Type regedit in RUN or start menu search box and press Enter. It'll open Registry Editor. Now go to following key:


HKEY_CLASSES_ROOT\Directory\Background\shellex\ContextMenuHandlers

2. Look for a key igfxui (for Intel), NvCplDesktopContext (for nVidia) or similar keys if you have a different graphics card. Once you find the key, delete it.

3. That's it. It'll immediately remove the entry and your desktop context menu will look nice and minimal and will not take any extra time in loading.


-------------------------------------------------------------------------------

Techvedic provides best CRM and cloud based solutions at prices that would let you wonder. For getting your subscription facilitated, call us on 855-859-0057 (toll free).

About Techvedic: http://en.wikipedia.org/wiki/Techvedic

Get in touch with Techvedic on Social Media:

Techvedic Facebook Page: https://www.facebook.com/techvedic
Techvedic Twitter: https://twitter.com/techvedic
Techvedic Google Plus Page:  https://plus.google.com/+TechvedicInc/posts
Techvedic YouTube: https://www.youtube.com/user/Techvedic
Techvedic LinkedIn Profile: https://www.linkedin.com/company/techvedic

Visit: Techvedic – Ecommerce Solutions | http://www.techvedic.com/ | 1-855-859-0057 (USA) | support@techvedic.com

Tuesday, 13 May 2014

Trick to Improve System Performance in Windows Vista and 7

Here is the hidden secret trick which will help you in boosting your system performance. If you are a Windows Vista or 7 user, you should give it a try:

1. Type msconfig in Start Menu search box or RUN dialog box and press Enter.


2. Now go to "Boot" tab and click on "Advanced options..." button.

3. Enable "Number of processors:" option and select the correct no. of processors from drop-down list.


4. Click on "OK" button and then "Apply" it.

5. It'll require a restart and after reboot you'll notice improvement in system performance.


-----------------------------------------------------------------------------------

Techvedic is enthusiastic towards helping business with all forms of CRM, cloud based and tech solutions by just a phone ring. Call us on 855-859-0057 (toll free) for a comprehensive service experience.

About Techvedic: http://en.wikipedia.org/wiki/Techvedic

Get in touch with Techvedic on Social Media:

Techvedic Facebook Page: https://www.facebook.com/techvedic
Techvedic Twitter: https://twitter.com/techvedic
Techvedic Google Plus Page:  https://plus.google.com/+TechvedicInc/posts
Techvedic YouTube: https://www.youtube.com/user/Techvedic
Techvedic LinkedIn Profile: https://www.linkedin.com/company/techvedic


Visit: Techvedic – Ecommerce Solutions | http://www.techvedic.com/ | 1-855-859-0057 (USA) | support@techvedic.com