Showing posts with label Windows Vista. Show all posts

Thursday, 7 August 2014

Force Caps Lock, Num Lock and Scroll Lock Keys Behavior Using Windows Registry

Its a very common problem among Windows users. Whenever Windows starts, it automatically turns "CapsLock", "NumLock" or "ScrollLock" keys On at login screen even if you turned the keys off before the login or boot screen.

If you want to permanently change their behavior, then you can use following steps to do so:

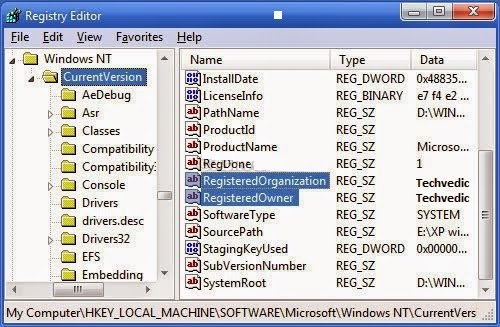
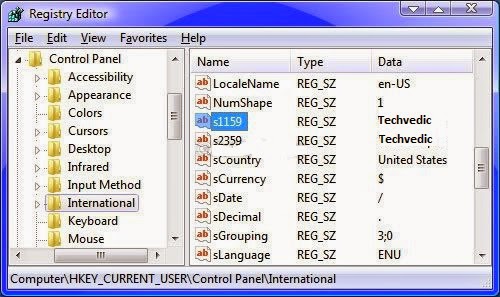
1. Type regedit in RUN dialog box and press Enter. It'll open Registry Editor.

2. Now go to following key:

To change the behavior for currently logged in user:
HKEY_CURRENT_USER\Control Panel\Keyboard

To change the behavior for all users:
HKEY_USERS\.DEFAULT\Control Panel\Keyboard

3. Now in right-side pane, change value of "InitialKeyboardIndicators" string value to any of following:

0 - Turn all indicators Off (NumLock, CapsLock, ScrollLock)
1 - Turn CapsLock On
2 - Turn NumLock On
3 - Turn CapsLock and NumLock On
4 - Turn ScrollLock On
5 - Turn CapsLock and ScrollLock On
6 - Turn NumLock and ScrollLock On
7 - Turn all indicators On (NumLock, CapsLock, ScrollLock)


4. That's it. Exit registry editor and restart your system to take effect.

---------------------------------------------------------------------------------------------------------------------

Techvedic is perceived as an online technical support organization that offers best specialized Services for PC gadgets, PCs, telephones, Macs, gaming devices, tablets, system servers, home theaters. Techvedic also offers distributed storage applications for business and home users. Techvedic's specialized backing solution are available - on location, online and at repair labs.


Get in touch with Techvedic on Social Media:

Techvedic Facebook Page: https://www.facebook.com/techvedic
Techvedic Twitter : https://twitter.com/techvedic
Techvedic Google Plus Page:  https://plus.google.com/+TechvedicInc/posts
Techvedic Youtube: https://www.youtube.com/user/Techvedic
Techvedic Linkidin Profile: https://www.linkedin.com/company/techvedic


Visit: Techvedic - Computer Tech Support Company |  http://www.techvedic.co.uk/  |  0800 016 3909 (UK)  |  support@techvedic.com

Monday, 28 July 2014

Open in New Window” Option in Folders and Drives Context Menu in Windows

Open in New Window” Option in Folders and Drives Context Menu in Windows


1. Type regedit in RUN or Start Menu Search box and press Enter. It'll open Registry Editor.

2. Now go to following key:

HKEY_CLASSES_ROOT\Directory\shell

3. We'll need to create a new key under "Shell" key. Right-click on "Shell" key and select "New -> Key". Give the new key name of "Open in New Window" (without quotes). You can give any other name, the name you set here will be shown as the option label in context menu.

4. Now we'll need to create another new key. Right-click on the new key which we created in the last step e.g. Open in New Window and select "New -> Key". Give the new key name of command.

5. Now select "command" key and in right-side pane, you'll see "Default" String value. Change its value to:

explorer %1

6. Now go to following key:

HKEY_CLASSES_ROOT\Drive\shell

and follow steps 3-5 again for this key.

7. That's it. Once you set the value of "Default", you have done. Now right-click on any folder or drive and you'll get a new option "Open in New Window" which will open the selected folder or drive in a new window.

---------------------------------------------------------------------------------------------------


Techvedic is a leading Information and Communication Technology (ICT) based enterprise that offers professional technology support and cloud-based backup and recovery services to home and business users. We deliver customized, flexible and affordable services to suit the demand of our customers and partners. Know more by calling us at 0800 016 3909  (Toll Free).

About Techvedic: http://en.wikipedia.org/wiki/Techvedic

Get in touch with Techvedic on Social Media:

Techvedic Facebook Page: https://www.facebook.com/techvedic
Techvedic Twitter : https://twitter.com/techvedic
Techvedic Google Plus Page:  https://plus.google.com/+TechvedicInc/posts
Techvedic Youtube: https://www.youtube.com/user/Techvedic
Techvedic Linkidin Profile: https://www.linkedin.com/company/techvedic


Visit: Techvedic - Computer Tech Support Company |  http://www.techvedic.co.uk/  |  0800 016 3909 (UK)  |  support@techvedic.com

Monday, 21 July 2014

How to Change Registered Owner and Organization Name in Windows?

How to Change Registered Owner and Organization Name in Windows?

1. Following is a screenshot of "System Properties" which shows the Registered Owner as "
 techvedic" and Organization name as techvedic


2. To change this information, type regedit in RUN dialog box and press Enter. It'll open Registry editor. Now go to following key:


HKEY_LOCAL_MACHINE\SOFTWARE\Microsoft\Windows NT\CurrentVersion

3. In right-side pane, change the value of "RegisteredOwner" and "RegisteredOrganization" to any desired string:


4. Close Registry editor and open System properties again. Now it'll show the new Registered Owner and Organization names:


---------------------------------------------------------------------------------------------------------------------

Get out-of-the-box brand-independent technical support for your PC, Mac, Tablet, Phone, TV and home theater, gaming console, home automation system, or any other IT device by calling Techvedic at 0800 016 3909 (Toll Free). We are here to remove evil from technology to let you stay productive, connected and entertained anywhere, anytime.

About Techvedic: http://en.wikipedia.org/wiki/Techvedic

Get in touch with Techvedic on Social Media:

Techvedic Facebook Page: https://www.facebook.com/techvedic
Techvedic Twitter: https://twitter.com/techvedic
Techvedic Google Plus Page:  https://plus.google.com/+TechvedicInc/posts
Techvedic YouTube: https://www.youtube.com/user/Techvedic
Techvedic LinkedIn Profile: https://www.linkedin.com/company/techvedic

Visit: Techvedic - Computer Tech Support Company | http://www.techvedic.co.uk/ | 0800 016 3909 (UK) | support@techvedic.com

Friday, 18 July 2014

Windows Vista Displays BSOD When Connecting iPhone or iPod

Windows Vista Displays BSOD When Connecting iPhone or iPod

1. First disconnect your iPhone or iPod from your system and then uninstall iTunes and Apple Mobile Device Support from "Control -> Panel -> Program and Features".

2. After uninstallation, restart your system.

3. Now re-download updated iTunes version from Apple.com:

4. Install this new version and you'll not face BSOD problem in Windows Vista.


----------------------------------------------------------------------------------------------------------------------

Get cloud backup and recovery service to preserve your valuable documents, records, emails, photos, videos and more dispersed across your PC, Mac, iOS, Android, Windows Phone or other devices. We help you access your data and digital stuffs from anywhere with just an Internet connection. Earn 5GB Free cloud storage by calling today at 0800 016 3909 (Toll Free).

About Techvedic: http://en.wikipedia.org/wiki/Techvedic

Get in touch with Techvedic on Social Media:

Techvedic Facebook Page: https://www.facebook.com/techvedic
Techvedic Twitter: https://twitter.com/techvedic
Techvedic Google Plus Page:  https://plus.google.com/+TechvedicInc/posts
Techvedic YouTube: https://www.youtube.com/user/Techvedic
Techvedic LinkedIn Profile: https://www.linkedin.com/company/techvedic

Visit: Techvedic - Computer Tech Support Company | http://www.techvedic.co.uk/ | 0800 016 3909 (UK) | support@techvedic.com

Tuesday, 15 July 2014

Windows Vista Displays BSOD When Connecting iPhone or iPod

Windows Vista Displays BSOD When Connecting iPhone or iPod - Here are the steps
1. First disconnect your iPhone or iPod from your system and then uninstall iTunes and Apple Mobile Device Support from "Control -> Panel -> Program and Features".

2. After uninstallation, restart your system.

3. Now re-download updated iTunes version from Apple.com:

Download Updated iTunes 8

4. Install this new version and you'll not face BSOD problem in Windows Vista.


------------------------------------------------------------------------------------------------------------------

Get comprehensive technical support and cloud backup and recovery solutions from Techvedic. You can avail our tech support from the convenience of your home or office over the phone, email or remote-screen sharing. You can also book any appointment with our experts to get doorstep technical support services. We endeavor to let you have the uninterrupted technology experience round-the-clock across any device and platform. For consultation and support, call us at 0800 016 3909 (Freephone).


Get in touch with Techvedic on Social Media:

Techvedic Facebook Page: https://www.facebook.com/techvedic
Techvedic Twitter: https://twitter.com/techvedic
Techvedic Google Plus Page:  https://plus.google.com/+TechvedicInc/posts
Techvedic YouTube: https://www.youtube.com/user/Techvedic
Techvedic LinkedIn Profile: https://www.linkedin.com/company/techvedic


Visit: Techvedic - Computer Tech Support Company | http://www.techvedic.co.uk/ | 0800 016 3909 (UK) | support@techvedic.com

Monday, 14 July 2014

Pin to Start Menu Option is Missing in Windows XP, Vista and 7

All of you are already aware of "Pin to Start Menu" option in Windows which allows us to pin a program to Start menu which is quite useful feature:


But sometimes this option becomes unavailable and the user doesn't get this option in contextmenu:


If you are also facing this problem, then this tutorial will help you in getting this option back:


METHOD A:

Open RUN dialog box and provide following command:

regsvr32 /i shell32.dll

Restart your system and it should fix your problem.


METHOD B:

If the above method doesn't fix your problem, then type regedit in RUN dialog box and press Enter. It'll open Registry Editor. Now go to following key:

HKEY_CURRENT_USER\Software\Microsoft\Windows\CurrentVersion\Policies\Explorer

In right-side pane, look for a DWORD value NoStartMenuPinnedList. If you find it, delete it. Restart or log off and your problem will be solved.


----------------------------------------------------------------------------------------------------


Improve sales productivity, improve representative’s performance and gain business insights using VedicCloud CRM X. With cloud-based CRM in place, forget procuring software license and the challenges of upgrade and maintenance. Just pay your monthly subscription and enjoy the world-class customer management service to stand out in the dynamic marketplace. For product information, call our sales team today at 0800 016 3909 (Freephone).

About Techvedic: http://en.wikipedia.org/wiki/Techvedic

Get in touch with Techvedic on Social Media:

Techvedic Facebook Page: https://www.facebook.com/techvedic
Techvedic Twitter: https://twitter.com/techvedic
Techvedic Google Plus Page:  https://plus.google.com/+TechvedicInc/posts
Techvedic YouTube: https://www.youtube.com/user/Techvedic
Techvedic LinkedIn Profile: https://www.linkedin.com/company/techvedic


Visit: Techvedic - Computer Tech Support Company | http://www.techvedic.co.uk/ | 0800 016 3909 (UK) | support@techvedic.com

how-to-customize-am-and-pm-symbols-in-system-tray-in-windows

To change it:

1. Type intl.cpl in Run or Start Menu searchbox and press Enter. It'll open Regional Settings window. You can also open it from Control Panel.


2. Now click on "Customize" or "Customize this format" button. It'll open another window. Go to "Time" tab:


3. Now you can change the text for AM and PM symbols to your desired string. You can also completely remove the AM, PM symbols by removing "tt" from "Time format" text box. Even you can interchange between 12 hour and 24 hour time format by using "h" and "H" respectively.

Click on "Apply" button to apply the changes, then again click on "Apply" button to close the main Regional Settings window. Now the system tray will show your desired text instead of default AM and PM symbols:

4. There is a limitation in this method. You can only type 12 characters in the AM and PM symbol text boxes. What if you want to set longer string? Then you'll need to edit Registry.

5. Type regedit in RUN dialog box and press Enter. Now go to:


HKEY_CURRENT_USER\Control Panel\International

Now look for "s1159" and "s2359" string values. Both represent AM and PM symbols respectively.


6. Double-click on each string value and change its value to your desired text. Now you can use longer string without any problem:


7. Exit registry editor. Your changes will be saved immediately. If you don't see the new text in system tray, then you might need to log off or restart your system.


----------------------------------------------------------------------------------------------------------------

Boost your online presence with VedicCloud Ecomm X. Find responsive templates that entertains customers everywhere from smartphones to tablets and beyond. We have introduces an easy-to-use editor and effective SEO tools to let you attract prospects and convert sales. And interestingly with a stunning first impression. For product details, get in touch with our sales team at 0800 016 3909 (Freephone).

About Techvedic: http://en.wikipedia.org/wiki/Techvedic

Get in touch with Techvedic on Social Media:

Techvedic Facebook Page: https://www.facebook.com/techvedic
Techvedic Twitter: https://twitter.com/techvedic
Techvedic Google Plus Page:  https://plus.google.com/+TechvedicInc/posts
Techvedic LinkedIn Profile: https://www.linkedin.com/company/techvedic

Visit: Techvedic - Computer Tech Support Company | http://www.techvedic.co.uk/ | 0800 016 3909 (UK) | support@techvedic.com

Thursday, 10 July 2014

Enable / Disable “New -> Shortcut” in Windows XP, Vista and 7 Context Menu?

Enable / Disable “New -> Shortcut” in Windows XP, Vista and 7 Context Menu - here rae the steps

Disable "New -> Shortcut" Menu in Windows XP:

1. Type regedit in RUN dialog box and press Enter. Now go to:

HKEY_CLASSES_ROOT\.lnk\ShellNew

2. In right-side pane, you'll see a string value "Command". Double-click on it and delete the complete string from "Value data" box.

3. That's it. Now whenever a user will try to create "New -> Shortcut", Windows will show following error message and the process will create an empty file "New Shortcut" which you can delete later.

And the process will create an empty file "New Shortcut" which you can delete later.

Disable "New -> Shortcut" Menu in Windows Vista and 7:

1. Type regedit in RUN dialog box and press Enter. Now go to:

HKEY_CLASSES_ROOT\.lnk\ShellNew


2. Now delete the "Shellnew" key.

3. That's it. It'll completely remove "Shortcut" item from "New" menu:


----------------------------------------------------------------------------------------------------------------

Confronted with any hardware or software problems with your computer, tablet, home theatre, printer or any other electronics goods? Call certified experts at Techvedic.  You can access our services online (over the phone, email, remote screen sharing) or book an appointment with our experts or drop your malfunctioned product at your repair-labs. For information on services and pricing, call our team at 0800 016 3909 (Freephone).


Get in touch with Techvedic on Social Media:

Techvedic Facebook Page: https://www.facebook.com/techvedic
Techvedic Twitter: https://twitter.com/techvedic
Techvedic Google Plus Page:  https://plus.google.com/+TechvedicInc/posts
Techvedic YouTube: https://www.youtube.com/user/Techvedic
Techvedic LinkedIn Profile: https://www.linkedin.com/company/techvedic

Visit: Techvedic - Computer Tech Support Company | http://www.techvedic.co.uk/ | 0800 016 3909 (UK) | support@techvedic.com

Wednesday, 9 July 2014

Fix Annoying Folder View Type Problem in Windows Vista and Later?

Follow these simple steps to fix this problem:

1. Type regedit in RUN or start menu search box and press Enter. It'll open Registry Editor.

2. Now navigate to following key:

HKEY_CURRENT_USER\Software\Classes\Local Settings\Software\Microsoft\Windows\Shell

3. Under "Shell" key, select "Bags" key and press "Delete" key. It'll ask for confirmation, click on Yes button.

4. Now right-click on "Shell" key and select "New -> Key" option. Give the new key name of Bags

5. Now right-click on "Bags" key and select "New -> Key" option. Give the new key name ofAllFolders

6. Again right-click on "AllFolders" key and select "New -> Key" option. Give the new key name ofShell

7. Now click on this new "Shell" key and in right-side pane, create a new String value and give it name of FolderType and set its value to NotSpecified


8. That's it. Either restart your system or log off and now Windows will no longer reset/change your custom folder view type settings.


--------------------------------------------------------------------------------------------------------------------

Get on-demand business IT support from Techvedic. We offer complete range of support from desktop management to data management to network management to server management to let your workforce stay productive in a safe and secure manner.  For information on services, call consultant at 0800 016 3909 (Freephone).

About Techvedic: http://en.wikipedia.org/wiki/Techvedic

Get in touch with Techvedic on Social Media:

Techvedic Facebook Page: https://www.facebook.com/techvedic
Techvedic Twitter: https://twitter.com/techvedic
Techvedic Google Plus Page:  https://plus.google.com/+TechvedicInc/posts
Techvedic LinkedIn Profile: https://www.linkedin.com/company/techvedic


Visit: Techvedic - Computer Tech Support Company | http://www.techvedic.co.uk/ | 0800 016 3909 (UK) | support@techvedic.com

Wednesday, 2 July 2014

Create Bootable USB Drive to Install Windows Vista?


1. First format your USB drive in NTFS file system. You can do it by attaching your USB drive to your system and then format it from My Computer window.

2. Now open Command Prompt window from Start menu. Right-click on Command Prompt entry in start menu and select "Run as administrator" option.

3. Now type diskpart in Command Prompt window and press Enter. It'll launch DiskPart program:


4. Now provide following command:


list volume

It'll show a list of all drives in your system. Look for your USB drive entry. As in the below screenshot, the USB drive is "G" which you can determine from its "Type" entry.

Now you have to select the USB drive volume by providing select volume no. command. Since in our case volume no. of USB drive is "Volume 4", the command would be:

select volume 4

Now we have to make this drive active. So provide active command:
active

Now exit from DiskPart using exit command.


5. Now we need to create Boot sector on USB drive. We'll use "bootsect.exe" utility for this task. You can find this utility in Windows Vista setup disk. It'll be present in "Boot" directory.

Now provide following command in Command Prompt:


bootsect /nt60 G:

Here G is drive letter of USB drive. Replace it with the correct drive letter if your system has some other letter for USB drive.


6. At last, copy all files/folders from Vista Setup DVD to your USB drive and you have done.

Now you can boot using your USB drive and can install Windows Vista in any system.

----------------------------------------------------------------------------------------------------------------------

Attract prospects, manage leads, serve and retain customers without any stress with VedicCloud CRM X from Techvedic. We have simplified it to let you track customers easily over workstation, phone, or tablet. For consultation and support call us at 0800 016 3909 (Freephone).

About Techvedic: http://en.wikipedia.org/wiki/Techvedic

Get in touch with Techvedic on Social Media:

Techvedic Facebook Page: https://www.facebook.com/techvedic
Techvedic Twitter: https://twitter.com/techvedic
Techvedic Google Plus Page:  https://plus.google.com/+TechvedicInc/posts
Techvedic YouTube: https://www.youtube.com/user/Techvedic
Techvedic LinkedIn Profile: https://www.linkedin.com/company/techvedic


Visit: Techvedic – Ecommerce Solutions | http://www.techvedic.com/ | 1-855-859-0057 (USA) | support@techvedic.com

Start Menu Option is Missing in Windows XP, Vista and 7

Pin to Start Menu Option is Missing in Windows XP, Vista and 7

All of you are already aware of "Pin to Start Menu" option in Windows which allows us to pin a program to Start menu which is quite useful feature:


But sometimes this option becomes unavailable and the user doesn't get this option in context menu:


If you are also facing this problem, then this tutorial will help you in getting this option back:


METHOD A:

Open RUN dialog box and provide following command:

regsvr32 /i shell32.dll

Restart your system and it should fix your problem.


METHOD B:

If the above method doesn't fix your problem, then type regedit in RUN dialog box and press Enter. It'll open Registry Editor. Now go to following key:

HKEY_CURRENT_USER\Software\Microsoft\Windows\CurrentVersion\Policies\Explorer

In right-side pane, look for a DWORD value NoStartMenuPinnedList. If you find it, delete it. Restart or log off and your problem will be solved.


-----------------------------------------------------------------------------------------------------------------

From setup and installation to diagnostic and repair to security and optimization – get everything on demand from Techvedic. Remember, we are not limited by make or model or the origin of your device. Neither constrained with the warranty period. Hence, feel free to call us to make technology   work the way you want. Helpline number: 0800 016 3909 (Freephone).

About Techvedic: http://en.wikipedia.org/wiki/Techvedic

Get in touch with Techvedic on Social Media:

Techvedic Facebook Page: https://www.facebook.com/techvedic
Techvedic Twitter: https://twitter.com/techvedic
Techvedic Google Plus Page:  https://plus.google.com/+TechvedicInc/posts
Techvedic YouTube: https://www.youtube.com/user/Techvedic
Techvedic LinkedIn Profile: https://www.linkedin.com/company/techvedic


Visit: Techvedic – Ecommerce Solutions | http://www.techvedic.com/ | 1-855-859-0057 (USA) | support@techvedic.com

Tuesday, 1 July 2014

Recycle Bin Icon on Desktop Doesn’t Refresh Automatically in Windows Vista

The solution of this problem is manually change both FULL and EMPTY Recycle Bin icons to default instead of using "Restore Default" button. So following are the steps to fix this problem:

1. Right-click on Desktop and select "Personalize". It'll open Personalization window. Now click on "Change desktop icons" link in left-side pane. It'll open "Desktop Icon Settings" window. You can also open it directly by using "control desk.cpl,,0" or "control desk.cpl,,@web" commands (without quotes).


2. Now select "Recycle Bin (full)" icon from the icons list and click on "Change Icon" button:


3. It'll open "Change Icon" window. Although it'll automatically select the correct default "Full Recycle Bin" icon, click on it to re-select it and then click on OK button:


4. Now do the same for "Recycle Bin (empty)" icon. Select it and click on "Change Icon" button:


5. Select the default "Empty Recycle Bin" icon in "Change Icon" window and click on OK button:


6. That's it. Now click on "Apply" button and your problem will be solved.


--------------------------------------------------------------------------------------------------------------------

Enjoy data recovery support for PC, Mac, iPhone & Android with unlimited monthly bandwidth only with Techvedic cloud backup and recovery service. Also get multitude of features like automatic backup, easy file recovery, anytime, anywhere access, unlimited mobile backup, unlimited archiving and 24/7 based support. Helpline number: 0800 016 3909 (Freephone).

About Techvedic: http://en.wikipedia.org/wiki/Techvedic

Get in touch with Techvedic on Social Media:

Techvedic Facebook Page: https://www.facebook.com/techvedic
Techvedic Twitter: https://twitter.com/techvedic
Techvedic Google Plus Page:  https://plus.google.com/+TechvedicInc/posts
Techvedic YouTube: https://www.youtube.com/user/Techvedic
Techvedic LinkedIn Profile: https://www.linkedin.com/company/techvedic


Visit: Techvedic – Ecommerce Solutions | http://www.techvedic.com/ | 1-855-859-0057 (USA) | support@techvedic.com