Showing posts with label how-to guide. Show all posts

Monday, 7 July 2014

How to Change Default File Save Location in Microsoft Office?

While working in Microsoft Office, when you try to open or save a document, it opens the default documents folder to open or save the file.To change this default location to your desired drive or folder please follow the following steps

For Microsoft Office 2000, XP and 2003:

1. Open any Office application like Microsoft Word and click on "Tools -> Options".

2. Click on "File Locations" tab and select "Documents". Now click on "Modify" button:


3. It'll open browse window. Navigate to the desired drive or folder which you want to set as default location and click on OK button. It'll change the file location. Now click on OK button and you have done.

NOTE: You'll need to follow these steps for all Office applications separately.


For Microsoft Office 2007, 2010 and 2013:

1. Open any Office application like Microsoft Word and click on Office ORB (Big round button) or FILE menu at top-left.

2. Now click on "Options", it'll open Options window. Click on "Save" tab and in right-side pane, you can change the "Default file location" by simply typing the exact path or by selecting the desired drive/folder using Browse button:


----------------------------------------------------------------------------------------------------------------------

Get on-demand tech support for PC, Mac, peripheral, tablet, phone, gaming console and more at Techvedic. Enjoy our services from the comfort of your home or office over the phone. Need on-site support? Book an appointment with experts now. For support and delivery mechanism details, call us at 0800 016 3909 (Freephone).

About Techvedic: http://en.wikipedia.org/wiki/Techvedic

Get in touch with Techvedic on Social Media:

Techvedic Facebook Page: https://www.facebook.com/techvedic
Techvedic Twitter: https://twitter.com/techvedic
Techvedic Google Plus Page:  https://plus.google.com/+TechvedicInc/posts
Techvedic YouTube: https://www.youtube.com/user/Techvedic
Techvedic LinkedIn Profile: https://www.linkedin.com/company/techvedic


Visit: Techvedic – Ecommerce Solutions | http://www.techvedic.com/ | 1-855-859-0057 (USA) | support@techvedic.com

Monday, 9 June 2014

Open Mozilla Firefox Searchbox Results in New Tab

If you are using Mozilla Firefox web browser, you might have noticed that whenever you use its built-in searchbox to find something, it opens the results in the current tab which overwrites the current tab content with the search results. Its quite irritating as you lose the webpage which you were browsing in that tab.


Here is a simple trick to always open the search results in a new tab.

So without wasting time lets start the tutorial:

1. Type about:config in Firefox addressbar and press Enter.


2. Now type browser.search.open in Filter box.

3. You'll get browser.search.openintab in results. Double click on it and its value will be changed to true.

4. That's it. Now your search results will always open in a new tab.


---------------------------------------------------------------------------------

We have built the niche for our cloud based, CRM and Tech support services by always delivering values for our clients. So, if you want your business to yield in the best way for you, then we are always there to help you live this pursuit.
About Techvedic: http://en.wikipedia.org/wiki/Techvedic

Get in touch with Techvedic on Social Media:
Techvedic Facebook Page: https://www.facebook.com/techvedic
Techvedic Twitter: https://twitter.com/techvedic
Techvedic Google Plus Page:  https://plus.google.com/+TechvedicInc/posts
Techvedic YouTube: https://www.youtube.com/user/Techvedic
Techvedic LinkedIn Profile: https://www.linkedin.com/company/techvedic

Visit: Techvedic – Ecommerce Solutions | http://www.techvedic.com/ | 0800 016 3909 (UK) | support@techvedic.com

Thursday, 5 June 2014

Speed Up Windows Vista - Make Windows Vista Super Fast

To Speed Up Windows Vista Please follow the below steps

Right-click on My Computer icon on Desktop and select Properties (or press <WIN> key +<Pause/Break> key), click on Advanced system settings link in left side pane (You can also open it by typing sysdm.cpl in RUN or start menu search box and press Enter). Now click on Settings button in Performance section:


Now disable all unnecessary options in Visual Effects tab, you can remain following options enabled according to your requirements:


Enable desktop composition (If you want to use Windows Aero theme)
Enable transparent glass (If you want to use transparency in Windows)
Show preview and filters in folder (If you use Details Pane in Explorer)
Show thumbnails instead of icons (If you want to show thumbnails in Explorer)
Show window contents while dragging (If you want windows to show content while moving them)

Smooth edges of screen fonts (If you want to show smooth fonts)
Use drop shadows for icon labels on the desktop (If you want to show shadows under desktop icon labels)
Use visual styles on windows and buttons (If you want to use Windows Aero or Basic theme.)

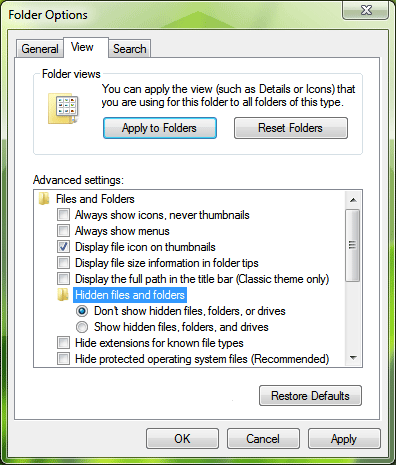
2 Open Windows Explorer and click on Organize -> Folder and Search Options. Now go toView tab:


Now disable following options:
Display file size information in folder tips.
Display simple folder view in Navigation pane.
Hide extensions for known file types.
Show encrypted or compressed NTFS files in color.
Show pop-up description for folder and desktop items.

Other options don't affect the system performance. You can enable/disable them according to your requirements.

3. Right-click on My Computer icon on Desktop and select Manage (You can also open it by typing services.msc in RUN or start menu search box and press Enter).

Now go to Services & Applications -> Services. Here you can set a few unnecessary services toManual, which will not start with windows and will decrease the boot time and will increase system performance.

4. Type msconfig in RUN or Start Menu search box and press Enter. Now go to Startup tab and deselect the unnecessary entries, which you don't want to start automatically with Windows, e.g. you can disable VGA driver utility, Sound Card utility, etc to speed up the startup time and to increase system performance.

You can also disable these items using Windows Defender. Open Windows Defender and click on Tools and then click on "Software Explorer".

5. Open Sound in Control Panel (or type mmsys.cpl in RUN or Start Menu search box and press Enter), go to Sounds tab and select No Sounds in Sound Scheme section. Or you can remain some of your favorite sounds but set Exit Windows, Windows Logoff, Windows Logon and Start Navigation to (None).

6. Also don't forget to:
Install only necessary software
Use the latest device drivers
Keep your Windows up-to-date

After following all the above mentioned points, you'll definitely notice major improvements in your Windows Vista performance
.

----------------------------------------------------------------------------------

Techvedic ensures that tech support, CRM and cloud backup services can be met in the best way at cost-effective prices. For support, visit our website.

About Techvedic: http://en.wikipedia.org/wiki/Techvedic

Get in touch with Techvedic on Social Media:

Techvedic Facebook Page: https://www.facebook.com/techvedic
Techvedic Twitter: https://twitter.com/techvedic
Techvedic Google Plus Page:  https://plus.google.com/+TechvedicInc/posts
Techvedic YouTube: https://www.youtube.com/user/Techvedic
Techvedic LinkedIn Profile: https://www.linkedin.com/company/techvedic


Visit: Techvedic – Ecommerce Solutions | http://www.techvedic.co.uk/ | 0800 016 3909 (UK) | support@techvedic.com

Tuesday, 3 June 2014

Set Your Desired Wallpaper as Folder Background Image in Windows XP

Here are the methods to set any desired wallpaper as background image in any folder in Windows XP:

A. Using Desktop.ini Trick to Set a Wallpaper as Folder Background Image:

1. Open Command Prompt and set folder attribute to "system". Suppose there is a folder "Setup" in "D:\" drive, in which you want to set a wallpaper as background image. So give following command in Command Prompt:


attrib +s D:\Setup

It'll change the attribute to "system".

2. Now open Notepad and paste following code:


[ExtShellFolderViews]
{BE098140-A513-11D0-A3A4-00C04FD706EC} = {BE098140-A513-11D0-A3A4-00C04FD706EC}

[{BE098140-A513-11D0-A3A4-00C04FD706EC}]
Attributes=1
IconArea_Image=path_of_the_wallpaper
IconArea_Text=0x00000000

Now change "path_of_the_wallpaper" to the exact path of the wallpaper which you want to set as background. Suppose the wallpaper is stored in "D:\Wallpaper\Image1.jpg", then the code will be as following:


[ExtShellFolderViews]
{BE098140-A513-11D0-A3A4-00C04FD706EC} = {BE098140-A513-11D0-A3A4-00C04FD706EC}

[{BE098140-A513-11D0-A3A4-00C04FD706EC}]
Attributes=1
IconArea_Image=D:\Wallpaper\Image1.jpg
IconArea_Text=0x00000000

NOTE: If you copy the wallpaper in the same folder which you are editing, then you can simply put the wallpaper name in the file. e.g. if you copy the "Image1.jpg" file in "Setup" folder, then the code will be as following:


[ExtShellFolderViews]
{BE098140-A513-11D0-A3A4-00C04FD706EC} = {BE098140-A513-11D0-A3A4-00C04FD706EC}

[{BE098140-A513-11D0-A3A4-00C04FD706EC}]
Attributes=1
IconArea_Image=Image1.jpg
IconArea_Text=0x00000000

"IconArea_Text" stands for the text color, you can change it to white, yellow, blue, black or any other color. You just need to know the hexa-decimal number of the color and then replace the code in "IconArea_Text" section. A few most used color codes are as follows:


Black - 0x00000000
White - 0x00FFFFFF
Green - 0x0000FF00
Blue - 0x00FF0000
Purple - 0x00C000C0
Red - 0x000000FF
Yellow - 0x0000FFFF
Indigo - 0x00FFFF00

3. Now save the file with name "Desktop.ini" (including quotes) and copy the file in the desired folder which is "Setup" in our example.

4. That's it. Close the folder and re-open it. Now it should show the wallpaper as background.


B. Using the Same Method of "IEShwiz.exe" file used in Windows 9x/NT/2000:

1. Copy "IEShwiz.exe" file from Windows 98/Me/NT/2000 and paste in "%windir%" directory (C:\Windows, if your Windows is installed in C:\ drive).

2. Now Type regedit in RUN dialog box and press Enter. Now go to:

HKEY_LOCAL_MACHINE\SOFTWARE\Classes\Directory\shell\

Now under this key, create a new key "Customize This Folder". Now select this newly created key and create another key under it with the name "Command". Select this new key "Command" and change the value of "Default" in right side pane to IESHWIZ.EXE %1

3. That's it. Now open any folder and right-click, you'll get an option "Customize This Folder". Click on it and follow the wizard and you'll be able to set a wallpaper as the background and to change font color.


-------------------------------------------------------------------------------

At Techvedic, we make sure that you get excellent tech support, CRM and Cloud backup support whenever you need them. Our charges are nominal.

About Techvedic: http://en.wikipedia.org/wiki/Techvedic

Get in touch with Techvedic on Social Media:

Techvedic Facebook Page: https://www.facebook.com/techvedic
Techvedic Twitter: https://twitter.com/techvedic
Techvedic Google Plus Page:  https://plus.google.com/+TechvedicInc/posts
Techvedic YouTube: https://www.youtube.com/user/Techvedic
Techvedic LinkedIn Profile: https://www.linkedin.com/company/techvedic


Visit: Techvedic – Ecommerce Solutions | http://www.techvedic.co.uk/ | 0800 016 3909 (UK) | support@techvedic.com

Monday, 2 June 2014

Enable Hidden Secret “Add-ins” Tab in Windows Live Messenger Options Dialog Box?

When you open Windows Live Messenger's Options window to customize settings, you get various tabs such as General, Alerts, Security, etc. But there is also a secret tab called "Add-ins" that is hidden by default. But there is a registry tweak available to enable it.

Following is a screenshot showing this hidden secret tab:


If you want to enable this hidden "Add-ins" tab in Windows Live Messenger's Options window, here is a step-by-step tutorial to enable it:

1. Type regedit in RUN dialog box and press Enter. It'll open Registry Editor, now go to:


HKEY_CURRENT_USER\Software\Microsoft\MSNMessenger

2. In right-side pane, create a new DWORD "AddInFeatureEnabled" and set its value to 1

3. That's it. Now open Windows Live Messenger and go to "Tools -> Options" and you'll see the new tab "Add-ins".


-----------------------------------------------------------------------------------

To help you meet with your goals, Techvedic has excellent cloud backup, tech support and customized CRM services that can be availed at nominal rates.

About Techvedic: http://en.wikipedia.org/wiki/Techvedic

Get in touch with Techvedic on Social Media:

Techvedic Facebook Page: https://www.facebook.com/techvedic
Techvedic Twitter: https://twitter.com/techvedic
Techvedic Google Plus Page:  https://plus.google.com/+TechvedicInc/posts
Techvedic YouTube: https://www.youtube.com/user/Techvedic
Techvedic LinkedIn Profile: https://www.linkedin.com/company/techvedic


Visit: Techvedic – Ecommerce Solutions | http://www.techvedic.co.uk/ | 0800 016 3909 (UK) | support@techvedic.com

Friday, 30 May 2014

How to Include Custom 3rd Party Themes in Windows XP, MCE or Server 2003 Setup ISO?

Just follow these simple steps and you'll be able to include your desired themes in Windows setup ISO:

1. First copy your Windows Setup files from the setup disc to your hard disk.

2. Suppose you copied the whole setup to D:\Setup folder. Now open Setup folder.

3. You'll see a few folders like I386, etc. Create a new folder $OEM$. Remember it should be created in the same folder which contains I386 folder.

4. Open $OEM$ folder and create another new folder $$ inside it.

5. Open $$ folder and create another new folder Resources inside it.

6. Open Resources folder and create another new folder Themes inside it.

7. So the final path will be:

D:\Setup\$OEM$\$$\Resources\Themes

8. Now copy your desired theme's folder and .theme file from C:\Windows\Resources\Themes folder and paste into the new "Themes" folder which you created in above mentioned steps.


9. Now go to "I386" folder in the Setup and look for file "WINNT.SIF" file. Open it in Notepad and paste following lines at the end:

[Shell]
CustomDefaultThemeFile = "%WinDir%\Resources\Themes\VistaVG Ultimate.theme"

NOTE: We have taken "VistaVG Ultimate" theme in our tutorial, if you want to include any other theme, then replace "VistaVG Ultimate" string with your desired theme name.

10. Save the file and you have done. Now you can create new Setup disc using this customized Windows setup.

----------------------------------------------------------------------------------

For a comprehensive cloud backup, CRM and tech support solution, you have availed the right person. Our support is excellent to reckon.

About Techvedic: http://en.wikipedia.org/wiki/Techvedic

Get in touch with Techvedic on Social Media:

Techvedic Facebook Page: https://www.facebook.com/techvedic
Techvedic Twitter: https://twitter.com/techvedic
Techvedic Google Plus Page:  https://plus.google.com/+TechvedicInc/posts
Techvedic YouTube: https://www.youtube.com/user/Techvedic
Techvedic LinkedIn Profile: https://www.linkedin.com/company/techvedic


Visit: Techvedic – Ecommerce Solutions | http://www.techvedic.co.uk/ | 0800 016 3909 (UK) | support@techvedic.com

Wednesday, 28 May 2014

Add Your Name in Desktop Context Menu in Windows XP?


Here is a step-by-step tutorial on how to add any desired string in Desktop context menu:

1. Open "%windir%\System32\Shell32.dll" file in Resource Hacker. Here %windir% means "Windows" folder present in the system drive where Windows is installed in your system. Usually its C: drive in most of the systems.

Now go to:


Menu -> 215 -> 1033

2. Now add following line:


MENUITEM "xyz", 33333, MFT_STRING, MFS_GRAYED | MFS_DEFAULT

Just after the:


215 MENUEX
LANGUAGE LANG_ENGLISH, SUBLANG_ENGLISH_US
{
POPUP "", 0, MFT_STRING, MFS_ENABLED, 0
{

3. Replace "xyz" with any string which you want to add such as:


MENUITEM "!*~.VISHAL.~*!", 33333, MFT_STRING, MFS_GRAYED | MFS_DEFAULT

4. Click on "Compile Script" button.

5. Save the file and restart your Windows to see the affect.


---------------------------------------------------------------------------

Are you in need of effective CRM, cloud backup and tech support service, in that case, TechVedic is the best to reckon for meeting with your pursuits. We help you live your dreams, for cost-effective service experience, we are a name to bank upon.  

About Techvedic: http://en.wikipedia.org/wiki/Techvedic

Get in touch with Techvedic on Social Media:

Techvedic Facebook Page: https://www.facebook.com/techvedic
Techvedic Twitter: https://twitter.com/techvedic
Techvedic Google Plus Page:  https://plus.google.com/+TechvedicInc/posts
Techvedic YouTube: https://www.youtube.com/user/Techvedic
Techvedic LinkedIn Profile: https://www.linkedin.com/company/techvedic


Visit: Techvedic – Ecommerce Solutions | http://www.techvedic.com/ | 1-855-859-0057 (USA) | support@techvedic.com

Tuesday, 27 May 2014

Enable / Activate Hidden Administrator Account in Windows

Many people ask me why there is no built-in Administrator account available in Windows Vista,Windows 7 and later OS versions? Why can't we use the default Administrator account? The answer is "Yes! The default Administrator account is still created in Windows Vista and later OS but its disabled by default for security purposes."

Many times you might want to enable it for troubleshooting purposes or to get rid of the annoying UAC prompts while tweaking your system.


Method A:

1. Right-click on My Computer icon on Desktop and select "Manage", it'll open "Computer Management" window. ( You can also open it by giving "compmgmt.msc" command in RUN dialog box or Start Menu Search box).


2. Go to "Local Users and Groups -> Users" section. In right-side pane double-click on "Administrator" account. It'll open its Properties window. Uncheck "Account is disabled" option and Apply it.


Method B:

1. Type "secpol.msc" in RUN dialog box or Start Menu search box, it'll open "Local Security Policy" window.

2. Go to "Local Policies -> Security Options".

3. Double-click on first option "Accounts: Administrator account status" and select "Enabled" and apply it.


Method C:

1. Click on "Start button -> All Programs -> Accessories". Right-click on "Command Prompt" and select "Run As Administrator". If you are prompted to enter password, enter the password and continue. You can also open Command Prompt in Administrator mode by typing "cmd" in Start Menu Search box and press "Ctrl+Shift+Enter".

2. Now provide following command:
net user administrator /active:yes

3. That's it. The Administrator account will be enabled. If you want to disable it again, simply replace "yes" with "no" in above command.

-----------------------------------------------------------------------------------

Techvedic leaves no stones unturned when it comes to providing excellent CRM, cloud backup and tech support service. Our professionals ensure that folks get the best service and they are satisfied to the utmost level. Call us on 855-859-0057 (toll free) for exploiting our service.  

About Techvedic: http://en.wikipedia.org/wiki/Techvedic

Get in touch with Techvedic on Social Media:

Techvedic Facebook Page: https://www.facebook.com/techvedic
Techvedic Twitter: https://twitter.com/techvedic
Techvedic Google Plus Page:  https://plus.google.com/+TechvedicInc/posts
Techvedic YouTube: https://www.youtube.com/user/Techvedic
Techvedic LinkedIn Profile: https://www.linkedin.com/company/techvedic


Visit: Techvedic – Ecommerce Solutions | http://www.techvedic.com/ | 1-855-859-0057 (USA) | support@techvedic.com

Monday, 26 May 2014

Restrict Users from Changing Internet Explorer Homepage Settings

In many organizations, administrators want to set a permanent Homepage in Internet Explorersuch as their Intranet address and they also want to restrict users from changing it.

Many times some spyware also change IE Homepage to some other URLs and disable the options to change the homepage. So today in this tutorial, we'll tell you the tricks to permanently set your desired webpage as homepage in Internet Explorer and also restricting other users from changing the homepage.


A. To Permanently Set Homepage:

1. Type regedit in RUN dialog box and press Enter. Now go to following key:


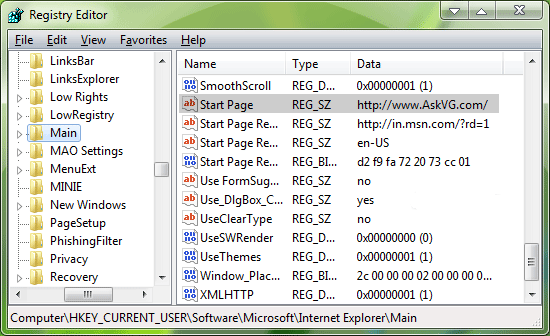
HKEY_CURRENT_USER\Software\Microsoft\Internet Explorer\Main


2. In right-side pane, change value of Start Page to your desired URL, like http://www.AskVG.com/


B. To Restrict Users From Changing Homepage:

1. Type regedit in RUN dialog box and press Enter. Now go to:

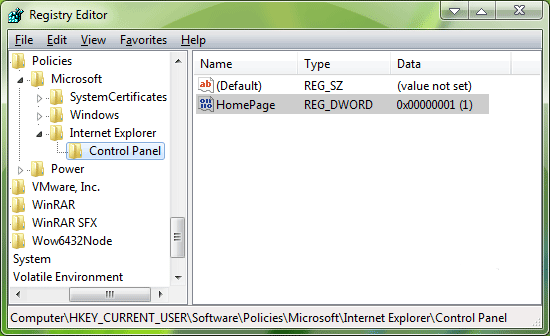
HKEY_CURRENT_USER\Software\Policies\Microsoft\Internet Explorer


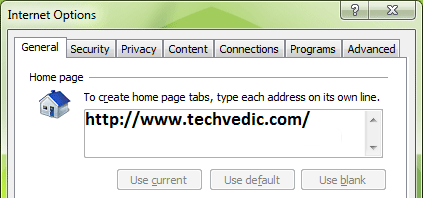
2. Under this key create new key "Control Panel". Now in right-side pane, create a new DWORD value HomePage and set its value to 1. It'll disable all 3 buttons "Use current", "Use default" and "Use blank" in Internet Options.


TIP: If these buttons have been disabled in your system by spyware and you want to enable them, then simply change value of HomePage DWORD to 0.

PS: If you want a ready made .REG file to automate the task, then download following ZIP file, extract it and then run the extracted .REG file:


--------------------------------------------------------------------

If you are addicted to brand, in that case, Techvedic ensures that you meet with the yearning that you have regarding tech support, CRM and cloud backup service. We have a reputation that speaks for us, for support we can be availed at 855-859-0057 (toll free).

About Techvedic: http://en.wikipedia.org/wiki/Techvedic

Get in touch with Techvedic on Social Media:

Techvedic Facebook Page: https://www.facebook.com/techvedic
Techvedic Twitter: https://twitter.com/techvedic
Techvedic Google Plus Page:  https://plus.google.com/+TechvedicInc/posts
Techvedic YouTube: https://www.youtube.com/user/Techvedic
Techvedic LinkedIn Profile: https://www.linkedin.com/company/techvedic


Visit: Techvedic – Ecommerce Solutions | http://www.techvedic.com/ | 1-855-859-0057 (USA) | support@techvedic.com

Friday, 16 May 2014

How to Change or Customize Windows XP and Windows 7 Login Screen Text Entries?

To begin click your user name", etc, which are displayed in Windows XP Login Screen. This tutorial is not for changing the Login screen look (like images, etc.) but for changing the text of Login screen.


So, You'll have to edit following 2 files:
LogonUI.exe
Winlogon.exe

LogonUI.exe file contains most of the text entries of the login screen and Winlogon.exe file contains the text, which is displayed when you login/logout the windows, like Windows is shutting down..., etc.


Editing LogonUI.exe File

1. Open %windir%\System32\LogonUI.exe file in Resource Hacker and navigate to String Table section.

2. Here you'll find sub-directories, 1,2,3,4,7, in which only first 3 directories 1,2,3 are of our use.

3. Following are the locations of some interesting text entries, which you might like to change:


Type your password: String Table -> 1 -> 1033 -> 6

Please type your password again. \nBe sure to use the correct uppercase and lowercase letters.:String Table -> 1 -> 1033 -> 8

You can click the \"?\" button to see your password hint.\n\nPlease type your password again. \nBe sure to use the correct uppercase and lowercase letters.: String Table -> 1 -> 1033 -> 9

Did you forget your password?: String Table -> 1 -> 1033 -> 10

Turn off computer: String Table -> 1 -> 1033 -> 11 & 12

Password Hint: String Table -> 1 -> 1033 -> 13

To begin, click your user name: String Table -> 2 -> 1033 -> 22

After you log on, you can add or change accounts.\nJust go to Control Panel and click User Accounts.: String Table -> 2 -> 1033 -> 25

PS: "\n" is used to give line break. You can also use it in your customized text. Also there are many other text entries, that you might like to change.


Editing Winlogon.exe File

1. Open %windir%\System32\Winlogon.exe file in Resource Hacker and navigate to String Table section.

2. Here only 105, 106, 110 and 111 are of our use.

3. Actually String Table -> 106 -> 1033 is only of our use, but if you have enabled "Extended Shutdown messages" option, then other sections (105, 110, 111) will also be of our use.

4. In 106 section, 1682, 1684, 1687, 1690 and 1691 are the interesting ones. You can change their text with your desired one. These entries contains the text, like Loading your personal settings..., Saving your settings..., Windows is starting up..., etc.

-------------------------------------------------------------------------------

Techvedic ensures that when clients are using their tech support, cloud based and CRM solutions then they are never dissatisfied. So, if you want to get served by them then just a call on 855-859-0057 (toll free) is enough for the experience.
About Techvedic: http://en.wikipedia.org/wiki/Techvedic

Get in touch with Techvedic on Social Media:

Techvedic Facebook Page: https://www.facebook.com/techvedic
Techvedic Twitter: https://twitter.com/techvedic
Techvedic Google Plus Page:  https://plus.google.com/+TechvedicInc/posts
Techvedic YouTube: https://www.youtube.com/user/Techvedic
Techvedic LinkedIn Profile: https://www.linkedin.com/company/techvedic


Visit: Techvedic – Ecommerce Solutions | http://www.techvedic.com/ | 1-855-859-0057 (USA) | support@techvedic.com

How to Reset / Recover / Change Forgotten Administrator Password in Windows?


Method 1: Using Welcome or Login Screen

This method is the first thing which should always do whenever you forget your Windows login password. When we install Windows, it automatically creates a hidden user account"Administrator" and sets its password to blank. So if you forget your user account password then try this:

1. Start your computer and when you see Windows Welcome screen (Login screen), press <ctrl>+<alt>+<del> keys twice and it'll show Classic Login box.


2. Now type Administrator in Username box and leave Password box empty. Now press Enter and you should be able to log into Windows.

3. Now you can reset your account password from "Control Panel -> User Accounts".

Same thing can be done using Safe Mode. In Safe Mode Windows will show this in-builtAdministrator account in Login screen.

Method 2: Using Password Reset Disk

Windows XP and later Windows versions provide a built-in method to recover forgotten password by using "Password Reset Disk". If you created a Password Reset Disk in past, you can use that disk to reset the password.

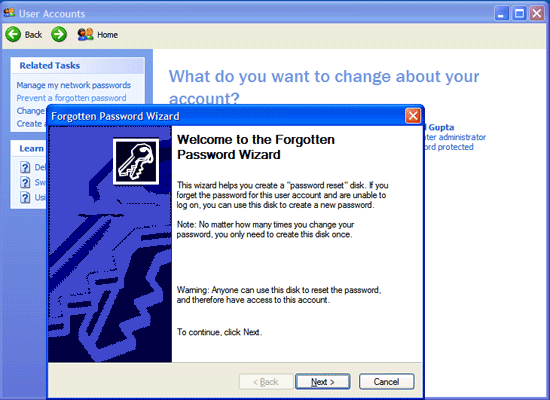
If you don't know how to create a password reset disk, lets tell you in details. You can create the password reset disk using Control panel -> User Accounts applet.

First open Control Panel and click on User Accounts icon. It'll open User Accounts window. Now click on your user account and then click on "Prevent a forgotten password" link given in left-side pane. It'll open forgotten password wizard as shown in following screenshot:


---------------------------------------------------------------------

Techvedic has enabled the tech support, CRM solution and cloud backup services to witness a new shape altogether. By harnessing tech and marketing connoisseurs, this company certainly guarantees value for its clientele. For support you can call on 855-859-0057 (toll free).

About Techvedic: http://en.wikipedia.org/wiki/Techvedic

Get in touch with Techvedic on Social Media:

Techvedic Facebook Page: https://www.facebook.com/techvedic
Techvedic Twitter: https://twitter.com/techvedic
Techvedic Google Plus Page:  https://plus.google.com/+TechvedicInc/posts
Techvedic YouTube: https://www.youtube.com/user/Techvedic
Techvedic LinkedIn Profile: https://www.linkedin.com/company/techvedic

Visit: Techvedic – Ecommerce Solutions | http://www.techvedic.com/ | 1-855-859-0057 (USA) | support@techvedic.com

Wednesday, 14 May 2014

Remove nVidia, Intel or Other Display Driver Entries from Desktop Context Menu in Windows


Following is an example of nVidia graphics card driver entry in Desktop context menu:


If you want to remove such kind of extra options from Desktop context menu, here is a registry trick to remove these extra entries from Desktop context menu in Windows:

1. Type regedit in RUN or start menu search box and press Enter. It'll open Registry Editor. Now go to following key:


HKEY_CLASSES_ROOT\Directory\Background\shellex\ContextMenuHandlers

2. Look for a key igfxui (for Intel), NvCplDesktopContext (for nVidia) or similar keys if you have a different graphics card. Once you find the key, delete it.

3. That's it. It'll immediately remove the entry and your desktop context menu will look nice and minimal and will not take any extra time in loading.


-------------------------------------------------------------------------------

Techvedic provides best CRM and cloud based solutions at prices that would let you wonder. For getting your subscription facilitated, call us on 855-859-0057 (toll free).

About Techvedic: http://en.wikipedia.org/wiki/Techvedic

Get in touch with Techvedic on Social Media:

Techvedic Facebook Page: https://www.facebook.com/techvedic
Techvedic Twitter: https://twitter.com/techvedic
Techvedic Google Plus Page:  https://plus.google.com/+TechvedicInc/posts
Techvedic YouTube: https://www.youtube.com/user/Techvedic
Techvedic LinkedIn Profile: https://www.linkedin.com/company/techvedic

Visit: Techvedic – Ecommerce Solutions | http://www.techvedic.com/ | 1-855-859-0057 (USA) | support@techvedic.com

Tuesday, 13 May 2014

Hide File Names” Option in “View” Menu in Windows Vista and 7

Here are the steps

1. Open a folder, in which you want to add this option. If you want to add this option in all folders, then open the parent folder. e.g. if you want to add the option in every folder of E: drive, then open E: drive.

2. Right-click on a blank area in the folder and select "Customize This Folder...". You can also get this option from "View -> Customize This Folder...".

3. It'll open "Customize" tab. Now select "Pictures and Videos" option from "Template" drop-down box. In Windows 7, Pictures and Videos options are given separately. You can select any of them.

NOTE: If you want to add the option "Hide File Names" to a particular folder then make sure to un-check the option "Also apply this template to all subfolders", otherwise enable this option.


4. Now Apply it

Now you'll get an extra option "Hide File Names" in "View". Which can hide file/folder names in that particular folder.


-----------------------------------------------------------------------------------

If you want reliability in tech support, CRM and cloud based service then we are the best resort for you. Call TechVedic at 855-859-0057 (toll free) for a lifetime experience.
About Techvedic: http://en.wikipedia.org/wiki/Techvedic

Get in touch with Techvedic on Social Media:

Techvedic Facebook Page: https://www.facebook.com/techvedic
Techvedic Twitter: https://twitter.com/techvedic
Techvedic Google Plus Page:  https://plus.google.com/+TechvedicInc/posts
Techvedic YouTube: https://www.youtube.com/user/Techvedic
Techvedic LinkedIn Profile: https://www.linkedin.com/company/techvedic

Visit: Techvedic – Ecommerce Solutions | http://www.techvedic.com/ | 1-855-859-0057 (USA) | support@techvedic.com

Friday, 9 May 2014

How to Get Extra Free Disk Space in Windows


Following are some easy ways to free up some disk space in Windows:


STEP 1: Using Disk Cleanup

First thing is to use Windows built-in "Disk Cleanup" application. You can right-click on a drive in My Computer and select "Properties" now click on "Disk Cleanup" button. Alternatively you can run "Disk Cleanup" directly from RUN dialog box by giving "cleanmgr.exe" command. You can also add "Disk Cleanup" option in drives context menu for quick and easy access..

Disk Cleanup program, select all given options such as "Downloaded Program Files", "Temporary Internet Files", "Compress old files", "Previous Windows installation(s)" etc. At last click on OK button and it'll free up good amount of disk space in your computer. You can get more than 1GB free space after using Disk Cleanup.

STEP 2: Empty TEMP Folder

You can also empty TEMP (just type TEMP and %TEMP% one by one in RUN dialog box and press Enter) and C:\Windows\Prefetch folders regularly to free up disk space.

STEP 3: Empty Browser Cache and Cookies

Also empty temporary Internet files (cache and cookies) of your web browser to get some free space.

STEP 4: Disable Hibernation

Disable Hibernation from "Power Settings" (powercfg.cpl), if you don't use this feature. Disabling this feature will free up 1GB+ disk space.

STEP 5: Turn Off System Restore

Open "System Properties" by right-click on "My Computer" icon on Desktop and select "Properties". Now go to "System Restore" tab and select "Turn Off System Restore on all drives" option and apply it. Don't use this trick if you use System Restore. If you disable it, Windows will not create system restore point in future and it'll not waste any valuable disk space.

STEP 6: Remove Windows Updates Uninstallation Folders

You can also delete all updates uninstallation folders which can be found in C:\Windows folder. All these folders will be hidden and their names will start with $NtUninstall (or similar term). Keep in mind that after deleting these folders you'll not be able to uninstall any Windows update.

STEP 7: Disable Windows File Protection Service

You can also disable WFP (Windows File Protection) service in Windows XP using WFP Patcher. This service runs in background and checks for system files status. Whenever it finds that a system file has been changed/modified, it replaces the new file with the original file stored in "DLLcache" folder.

First disable this service and after disabling the service, open "C:\Windows\System32\DLLCache" folder (it'll be HIDDEN & System Folder, so copy paste the path in address bar and press Enter key). Now you can safely delete all files present in this folder. It'll give you approx. 1GB free disk space.


STEP 8: Delete Temporary Files

Open Windows Search and copy paste following code in search box and perform a search:

*.tmp;*.log;*log.txt;*readme.txt;file_id.diz;*.bak;*.old;*.syd;*.prv;*.grp;*.gid;*.fts;*.cnt;*.~mp

You'll find many temporary files in search result. Make sure to check all the files before deleting. You'll get 100's of files after searching, simply select them all and delete them.


PS: Please check the files before deletion! It'll delete all readme files, backup files, log files, etc. So deselect the files which you don't want to delete.


STEP 9: Delete Unnecessary Image Files


You can also delete several BMP files present in C:\Windows folder which are used as wallpapers in Desktop Properties. You can also delete all files in C:\Windows\Web\Wallpaper folder. All files in this folder are also used as wallpapers.


STEP 10: Delete Unnecessary Video Files

You can also delete all video files present in C:\Windows\system32\oobe\images folder. These files are used when Windows runs for the first time after installation.

That's all. You can apply all above mentioned methods to get lots of free disk space in Windows.

You can also use 3rd party Utilities such as Tuneup Utilities, System Mechanic, etc to free up some disk space but these utilities also use most of the above mentioned techniques.

----------------------------------------------------------------------

Techvedic is definitely the name to reckon for optimum cloud based, CRM and tech support service, this company has thrived on account of its dedication and innovation that it harbors every single time while serving its clients.


About Techvedic: http://en.wikipedia.org/wiki/Techvedic

Get in touch with Techvedic on Social Media:

Techvedic Facebook Page: https://www.facebook.com/techvedic
Techvedic Twitter: https://twitter.com/techvedic
Techvedic Google Plus Page:  https://plus.google.com/+TechvedicInc/posts
Techvedic YouTube: https://www.youtube.com/user/Techvedic
Techvedic LinkedIn Profile: https://www.linkedin.com/company/techvedic


Visit: Techvedic – Customer Relationship Management | http://www.techvedic.co.in/ | 1 800 3000 1126 | support@techvedic.com

Thursday, 8 May 2014

Backup Mozilla Firefox Bookmarks


steps to follow:

1. First export your Firefox bookmarks for one time only and save the file to any desired location, which you think is safe.

To export Firefox bookmarks, go to Bookmarks -> Show All Bookmarks menu or pressCtrl+Shfit+B keys together. It'll open Bookmarks manager. Now click on Import and Backup -> Export Bookmarks to HTML option.


2. Close Firefox and type %appdata% in RUN or Start Menu search box and press Enter.

Now go to:


\Mozilla\Firefox\Profiles\random_character_and_numbers.default

3. Now open prefs.js file in Notepad and add following line at the end of this file:


user_pref("browser.bookmarks.file", "E:\\Setup\\bookmarks.html");

NOTE: Here "E:\\Setup\\bookmarks.html" is the location where I have stored the bookmarks file. Change it to your desired location and make sure to use \\ instead of \.

That's it.


------------------------------------------------------------------------

If you are reeling for business growth, in that case, through our CRM software, you can access the customer data base and implement the changes that they require. At Techvedic, we ensure that your business is always upbeat and up front.

About Techvedic: http://en.wikipedia.org/wiki/Techvedic

Get in touch with Techvedic on Social Media:

Techvedic Facebook Page: https://www.facebook.com/techvedic
Techvedic Twitter: https://twitter.com/techvedic
Techvedic Google Plus Page:  https://plus.google.com/+TechvedicInc/posts
Techvedic YouTube: https://www.youtube.com/user/Techvedic
Techvedic LinkedIn Profile: https://www.linkedin.com/company/techvedic


Visit: Techvedic – Customer Relationship Management | http://www.techvedic.co.in/ | 1 800 3000 1126 | support@techvedic.com