Showing posts with label how-to. Show all posts

Sunday, 23 February 2014

Sorting options Windows

Microsoft has made it easier to find files with enhanced search capabilities for finding that one Word document, photo, or video you need. Search is great when you're looking for a specific file by name, but sometimes you don't care about words. Sometimes, you're looking for the largest video file in your collection, or the most recently modified Word document in your OneDrive folder.

One of the biggest pains of using a PC is rooting around the file system to find very specific information.

Over the years, Microsoft has made it easier to find files with enhanced search capabilities for finding that one Word document, photo, or video you need. Search is great when you're looking for a specific file by name, but sometimes you don't care about words. Sometimes, you're looking for the largest video file in your collection, or the most recently modified Word document in your OneDrive folder.

That's where File Explorer's View menu comes in handy.


File Explorer lists your files and folders in ascending alphabetical order from A to Z. But let's say you want to group all the files in your Documents folder a more helpful way—say, so you can see how many spreadsheets you have. 
At the top of Windows 8's File Explorer window, click on View > Sort by > Type. (Windows 7 users can view the sort menu by right-clicking in an empty part of the folder window.) If you have a lot of folders you won't see much of a difference at first since, File Explorer always lists folders before loose files.

Scroll down, however, and you'll see all your files grouped by their file type such as HTML, text, Excel, Word, XLS, PDF, and so on.

Now you can quickly scroll down to the spreadsheet section to find what you're looking for. To revert File Explorer back to a straight alphabetical list just click View > Sort by > Name.

Some of the options lend themselves well to more productive sorting. File Explorer provides view options for date modified, size, date created, who created the file, and reverse alphabetical order, for example—all of which can help you put your finger on very specific files.


For more from the XpertCrewTM team please follow us on Twitter @Techvedic or 

our Facebook Page- 

or  contact us at

U.S. +855-859-0057 (http://www.techvedic.com/  )
U.K. +800-635-0716 (http://www.techvedic.co.uk/ )
CA  1-855-749-5861 (http://www.techvedic.ca/ )
AU  1-800-197-298  (http://www.techvedic.com.au/ )
And yes, we are eagerly waiting for your valuable feedback. Do write us back. We would be more than happy to help you. We are available 24/7.

Tuesday, 11 February 2014

Browser toolbars clean up procedure

You would assume that in 2014, we'd have place all the net shenanigans of the Nineties and early aughts behind US,however you would be wrong—at least for Windows users. transfer a desktop app like AVG, Skype, or Vuze and these programs can attempt to sneak toolbars onto your system or modification your default home page and browser. Yuck.

If your browser is loaded down with toolbars otherwise you wish to induce back to looking with DuckDuckGoinstead of Bing, here's the way to do battle against these foes on Chrome, Firefox, and net somebody.


Internet Explorer

iemanage

Like several fashionable browsers, net somebody will not let a toolbar run automatically—you ought to manually activate the trespasser. however it will still happen if you are not being attentive.

To scrub installed toolbars, click the settings cog in the upper right corner. From the drop-down menu select Manage add-ons. A new window will open and right at the top you'll see all of the toolbars hiding in your browser.

Highlight a toolbar you don't want and then at the bottom of the window, tap the Disable button. Repeat for all toolbars you want to get rid of and you're done.

iemanageaddons

If a toolbar has hijacked your default search provider, stay in the "Manage Add-ons" window and click on Search Providers in the left-hand navigation column. Again, highlight anything you want to get rid of and then click Remove at the bottom of the window.

Finally, if you need to reset your home page, click on the settings cog again, this time selecting Internet Options. In the new window that appears, open the General tab to see a text entry box right at the top. Remove whatever's in there and replace it with your preferred homepage (such as "https://www.google.com"). Then hit Apply, followed by OK.

Firefox
It's even harder to enable a toolbar by accident in Firefox, but mistakes happen. To fix your problem, click on the orange Firefox button in the upper left corner of the browser.

firefox add ons manager


From the drop-down menu select Add-ons. In the tab that opens, click Extensions in the left-hand navigation column. Select the toolbar you want to get rid of and then click the Disable button to the far right of the page. You may be prompted to restart, which you may want to hold off on if you plan to disable multiple toolbars.

firefoxoptions


To reclaim your preferred search engine in Firefox, go back to the main Firefox interface. Click the search provider icon in the search box to the far right of the address bar. Then simply choose a search provider from the drop-down list that appears.

Finally, to return to an old home page, click the orange Firefox button again and select Options > Options. Then in the new window that opens select General. At the top you'll see a spot called "Home Page." Highlight the text entry box next to it, enter your preferred home page's  URL, and click OK.

Chrome
Chrome is even less of a fan of toolbars than other browsers, and Google plans on banning all toolbars from the Chrome Web Store by June.But sometimes we might download and install a toolbar just for the heck of it. Luckily, dumping a toolbar is almost as easy as installing it.

chrometoolbaravg


Start by tapping the menu icon in the upper right corner and select Settings from the drop down menu. In the new tab that opens, select Extensions from the left-hand navigation column. Scroll down until you find the toolbar you're looking for and either uncheck the Enabled checkbox or click the trash icon. Clicking the trash icon rids you of the toolbar for good, while unchecking the Enabled box leaves the toolbar installed but disabled.

Chrome also resists changes to its default search provider, but if you ever need to change it, here's what you do.

Again go the Chrome settings tab, but this time choose Settings in the left-hand navigation column. Under Search, click on the drop down menu and select your preferred search provider from the list.

chromesettings

To return your home page settings, go up to the top of the same settings menu. Under On startup, click the Set pages link. A new window will open with the pages set to open when you fire up the browser. Hover over any pages you don't want and click the "X" on the far right of the page to nuke unwanted hijackers. You can also choose which page(s) to load on startup by merely adding their URL here.


That's it, you are back to normal!

Toolbars, home page, and computer program changes ar annoying, however they are doing take place from time to time if you are not careful once putting in new software package. Now, however, you recognize a way to obstruct the mental illness once disaster will strike.

For more from the XpertCrewTM team please follow us on Twitter @Techvedic or 

our Facebook Page- 

or  contact us at

U.S. +855-859-0057 (http://www.techvedic.com/  )
U.K. +800-635-0716 (http://www.techvedic.co.uk/ )
CA  1-855-749-5861 (http://www.techvedic.ca/ )
AU  1-800-197-298  (http://www.techvedic.com.au/ )
And yes, we are eagerly waiting for your valuable feedback. Do write us back. We would be more than happy to help you. We are available 24/7.

Sunday, 9 February 2014

Create an alias in Outlook.com

Microsoft’s Outlook.com is not anyplace close to as tweakable as Gmail, however one great point Outlook.com will supply is email aliases—multiple, freelance email addresses happiness to one account.

Why would you wish to use Associate in Nursing email alias? you'll be able to produce a hard-to-guess alias as a countersign recovery address for your on-line accounts, creating it harder for hackers to nab your knowledge through the rear door. making junk addresses handy over to websites or apps that force you to register is additionally an excellent thanks to keep your personal email address out of the hands of marketers.


How to create an alias in Outlook.com

From the Outlook.com inbox, click on the settings cog in the upper right corner and click on More mail settings in the drop down menu.

On the next page, under Managing your account, click on Create an Outlook alias. For security reasons, Microsoft will ask you to sign in to your account again.

Next you’ll be on the alias creation page. Just enter the name of the email address you’d like to use, select whether you’d like the address to be Outlook.com, Hotmail.com, or Live.com, and then click Create an alias. (You probably stand a better chance of getting the address you want with the newer Outlook.com domain.)

If the address you want isn’t taken, Outlook will take you back to your inbox. You can then choose to have mail from your new alias delivered straight to your inbox or to a separate folder. Once you’ve decided which you prefer, click Done.

A few minutes later, Outlook will drop you an email message telling you that you’re alias is ready for use.
Once your alias is up and running, you can use it to sign in to your Microsoft account using the same password you always have. You can also use aliases to replace your current Hotmail or Live.com address as the primary identity for your Microsoft account. So instead of automatically signing into your Windows 8 PC or Xbox Live with johnapplemissed@hotmail.com, you can use johnapplemissed@outlook.com.

For more from the XpertCrewTM team please follow us on Twitter @Techvedic or 

our Facebook Page- 

or  contact us at

U.S. +855-859-0057 (http://www.techvedic.com/  )
U.K. +800-635-0716 (http://www.techvedic.co.uk/ )
CA  1-855-749-5861 (http://www.techvedic.ca/ )
AU  1-800-197-298  (http://www.techvedic.com.au/ )
And yes, we are eagerly waiting for your valuable feedback. Do write us back. We would be more than happy to help you. We are available 24/7.


Wednesday, 5 February 2014

Maximize your screen space- windows 8 / windows 8.1

Let’s begin with the most recent thanks to share desktop area in Windows 8: Snap. to not be confused with Windows 7's desktop snap, Windows 8's Snap enables you to show 2 fashionable apps, or a contemporary app and therefore the desktop, on the screen at the same time.

This feature originally showed up in Windows eight, however has immensely improved in Windows 8.1 because of new size choices.


Directions:- 

  • open multiple fullscreen modern apps
  • point mouse cursor at the lower-right corner of the screen towards Start button (Please do not click!)
  • Now slide your cursor upward 
  • A sidebar will  opens with your currently open apps.

on-screen real estate dedicated to each app by clicking on the black bar two Snapped apps, then dragging it left or right to resize the apps. On a large enough monitor, you can even view three apps at once using Snap. Talk about maximizing modern life.


Windows 7


  • Open Word and then tap the Windows key + the left arrow on your keyboard to resize the program to take up the left half of your right. 
  • Now open Chrome and Windows key + right arrow to snap the browser to the right side of the screen.
  • Now Each program now takes up half the screen
  • you can also manually drag an open window to the left or right edge of the screen to snap it

Tasking the taskbar
There also are some old window management options designed into the taskbar that may are available handy once you ought to see over 2 windows promptly. These options don’t very assist you maximize your table area the maximum amount as they create it easier to search out a selected window once you’ve got plenty of desktop apps open promptly.


Move your mouse down to the taskbar and right-click to show the context menu. 

You will see three different options


  • Cascade windows, 
  • show windows stacked, 
  • show windows side-by-side. 


Be warned: Using these features will display all your open windows at once, but they'll also mess up the default sizes of your windows.


Once you’ve mastered these various methods you can even try combining them—Snapping a modern app to one-third of your display


For more from the XpertCrewTM team please follow us on Twitter @Techvedic or 

our Facebook Page- 

or  contact us at

U.S. +855-859-0057 (http://www.techvedic.com/  )
U.K. +800-635-0716 (http://www.techvedic.co.uk/ )
CA  1-855-749-5861 (http://www.techvedic.ca/ )
AU  1-800-197-298  (http://www.techvedic.com.au/ )
And yes, we are eagerly waiting for your valuable feedback. Do write us back. We would be more than happy to help you. We are available 24/7.

Monday, 27 January 2014

How to use Google Calendar for groups

Instructions to utilize Google Calendar to keep assemblies sorted out

In the matter of keeping a family, group, or staff composed, nothing works superior to everybody having entry to one another's timetables. One of the most straightforward routes for everybody to stay on the same page is to utilize Google Calendar.

The quest monster offers a few courses for everybody to impart datebook information. Here's a gander at two especially accommodating choices.


Group calendar

The most straightforward approach to keep everybody on the same page is to make a gathering schedule that everybody puts their timetable on.

Open up Google Calendar and in the left-hand navigation column, click the downward facing arrow to the right of the “My calendars” heading. In the drop down menu that appears, select “Create new calendar.”


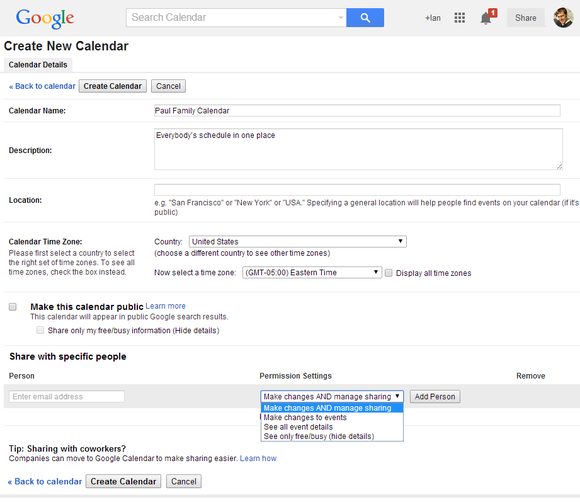
In the new page that opens, we’ll create a calendar for the Paul Family. So in the “Calendar Name” entry field we’ll put “Paul Family Calendar.” Put whatever you want in the description field.


Then fill out the location if you want, and set the calendar time zone to your local time. Note that Google Calendar does not automatically choose a time zone based on what you put in the location entry field. Since this is a private calendar for one family, we won’tcheck off “Make this calendar public.”

The last thing to do is send this to everyone in the family by filling out each family member’s email address under “Share with specific people.” Fill out the first person’s email then choose her editing rights under “Permission Settings.”

In this case we want every person who has access to the calendar to have full edit rights, so we’ll click the drop down and select “Make changes AND manage sharing.” Click “Add Person” , then continue adding other people using the same process.

When you're done, click the “Create Calendar” button to, well, create the calendar.

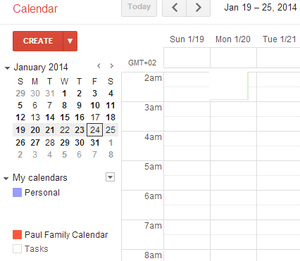
Google will now shoot you back to the main calendar page, and in a few seconds you should see the new group calendar under “My Calendars.”


Finding an event time that works

Another way to manage schedules if everyone prefers to keep separate calendars is to use Google’s “Find a time” feature. This will help you figure out the best time to schedule a meeting, party, or other occasion.

For this feature to work everyone has to be sharing their calendars with each other. To find out how to share your private calendar with specific people check out Google’s Calendar help page.

First, create a new event by clicking the aptly named “Create” button on the main page of Google Calendar.

Now just create your calendar event as you normally would: fill out the name of the event, select the date and time (we’ll change it later), add a location, and select the Calendar you want to use. (Note: this is where teams and families would choose the group calendar from the drop down menu.)

There you have it: Two distinctive, yet just as utilitarian approaches to keep your companions, relatives, and collaborators on the same page. Revel in!


For more from the XpertCrewTM team please follow us on Twitter @Techvedic or 

our Facebook Page- 

or  contact us at

U.S. +855-859-0057 (http://www.techvedic.com/  )
U.K. +800-635-0716 (http://www.techvedic.co.uk/ )
CA  1-855-749-5861 (http://www.techvedic.ca/ )
AU  1-800-197-298  (http://www.techvedic.com.au/ )
And yes, we are eagerly waiting for your valuable feedback. Do write us back. We would be more than happy to help you. We are available 24/7.