Showing posts with label windows 8. Show all posts

Tuesday, 5 August 2014

Windows 8 Power User Tips

Windows 8 GodMode
A Windows 8 power user will appreciate the implementation of Godmode. GodMode has been available in other versions of Windows, but it seems even more useful in Windows 8, where users struggle to find menus in a Start menu-less environment. You can place a Godmode shortcut on your Desktop and avoid having to search endlessly through tiles and apps to do the things you need to do.


First, create a new folder on your Desktop by right-clicking the desktop and selecting New>Folder and then rename it to: GodMode.{ED7BA470-8E54-465E-825C-99712043E01C}

The folder will change its icon and then be opened to reveal a multitude of menus that can be expanded and collapsed depending on how often you use them.
Create An Applications Folder On The Desktop

For those who want a fast and easy way to access their applications without having to switch to the Modern UI tile mode can create an Applications folder on the Desktop.


To do so, create a new folder and then rename it to: Applications.
{4234d49b-0245-4df3-b780-3893943456e1}

You will now have fast access to all of your installed applications.
Tweak The Windows X Menu Options

As you may know, pressing the Windows key and X will display an abbreviated stat menu that gives you access to many of the critical areas of Windows, such as the Control Panel, Task Manager and File Explorer. But you can also tweak the Start X menu to exclude those things you do not need to be listed there.


To do so, you will first need to navigate to the WinX directory. You will go to the C drive>Users>your username>AppData>Local>Microsoft>Windows>Winx.

Note: You many need to enable hidden folders to view some of these directories. You can do this from the View tab in the navigation ribbon at the top of the Window.

Once in the WinX directory, you will see three folders: Group1, Group2 and Group3.


Expand these three folders to reveal the shortcuts to various control panels in Windows. You can safely delete any shortcuts you do not want listed in the Start X menu. For instance, if you never want to access the Power Options from the Start X menu, delete the shortcut and that option will no longer appear.
Disable Programs That Slow Your Boot Times

There are many factors that can slow down how quickly your system boots up. Windows 8 improved on the msconfig command that allowed you to disable applications at boot. Windows 8 now allows you to see which programs impact your boot times the most so you can remove them and improve boot speeds.

To view this, hit the CTRL+ SHIFT and ESC keys to bring up the Task Manager.


Under the Startup tab, look for those programs that have a High startup impact and disable them if you do not need them to load each time you boot your machine. This does not mean you are uninstalling the applications. It simply means these applications will not launch and run automatically in the background each time you boot your PC.
Windows 8 Power Users

So for those Windows 8 Power Users that have been putting off upgrading to Windows 8.1, these Windows 8 tweaks should help you regain the flexibility you’ve enjoyed in previous versions of Windows. If you have a Windows 8 power user tip you’d like to share, let us know.


-------------------------------------------------------------------------------------------------------

Techvedic (CRM) offers the best strategies and technologies to businesses that they can use to manage, record and evaluate customer interactions to drive greater sales growth and by enriching relationships with customer bases.


Get in touch with Techvedic on Social Media:

Techvedic Facebook Page: https://www.facebook.com/techvedic
Techvedic Twitter : https://twitter.com/techvedic
Techvedic Google Plus Page:  https://plus.google.com/+TechvedicInc/posts
Techvedic Linkidin Profile: https://www.linkedin.com/company/techvedic


Visit: Techvedic - Computer Tech Support Company |  http://www.techvedic.co.uk/  |  0800 016 3909 (UK)  |  support@techvedic.com

Monday, 28 July 2014

Create Wifi Hotspot on Windows 7 / Windows 8 Laptop Without Using any Software

Create Wifi Hotspot on Windows 7 / Windows 8 Laptop Without Using any Software- Here is how

1. Open the Command prompt as Administrator (Right click and select Run as administrator).You can also open it by pressing Window Key + X and choosing Command Prompt(Admin).


2. Type the following command in the command prompt and press Enter.

netsh wlan set hostednetwork mode=allow ssid=tipstrickshackery key=wifipassword 


Here ssid is the name of your hotspot and key is password of your hotspot.Choose both of these according to you.

3. Next,type the following command and hit enter.
netsh wlan start hostednetwork

You will get a message like The hosted network started.


4. Now go to Network And Sharing center and You can see your newly created wifi hotspot connection.But, as you can see, it has no network access.We need to fix this by enabling sharing of internet connection for your working Internet connection.In my case, it is wifi connection,but it can be Ethernet or any other working internet connection.


5. To enable sharing, Click on your default Internet connection and select Properties.Under the Sharing tab, tick the box saying – Allow other network users to connect through this computer’s Internet connection.Under the Home networking Connection, select the connection which is showing as your hotspot connection.(In my case, it is Local Area connection *12 ) .


6. Your Wifi hotspot is created and Internet sharing is enabled. You can check in the Network and Sharing center that your wifi hotspot now has Internet Access.


7. Now Connect any wifi enabled device to this hotspot using the password you choose while typing the command.

8. In order to stop the Wifi hotspot, Just type the following command in the command prompt(as Administrator).


It might came to your mind that remembering these commands is not easy.Also typing them again again is tedious task.This also has a solution.

1. Write both the commands in notepad.


2. Select Save As and save the file as Batch type. Name the file anything you want but make its extension .bat .Also select All Files in Save as Type. Save it on the desktop.


3. Your batch file is created.Now whenever you need to start hotspot, just run this file with admin privileges.


4. Similar way, you can create a batch file to stop the hotspot.

-------------------------------------------------------------------------------------------------------------------

Techvedic is a globally acknowledged provider of professional technology support programs, cloud backup and recovery services, CRM and e-Commerce website builder solution. We want to empower people to do more by making the best of their IT investments.  Know more by calling us at 0800 016 3909 (Toll Free).

About Techvedic: http://en.wikipedia.org/wiki/Techvedic

Get in touch with Techvedic on Social Media:

Techvedic Facebook Page: https://www.facebook.com/techvedic
Techvedic Twitter : https://twitter.com/techvedic
Techvedic Google Plus Page:  https://plus.google.com/+TechvedicInc/posts
Techvedic Linkidin Profile: https://www.linkedin.com/company/techvedic


Visit: Techvedic - Computer Tech Support Company |  http://www.techvedic.co.uk/  |  0800 016 3909 (UK)  |  support@techvedic.com

Friday, 20 June 2014

START SCREEN A NEW WAY TO ACCESS YOUR FAVORITE APPLICATIONS

               StartScreen


START SCREEN- A NEW WAY TO ACCESS YOUR FAVORITE APPLICATIONS

ACCESSING THE START SCREEN
The new start screen is accessible a few ways:

Touch: If you're using a touch based device, you can swipe from the right edge of the device towards the center. This will open up the charms menu on the right, one of which is your start button. Select the start button to return to the start screen.

Mouse: If you're using your mouse, just click on the bottom left corner of the screen, where the old start menu icon used to be.

Keyboard: If you're using a keyboard, you can access the start menu with your familiar Windows key.

Once you've opened the start screen, you'll now have quick access to all kinds of information at your finger tips. You can pin shortcuts to your favorite applications, or create a live tile from within your favorite app to gain information about everything important to you with just a glance. For more on some of the cool things you can do with Windows 8 and the new Start-Screen.

--------------------------------------------------------------------------------

Leveraging on its experience and expertise, TechVedic provides unprecedented tech support service to consumers and tech companies at market favorable rates. For support call us on 0800 016 3909 (Toll Free).

About Techvedic: http://en.wikipedia.org/wiki/Techvedic

Get in touch with Techvedic on Social Media:

Techvedic Facebook Page: https://www.facebook.com/techvedic
Techvedic Twitter: https://twitter.com/techvedic
Techvedic Google Plus Page:  https://plus.google.com/+TechvedicInc/posts
Techvedic YouTube: https://www.youtube.com/user/Techvedic
Techvedic LinkedIn Profile: https://www.linkedin.com/company/techvedic

Visit: Techvedic – Ecommerce Solutions | http://www.techvedic.co.uk/ | 0800 016 3909 (UK) | support@techvedic.com

Tuesday, 8 April 2014

How to Use Windows 8 Camera App


Windows 8 has a Metro-style app called Camera that lets you use your webcam to record videos and take photos. It’s definitely better than having to download spyware/malware-ridden third-party webcam recording software. In this article, I’ll walk you through the process of using the app and adjusting the various settings.


One of the problems with the new Metro-style interface in Windows 8 is that sometimes it’s too simplistic and clean. Literally, they have removed buttons and other visual elements that you otherwise expect. For example, in the camera app, I could not even figure out how to take a picture or video! There was no camera button or anything else.


Before we get to that, lets go through the basics. Firstly, open the app and if you don’t already have a webcam built-in or connected to the PC, you’ll see a simple black screen that says Connect a camera.


Once you do connect the camera, it will ask you for permission to use the webcam inside the Camera app.


Once you do this, you should be able to see your webcam in a full screen window with a navigation bar at the very bottom:


Note that if your webcam is not working with the Windows 8 camera app, it probably means Windows 8 does not recognize the webcam. This is probably due to the driver not being compatible with Windows 8. You’ll have to go to the manufacturer’s website and see if they have a version of the driver for Windows 8.

For more from the XpertCrewTM team please follow us on Twitter @Techvedic or 

our Facebook Page- 

or  contact us at

U.S. +855-859-0057 (http://www.techvedic.com/  )
U.K. +800-635-0716 (http://www.techvedic.co.uk/ )
CA  1-855-749-5861 (http://www.techvedic.ca/ )
AU  1-800-197-298  (http://www.techvedic.com.au/ )
And yes, we are eagerly waiting for your valuable feedback. Do write us back. We would be more than happy to help you. We are available 24/7.


Monday, 7 April 2014

Tech solutions for Window Restarts by itself

Window Restarts by itself

If you are experiencing Window Shutting Down by itself or rebooting by itself, don’t worry, Its not about hardware , but, its a Windows issue, Queues of complains have arose from users saying that their Windows 8 restarts after approaching the login screen, at most of the times this issue is due to “NEW HYBRID FEATURE” which is introduced to lessen the Windows Loading time, on the other side, it is causing this auto-restart problems too.

You can resolve this issue with these steps :

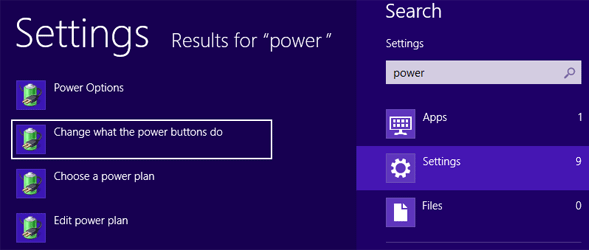
Step 1: Goto START Menu and type POWER

Step 2: Click SETTINGS > This will lead you to Power Options Window


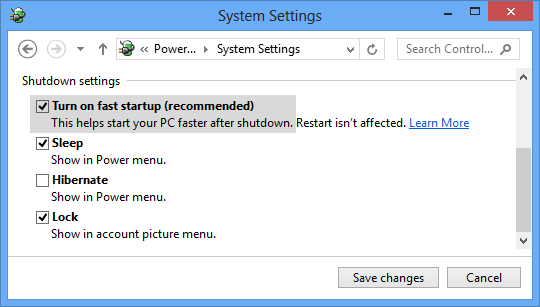
Step 3: Scroll Down to option “Turn on fast startup (recommended)


Windows 8

Uncheck the option and Click SAVE button.

Please click to on the line in case you require additional - Tech Support


For more from the XpertCrewTM team please follow us on Twitter @Techvedic or

our Facebook Page-

or contact us at

U.S. +855-859-0057 (http://www.techvedic.com/ )
U.K. +800-635-0716 (http://www.techvedic.co.uk/ )
CA 1-855-749-5861 (http://www.techvedic.ca/ )
AU 1-800-197-298 (http://www.techvedic.com.au/ )

Friday, 4 April 2014

Edit Photos in Windows 8.1

Here is how to edit photos in Windows 8.1 using the Photo editing tool included with every Microsoft Surface and device running Windows 8.1.

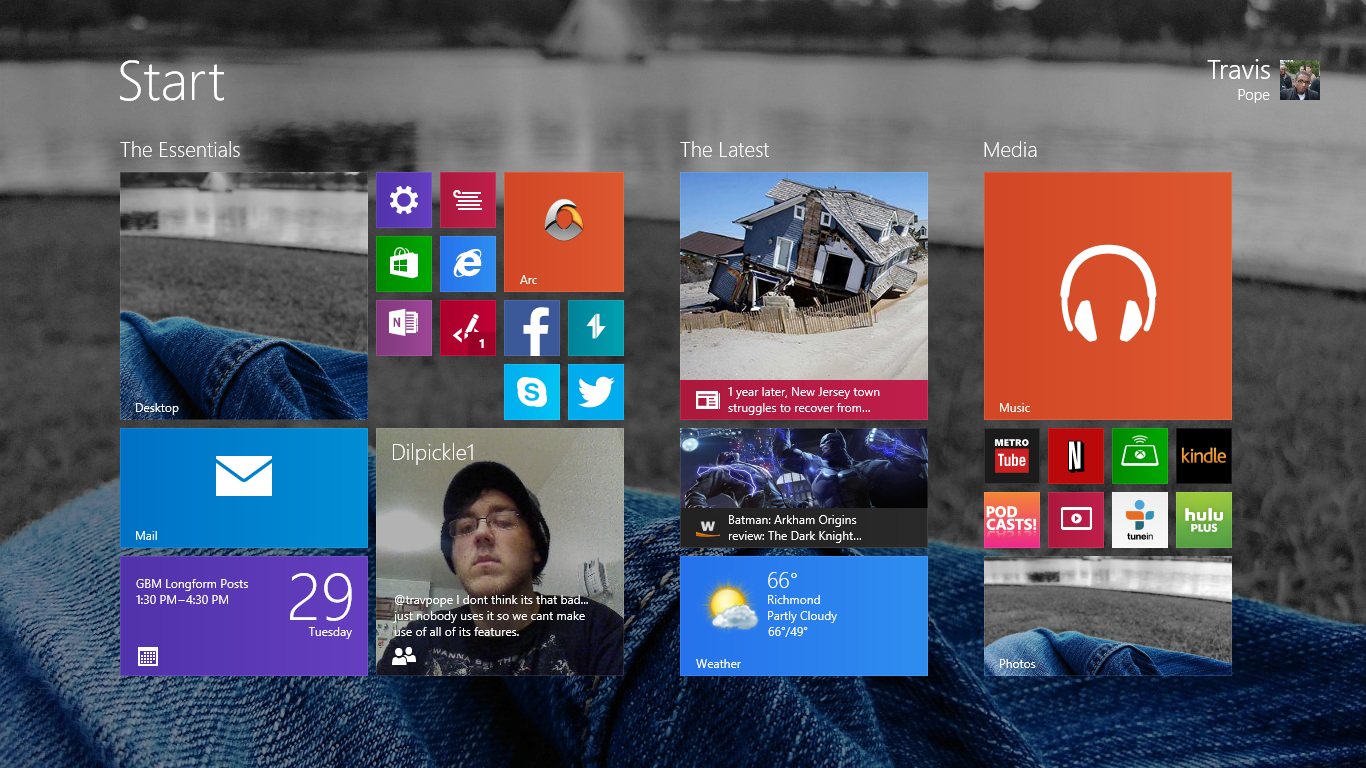
Go to the Start Screen by taping the Windows Key on your device. On laptops and desktops, the Windows Key is the button with the Windows logo on your keyboard.


Open the Photo app by tapping or click on the Live Tile that represents the Photos app on the Start Screen. In our example, it’s the Live Tile to the far right and bottom that showcases a lake and a pair of jeans colored in blue.

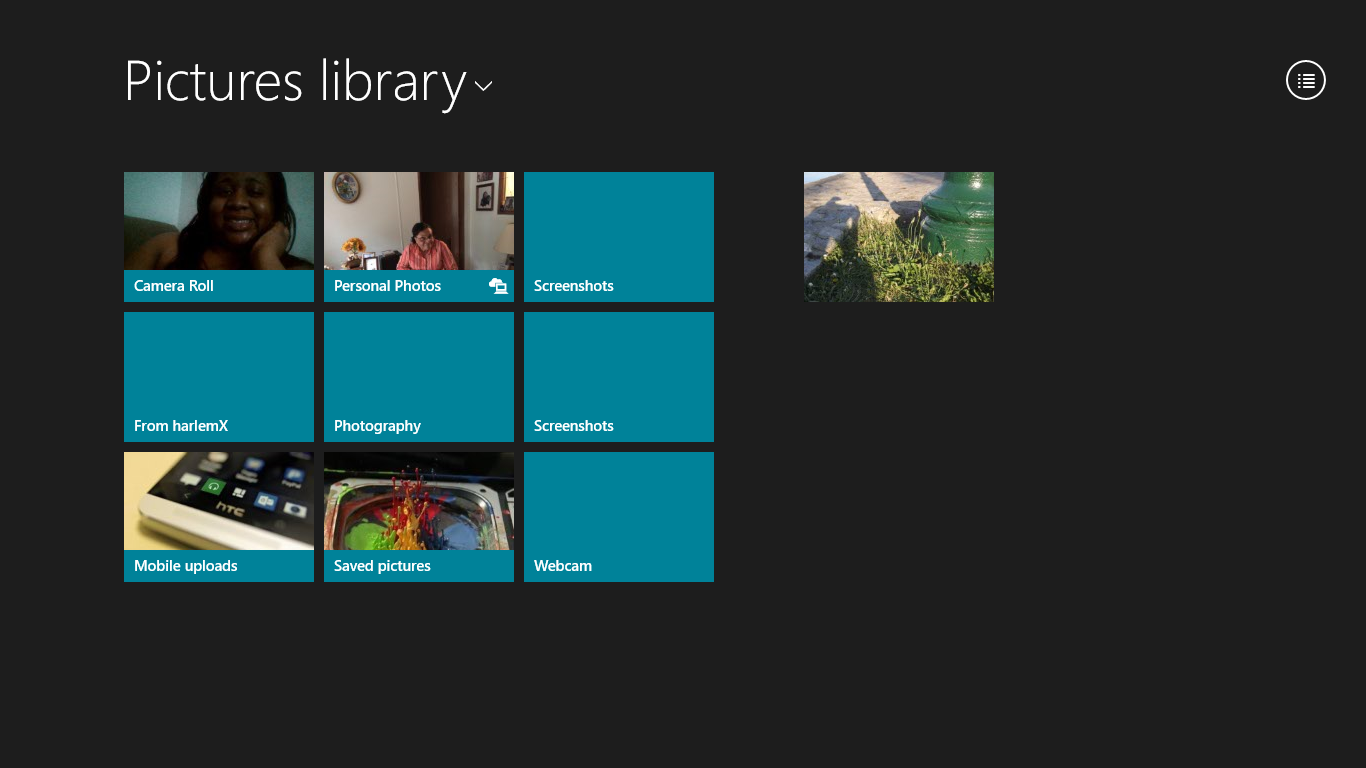
Right click or tap on the picture you would like to edit. If the photo is being stored in SkyDrive, click or tap on the Pictures library drop down menu on the top left then right-click or tap on the picture you wish to edit.


Once in the photo, right-click on the photo again or swipe from the button to the top of the screen to reveal the app bar.


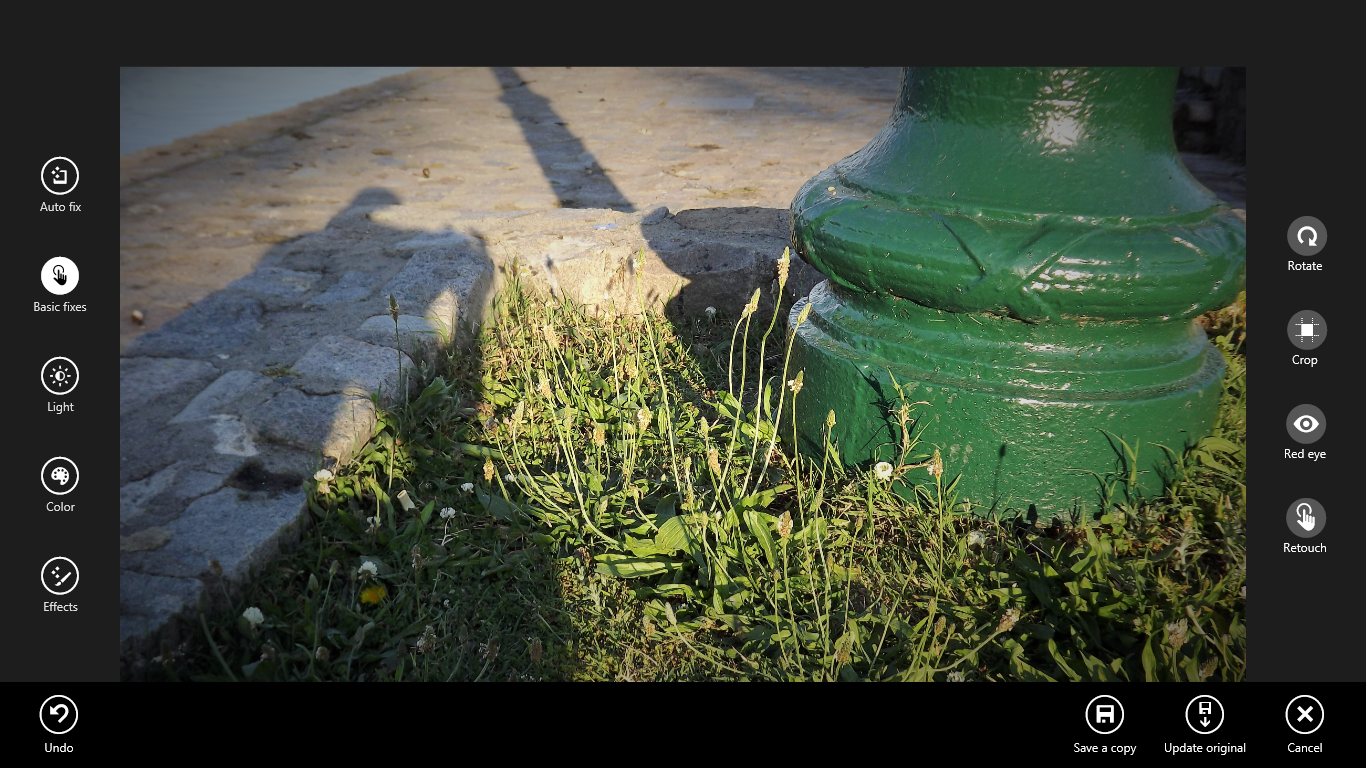
Click or tap Edit. It’s the button on the right bottom area of the app bar labeled Edit.


Click or tap Basic Edits to crop or retouch photos.


After you’ve finished editing, right-click or swipe up from the bottom of the screen to reveal the app bar. Then tap or click Update Original to save the photo, or Save as Copy to save the photo as a separate photo.


You’ve successfully edited a photo using the built-in Photos application in Windows 8.1. It’s important to remember that some photos may take a bit longer to load in the Photos application if they are stored on SkyDrive. The Photos app can import photos directly from most cameras, however it doesn’t allow users to directly edit and save RAW images captured by a high-end camera.

Please click the link If you require any further assistance regarding Computer Tech support

For more from the XpertCrewTM team please follow us on Twitter @Techvedic or 

our Facebook Page- 

or  contact us at

U.S. +855-859-0057 (http://www.techvedic.com/  )
U.K. +800-635-0716 (http://www.techvedic.co.uk/ )
CA  1-855-749-5861 (http://www.techvedic.ca/ )
AU  1-800-197-298  (http://www.techvedic.com.au/ )
And yes, we are eagerly waiting for your valuable feedback. Do write us back. We would be more than happy to help you. We are available 24/7.


Use Bing Search in Windows 8.1

Here’s how to use Bing Search in Windows 8.1 to find the things you are looking for .

Open the Charms Bar by swiping from right to left on the right edge of your screen or by placing the mouse cursor in the top-right hand corner of your display.

Open the Search pane by tapping or clicking on the Search Charm. It’s the icon at the top of the Charms Bar that is represented by a magnifying glass.


To search specific things locally, click or tap the drop down box labelled Everything. You can choose between searching settings, files stored on your computer or SkyDrive, or photos and videos collected by Microsoft’s Bing Search engine.


Bing Search will always showcase any files it found fitting the search term first, then photos and videos followed by individual websites that show have posted a lot of writing on that particular subject.

Results are actually the same results that you’d see immediately if you were using the Bing website. While Microsoft does allow users to turn off Bing search integration, it doesn’t allow them to replace it with any other search engine like Google.

It’s also important to remember that searching through Windows 8.1’s Search Charm doesn’t allow users to earn points for the Bing Reward Program that gifts users gift cards for Amazon and many of Microsoft’s online services.


Please click the link If you require any further assistance regarding Computer Tech support

For more from the XpertCrewTM team please follow us on Twitter @Techvedic or 

our Facebook Page- 

or  contact us at

U.S. +855-859-0057 (http://www.techvedic.com/  )
U.K. +800-635-0716 (http://www.techvedic.co.uk/ )
CA  1-855-749-5861 (http://www.techvedic.ca/ )
AU  1-800-197-298  (http://www.techvedic.com.au/ )
And yes, we are eagerly waiting for your valuable feedback. Do write us back. We would be more than happy to help you. We are available 24/7.


Tuesday, 25 March 2014

Windows 8 Sounds for XP

The original Windows 8 sound schemes adapted for Windows XP.

Windows 8 Default sounds

. 73 WAV files
. 3 MID files

To install.
1 Copy the "Windows 8" folder and contents as a subfolder of \windows\media
i.e. \windows\media\Windows 8\
2. Double-click the win8sounds.reg file to merge with the Windows Registry
When asked "Are you sure you want to add the information..." choose "Yes"
3. Open the Sounds and Audio Devices control applet in Contol Panel
Start\Control Panel\Sounds and Audio Devices
4. Click on the "Sounds" tab
5. Choose the Windows 8 Default scheme in the "Sound scheme" drop-down list
Choose to save your existing sound scheme if required
6. Click OK

To uninstall.
1. Open the Sounds and Audio Devices control applet in Contol Panel
Start\Control Panel\Sounds and Audio Devices
2. Select the "Sounds" tab
3. Choose the Windows 8 Default sound scheme in the "Sound scheme" drop-down list
4. Select Delete to delete the sound scheme (note, this only deletes the scheme list not the files).
5. To delete the sound files if desired, delete the \windows\media\Windows 8\ folder.

For more from the XpertCrewTM team please follow us on Twitter @Techvedic or 

our Facebook Page- 

or  contact us at

U.S. +855-859-0057 (http://www.techvedic.com/  )
U.K. +800-635-0716 (http://www.techvedic.co.uk/ )
CA  1-855-749-5861 (http://www.techvedic.ca/ )
AU  1-800-197-298  (http://www.techvedic.com.au/ )
And yes, we are eagerly waiting for your valuable feedback. Do write us back. We would be more than happy to help you. We are available 24/7.


Thursday, 13 March 2014

How to Create Partition from Ext4 File System

How to create partition from Ext4 file system?

This is very easy with the help of a third party software that is known as Minitool Partition Wizard. To use this software rather than Disk Management because you cannot detect Ext4 file system via Disk Management.

Download a free copy of Minitool Parition Wizard and start using it. At first, you have to detect them. This is easy. All Ext4 file system are there with a name, Ext4. Check the following image;


Then right click on it and select Delete button.


After that, again right click on that and press the Create button.


Now you will get a window from you have to select NTFS as File System, Drive Letter etc.


At last, press either Ctrl + A or navigate to General >> Apply Changes.


That’s all! You have done! Hope this tutorial will be helpful for you.

For more from the XpertCrewTM team please follow us on Twitter @Techvedic or 

our Facebook Page- 

or  contact us at

U.S. +855-859-0057 (http://www.techvedic.com/  )
U.K. +800-635-0716 (http://www.techvedic.co.uk/ )
CA  1-855-749-5861 (http://www.techvedic.ca/ )
AU  1-800-197-298  (http://www.techvedic.com.au/ )
And yes, we are eagerly waiting for your valuable feedback. Do write us back. We would be more than happy to help you. We are available 24/7.