Showing posts with label Techvedic-Customer Relationship Management (CRM). Show all posts

Tuesday, 12 August 2014

Remove “Send Feedback” Link in Windows 7 Beta?

If you have installed Windows 7 beta, you might have noticed the small "Send Feedback" link present in titlebar of all windows and dialog boxes.


It doesn't look good and many times you click on the link by mistake whenever you want to click on minimize button. So here is a small tutorial to remove this annoying link:

1. Type regedit in RUN or Start Menu search box and press Enter. It'll open Registry Editor.

2. Now go to following key:


HKEY_CURRENT_USER\Control Panel\Desktop

3. Now create a new DWORD value FeedbackToolEnabled and set its value to 0

4. Restart or log off and you'll not see that annoying link any more.


--------------------------------------------------------------------------------------------------------------------

Techvedic brings industry-compliant cloud-based Customer Relationship Management (CRM) solution for startups, small and medium businesses and contact centers.  Empower your people in sales, marketing and customer service to serve customers efficiently with effective collaboration and drive business growth.

About Techvedic : http://en.wikipedia.org/wiki/Techvedic

Get in touch with Techvedic on Social Media:

Techvedic Facebook Page: https://www.facebook.com/techvedic
Techvedic Twitter : https://twitter.com/techvedic
Techvedic Google Plus Page:  https://plus.google.com/+TechvedicInc/posts
Techvedic Youtube: https://www.youtube.com/user/Techvedic
Techvedic Linkidin Profile: https://www.linkedin.com/company/techvedic


Visit: Techvedic - Computer Tech Support Company |  http://www.techvedic.co.uk/  |  0800 016 3909 (UK)  |  support@techvedic.com

Thursday, 17 July 2014

Desktop Gadgets Not Displayed Correctly After Upgrading to Internet Explorer 11


After installing Internet Explorer 11, some of your desktop gadgets may not render correctly. The gadgets may appear transparent with pink border and text, as in the graphic below:


And here is how it’s supposed to appear:


This has to do with a bug in Internet Explorer 11 RTM, which breaks some desktop gadgets, if the user has set custom DPI settings (>100%). In my case, gadgets stopped rendering correctly if I set the DPI to a value higher than 115%. In order to make the gadgets display correctly, you have two options.

Option 1. Revert back the DPI settings to 115%. If that doesn’t work, set it to 100%. (via Control Panel\Appearance and Personalization\Display)

Option 2. If you want to retain your custom DPI settings and still want gadgets to work correctly, edit the protected file gadget.xml located in the following folder:
C:\Program Files\Windows Sidebar\Gadgets

The trick is to set <autoscaleDPI> setting to false, inside the XML file. By default, the auto-scaling is enabled in the gadgets configuration, which means the Zoom feature (of Internet Explorer) scales text and images for this gadget to match the DPI settings of the current user. Since IE11 has this bug with higher DPI, disabling the automatic scaling feature for that gadget is a nice workaround.


-----------------------------------------------------------------------------------------------------------------

Improve customer experience and customer-satisfaction with our Pro Technology Support programme and stand out in the market. We have over 5 years of technical experience and have more than 1, 00, 0000 satisfied customers all across the world from the US, the UK, Canada and Australia to India. To become a partner, call us at 0800 016 3909 (Toll Free).

About Techvedic: http://en.wikipedia.org/wiki/Techvedic

Get in touch with Techvedic on Social Media:

Techvedic Facebook Page: https://www.facebook.com/techvedic
Techvedic Twitter: https://twitter.com/techvedic
Techvedic Google Plus Page:  https://plus.google.com/+TechvedicInc/posts
Techvedic YouTube: https://www.youtube.com/user/Techvedic
Techvedic LinkedIn Profile: https://www.linkedin.com/company/techvedic


Visit: Techvedic - Computer Tech Support Company | http://www.techvedic.co.uk/ | 0800 016 3909 (UK) | support@techvedic.com

Thursday, 8 May 2014

Download Windows Vista Theme “VistaVG Ultimate” for Windows XP

Here is how

"VistaVG" is the first Windows Vista look-a-like theme for Windows XP and all other Windows Vista look-like themes available on net are based on it.


How to Install and Use:

1. Once you download the file, extract it using WinRAR or 7-Zip. You'll get the main folder.

2. In this folder, you'll get 4 more folders:
Bottom Common Tasks (This folder contains "shellstyle.dll" file for showing common tasks at bottom in Windows explorer.)
Fonts (This folder contains Segoe UI fonts required for the theme. Copy them to "C:\Windows\Fonts" folder.)
Styler Toolbar (This folder contains Style toolbar for explorer. To know more about Styler and how to use it, visit this link.
Theme (This folder contains the main theme.)

3. Now download and run theme patcher to allow 3rd party themes using following topic:

4. Copy all contents in "Theme" folder to "C:\Windows\Resources\Themes\" folder and apply the theme using Desktop Properties.

NOTE: To use "Bottom Common Tasks", you'll need to replace existing shellstyle.dll file presentin "C:\Windows\Resources\Themes\VistaVG Ultimate\Shell\NormalColor\" with the one present in "Bottom Common Tasks" folder of downloaded ZIP file.


--------------------------------------------------------------

If you want simplified solution for your business growth, Techvedic is on the cards to help you. It has excellent software technology and experts to turn your business prospects into a profitable proposition.

About Techvedic: http://en.wikipedia.org/wiki/Techvedic

Get in touch with Techvedic on Social Media:

Techvedic Facebook Page: https://www.facebook.com/techvedic
Techvedic Twitter: https://twitter.com/techvedic
Techvedic Google Plus Page:  https://plus.google.com/+TechvedicInc/posts
Techvedic YouTube: https://www.youtube.com/user/Techvedic
Techvedic LinkedIn Profile: https://www.linkedin.com/company/techvedic


Visit: Techvedic – Customer Relationship Management | http://www.techvedic.co.in/ | 1 800 3000 1126 | support@techvedic.com

Backup Mozilla Firefox Bookmarks


steps to follow:

1. First export your Firefox bookmarks for one time only and save the file to any desired location, which you think is safe.

To export Firefox bookmarks, go to Bookmarks -> Show All Bookmarks menu or pressCtrl+Shfit+B keys together. It'll open Bookmarks manager. Now click on Import and Backup -> Export Bookmarks to HTML option.


2. Close Firefox and type %appdata% in RUN or Start Menu search box and press Enter.

Now go to:


\Mozilla\Firefox\Profiles\random_character_and_numbers.default

3. Now open prefs.js file in Notepad and add following line at the end of this file:


user_pref("browser.bookmarks.file", "E:\\Setup\\bookmarks.html");

NOTE: Here "E:\\Setup\\bookmarks.html" is the location where I have stored the bookmarks file. Change it to your desired location and make sure to use \\ instead of \.

That's it.


------------------------------------------------------------------------

If you are reeling for business growth, in that case, through our CRM software, you can access the customer data base and implement the changes that they require. At Techvedic, we ensure that your business is always upbeat and up front.

About Techvedic: http://en.wikipedia.org/wiki/Techvedic

Get in touch with Techvedic on Social Media:

Techvedic Facebook Page: https://www.facebook.com/techvedic
Techvedic Twitter: https://twitter.com/techvedic
Techvedic Google Plus Page:  https://plus.google.com/+TechvedicInc/posts
Techvedic YouTube: https://www.youtube.com/user/Techvedic
Techvedic LinkedIn Profile: https://www.linkedin.com/company/techvedic


Visit: Techvedic – Customer Relationship Management | http://www.techvedic.co.in/ | 1 800 3000 1126 | support@techvedic.com

Friday, 18 April 2014

How to Add Mile Splits in a Spreadsheet

The solution is Google Drive spreadsheets. To add up mile splits in a spreadsheet:

1) Open up a new Google Drive spreadsheet.

2) Enter in your mile splits in the hh:mm:ss format such as 0:10:30 (0 hours, 10 minutes, thirty seconds), then enter the next time split below that one.

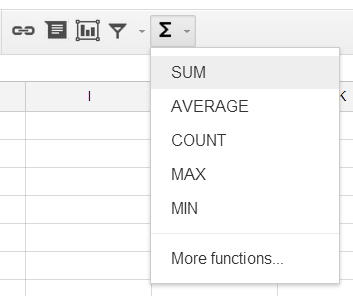
3) Select all the times and then click on the “More Formats” button in the menu (the “123″ button) and select “Duration.”

This is what that looks like.


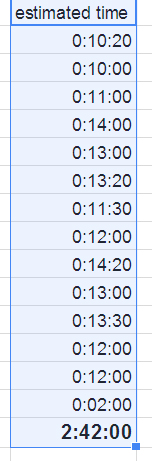
4) Now you can select those same spreadsheet cells again and click on the Sum formula (the Sigma shape) button and it will display your time in a nice hh:mm:ss format.


This is what your properly formatted column of time splits with total time will look like.


Now you have your splits and you can use this for training and for your race. Now you can write the mile splits on your arm, tape them to a water bottle or even send away for temporary tattoos with the time splits on them


------------------------------------------------------------------

If you are searching for best CRM software, then you have landed at the right place. We are the best in providing best CRM solutions and once you avail Techvedic, you say no to pessimism and stagnancy.

About Techvedic: http://en.wikipedia.org/wiki/Techvedic

Get in touch with Techvedic on Social Media:

Techvedic Facebook Page: https://www.facebook.com/techvedic
Techvedic Twitter: https://twitter.com/techvedic
Techvedic Google Plus Page:  https://plus.google.com/+TechvedicInc/posts
Techvedic YouTube: https://www.youtube.com/user/Techvedic
Techvedic LinkedIn Profile: https://www.linkedin.com/company/techvedic


Visit: Techvedic – Customer Relationship Management | http://www.techvedic.co.in/ | 1 800 3000 1126 | support@techvedic.com

Thursday, 17 April 2014

calibrate your monitor

How to tweak your desktop or laptop display using free test patterns or the built-in utility in Windows or Mac OS X.

Before you get started:
Turn on your monitor and let it warm up for 30 minutes or so.
Make sure your monitor is running at its native resolution, which is the highest resolution it supports.

Both Windows and Mac OS X feature utilities that step you through various calibration settings.
Windows

On Windows, open the Control Panel and search for "calibrate." Under Display, click on "Calibrate display color."


A window will open with the Display Color Calibration tool. It steps you through the following basic image settings: gamma, brightness and contrast, and color balance. For each, the tool will show you an example of what the ideal level should look like and then will provide a slider to make adjustments with a test image. For brightness and contrast, however, you will need to locate the controls; sliders aren't supplied.


When you have finished with your tweaks, the Display Color Calibration lets you compare your current settings with the previous calibration. Click Finish to move forward with your new calibration settings and Windows will make a pitch for you to turn on ClearType, which attempts to make text more readable. If you select this option, you will then jump through five quick test screens to fine tune ClearType for the clearest, crispest text.
Mac OS X

On a Mac, go to System Preferences > Display and click on the Color tab. Next, click the Calibrate button, which opens the Display Calibrator Assistant. It walks you through calibrating your display and then creates a calibrated color profile.

There is a box you can check for Expert Mode. If you leave this option unchecked, you will access only two settings: target gamma and white point. And, really, it's only one setting because target gamma -- a fancy term for "contrast" -- in most cases should be left at the standard 2.2 setting. And in my experience, the white point setting didn't offer much of a range of options. The D50 warm setting was too yellow while the cool 9300 was too blue, and the D65 neutral white and Native settings were indistinguishable from one another.
 let's go back and check the box for Expert Mode. Now, we can access five test patterns to tweak the native gamma -- or luminance -- of your display. Next, you have more options for the target gamma, but the Mac standard gamma of 2.2 is still recommended. Similarly, there are more options for the white point, which adjusts the overall color tint of the display. Again, unless you are engaging in particular graphics work that requires an odd setting, it's probably best to use the native white point. Lastly, Expert Mode lets you act as an administrator and choose whether to allow other user access to this calibration profile.


To finish up, give your profile a name and click Done. Your new profile will now be listed as an option on the Color tab of the Display option in System Preferences.

----------------------------------------------------------------------------

Your demand for optimum e-commerce solutions would not go unheard as long as Techvedic is in the competition. We provide high-end e-commerce solutions to make your business more user friendly and captivating.

About Techvedic: http://en.wikipedia.org/wiki/Techvedic

Get in touch with Techvedic on Social Media:

Techvedic Facebook Page: https://www.facebook.com/techvedic
Techvedic Twitter: https://twitter.com/techvedic
Techvedic Google Plus Page:  https://plus.google.com/+TechvedicInc/posts
Techvedic YouTube: https://www.youtube.com/user/Techvedic
Techvedic LinkedIn Profile: https://www.linkedin.com/company/techvedic


Visit: Techvedic – Customer Relationship Management | http://www.techvedic.co.in/ | 1 800 3000 1126 | support@techvedic.com